
For any business using Klaviyo, Klaviyo Signup Forms are the gateway to growing your audience and fueling your email and SMS marketing funnels. These forms are your primary tool for capturing valuable leads directly from your website. Understanding the different types of forms, how to build them, and how to optimize them is essential for maximizing your list growth. To see how signup forms are specifically implemented on ecommerce platforms, check out our guide on using Klaviyo popups for Shopify. For more on optimizing lead capture and engagement, see our guide to using popups to grow your email list.
This ultimate guide will cover everything you need to know about creating and implementing Klaviyo Signup Forms. We'll explore Klaviyo's native builder for popups, flyouts, and embedded forms, and then compare this with using a specialized tool like Poper for enhanced design flexibility and advanced targeting, while still integrating seamlessly with your Klaviyo account.
For an in-depth look at optimizing popup design for user experience, check out our guide on mobile popup design best practices. To compare Klaviyo popups with other popular solutions, explore our Klaviyo vs Mailchimp Popup Comparison.
What Are Klaviyo Signup Forms?
Curious how Klaviyo popups and embedded forms can be differentiated and used strategically? Learn more about their features and use cases in our Klaviyo Popup guide.
Klaviyo Signup Forms are web forms you create within your Klaviyo account to collect contact information (like email addresses and phone numbers) and other data from your website visitors. This information is automatically added to your Klaviyo lists, allowing you to trigger welcome series, segment your audience, and send targeted campaigns.
The 3 Main Types of Klaviyo Signup Forms
Klaviyo's native builder allows you to create three primary types of forms, each serving a different strategic purpose.
Want to see how Klaviyo stacks up against competitors? Explore our detailed comparison: A/B test results and feature differences between Amped and Klaviyo Popups. For hands-on A/B testing tips, check out our article on A/B testing Klaviyo forms.
Popup:
- What it is: An overlay that appears on top of the page content, demanding the visitor's attention.
- Best for: High-impact offers, welcome discounts, exit-intent captures, and major announcements. They are designed to interrupt the user's flow to present a compelling call to action.
What it is: An overlay that appears on top of the page content, demanding the visitor's attention.
Best for: High-impact offers, welcome discounts, exit-intent captures, and major announcements. They are designed to interrupt the user's flow to present a compelling call to action.
Flyout (or Slide-in):
- What it is: A smaller form that slides into view from the side or bottom of the screen. It's less intrusive than a full popup.
- Best for: Gentle reminders, newsletter signups, or collecting feedback without completely obscuring the page content.
What it is: A smaller form that slides into view from the side or bottom of the screen. It's less intrusive than a full popup.
Best for: Gentle reminders, newsletter signups, or collecting feedback without completely obscuring the page content.
Embedded Form:
- What it is: A form that is placed directly within the content of your webpage, such as in the footer, sidebar, or within a blog post.
- Best for: "Static" signup opportunities where the user expects to see a form, like a newsletter signup section in your website's footer or on a dedicated "Subscribe" page.
What it is: A form that is placed directly within the content of your webpage, such as in the footer, sidebar, or within a blog post.
Best for: "Static" signup opportunities where the user expects to see a form, like a newsletter signup section in your website's footer or on a dedicated "Subscribe" page.
Step 1: Create a Poper Account and Add Your Website
First things first, you'll need to sign up for a Poper account. Once you’re in, the first thing we'll ask you to do is add your website domain. This simple step connects your site to our platform, allowing us to display your campaigns later on.
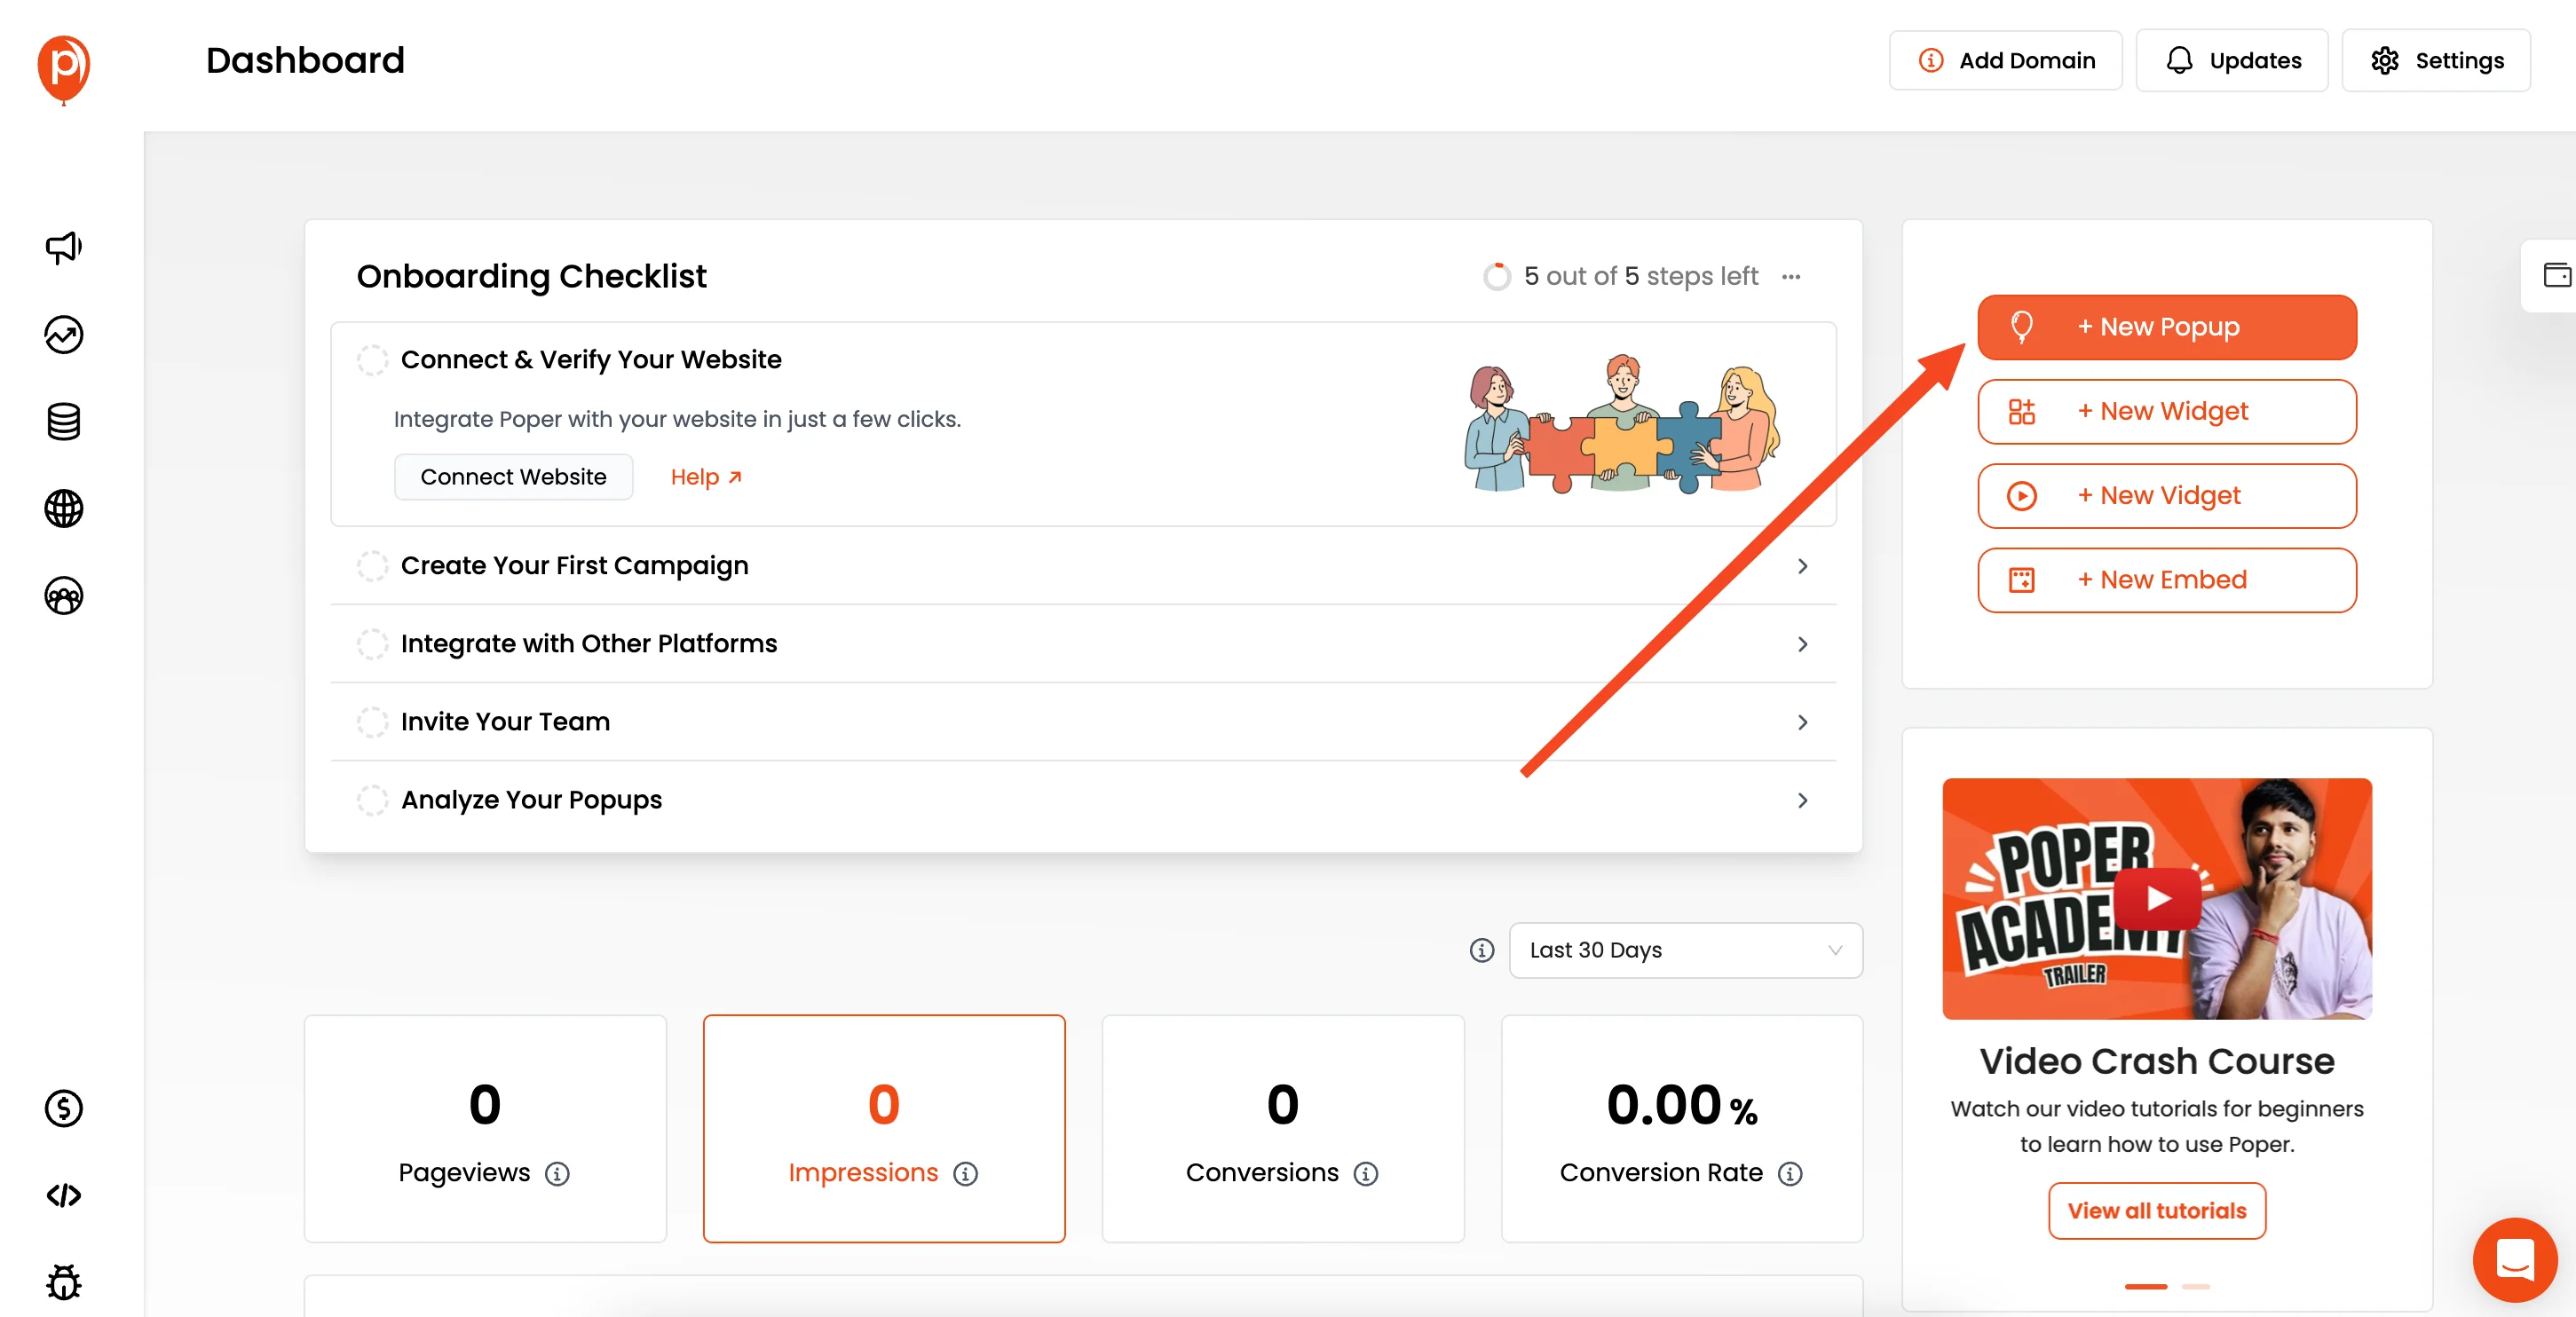
After adding your domain, click the “New Popup” button to get started. Don't worry about the name—you can start with a popup and we'll switch it to an Klaviyo Signup Forms in just a moment.
Step 2: Choose a Form Template to Save Time
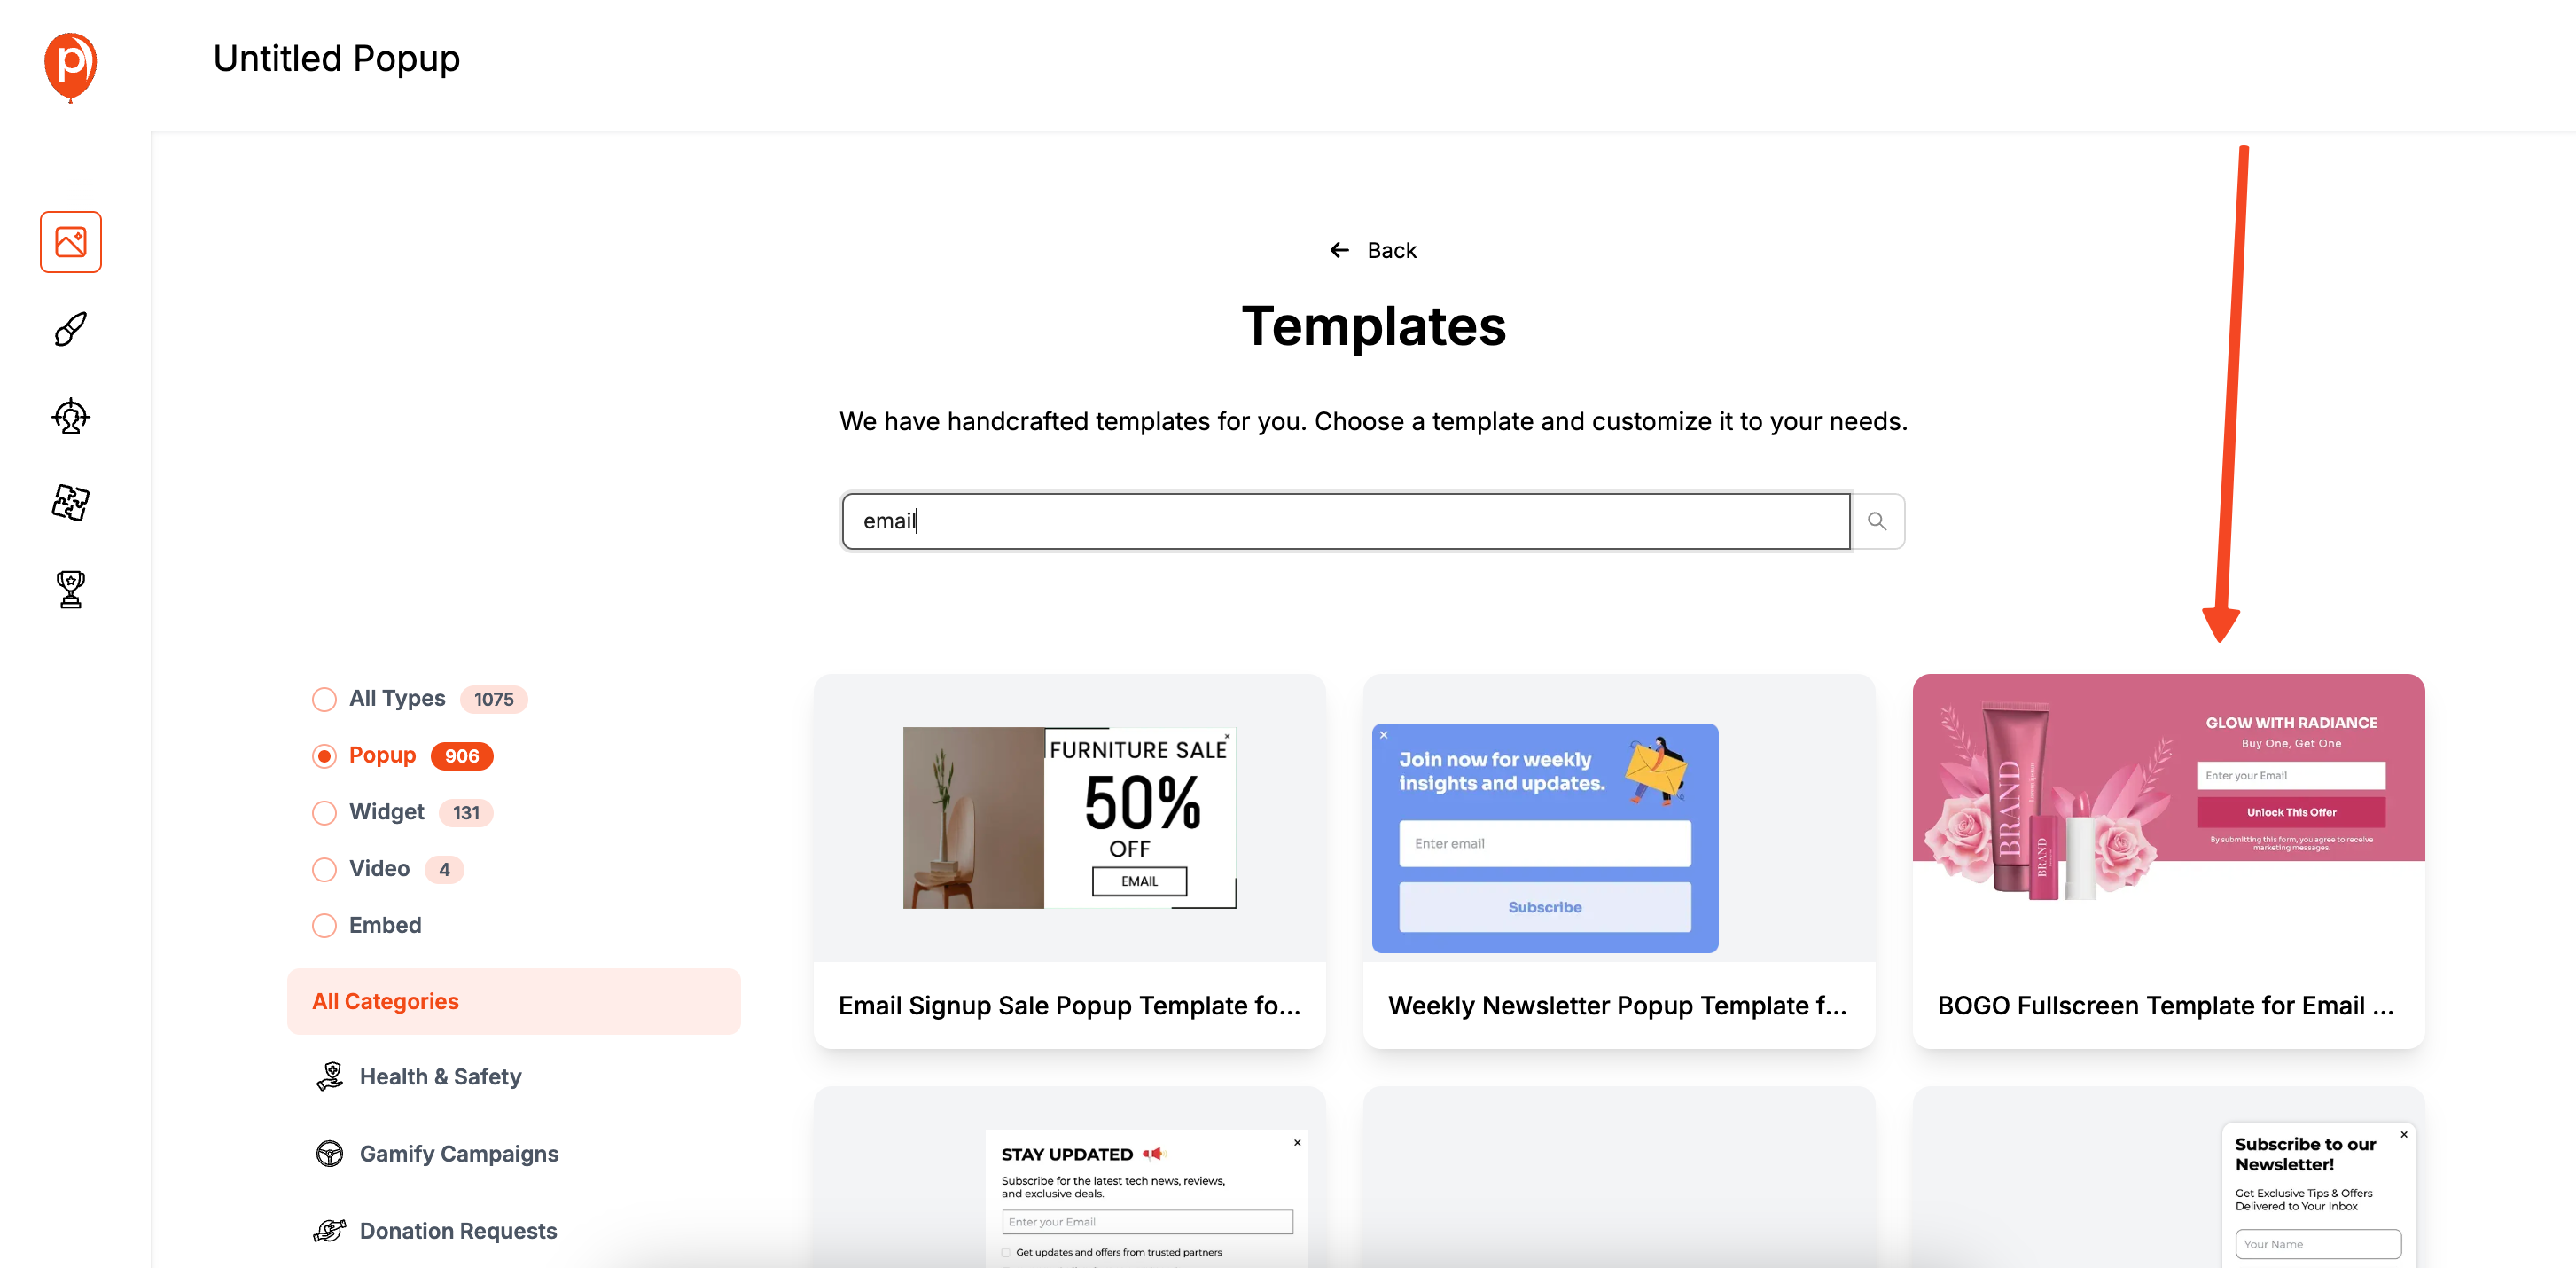
I’ve packed Poper with templates to give you a massive head start. I always recommend starting here. Click on “Choose from Templates” and use the search bar to look for “Form” or “Signup.”
You’ll find a bunch of designs ready to go. Pick one that has an email field and fits the general style you're aiming for. This will be our foundation.
Step 3: Customize the Klaviyo Signup Forms to Match Your Brand
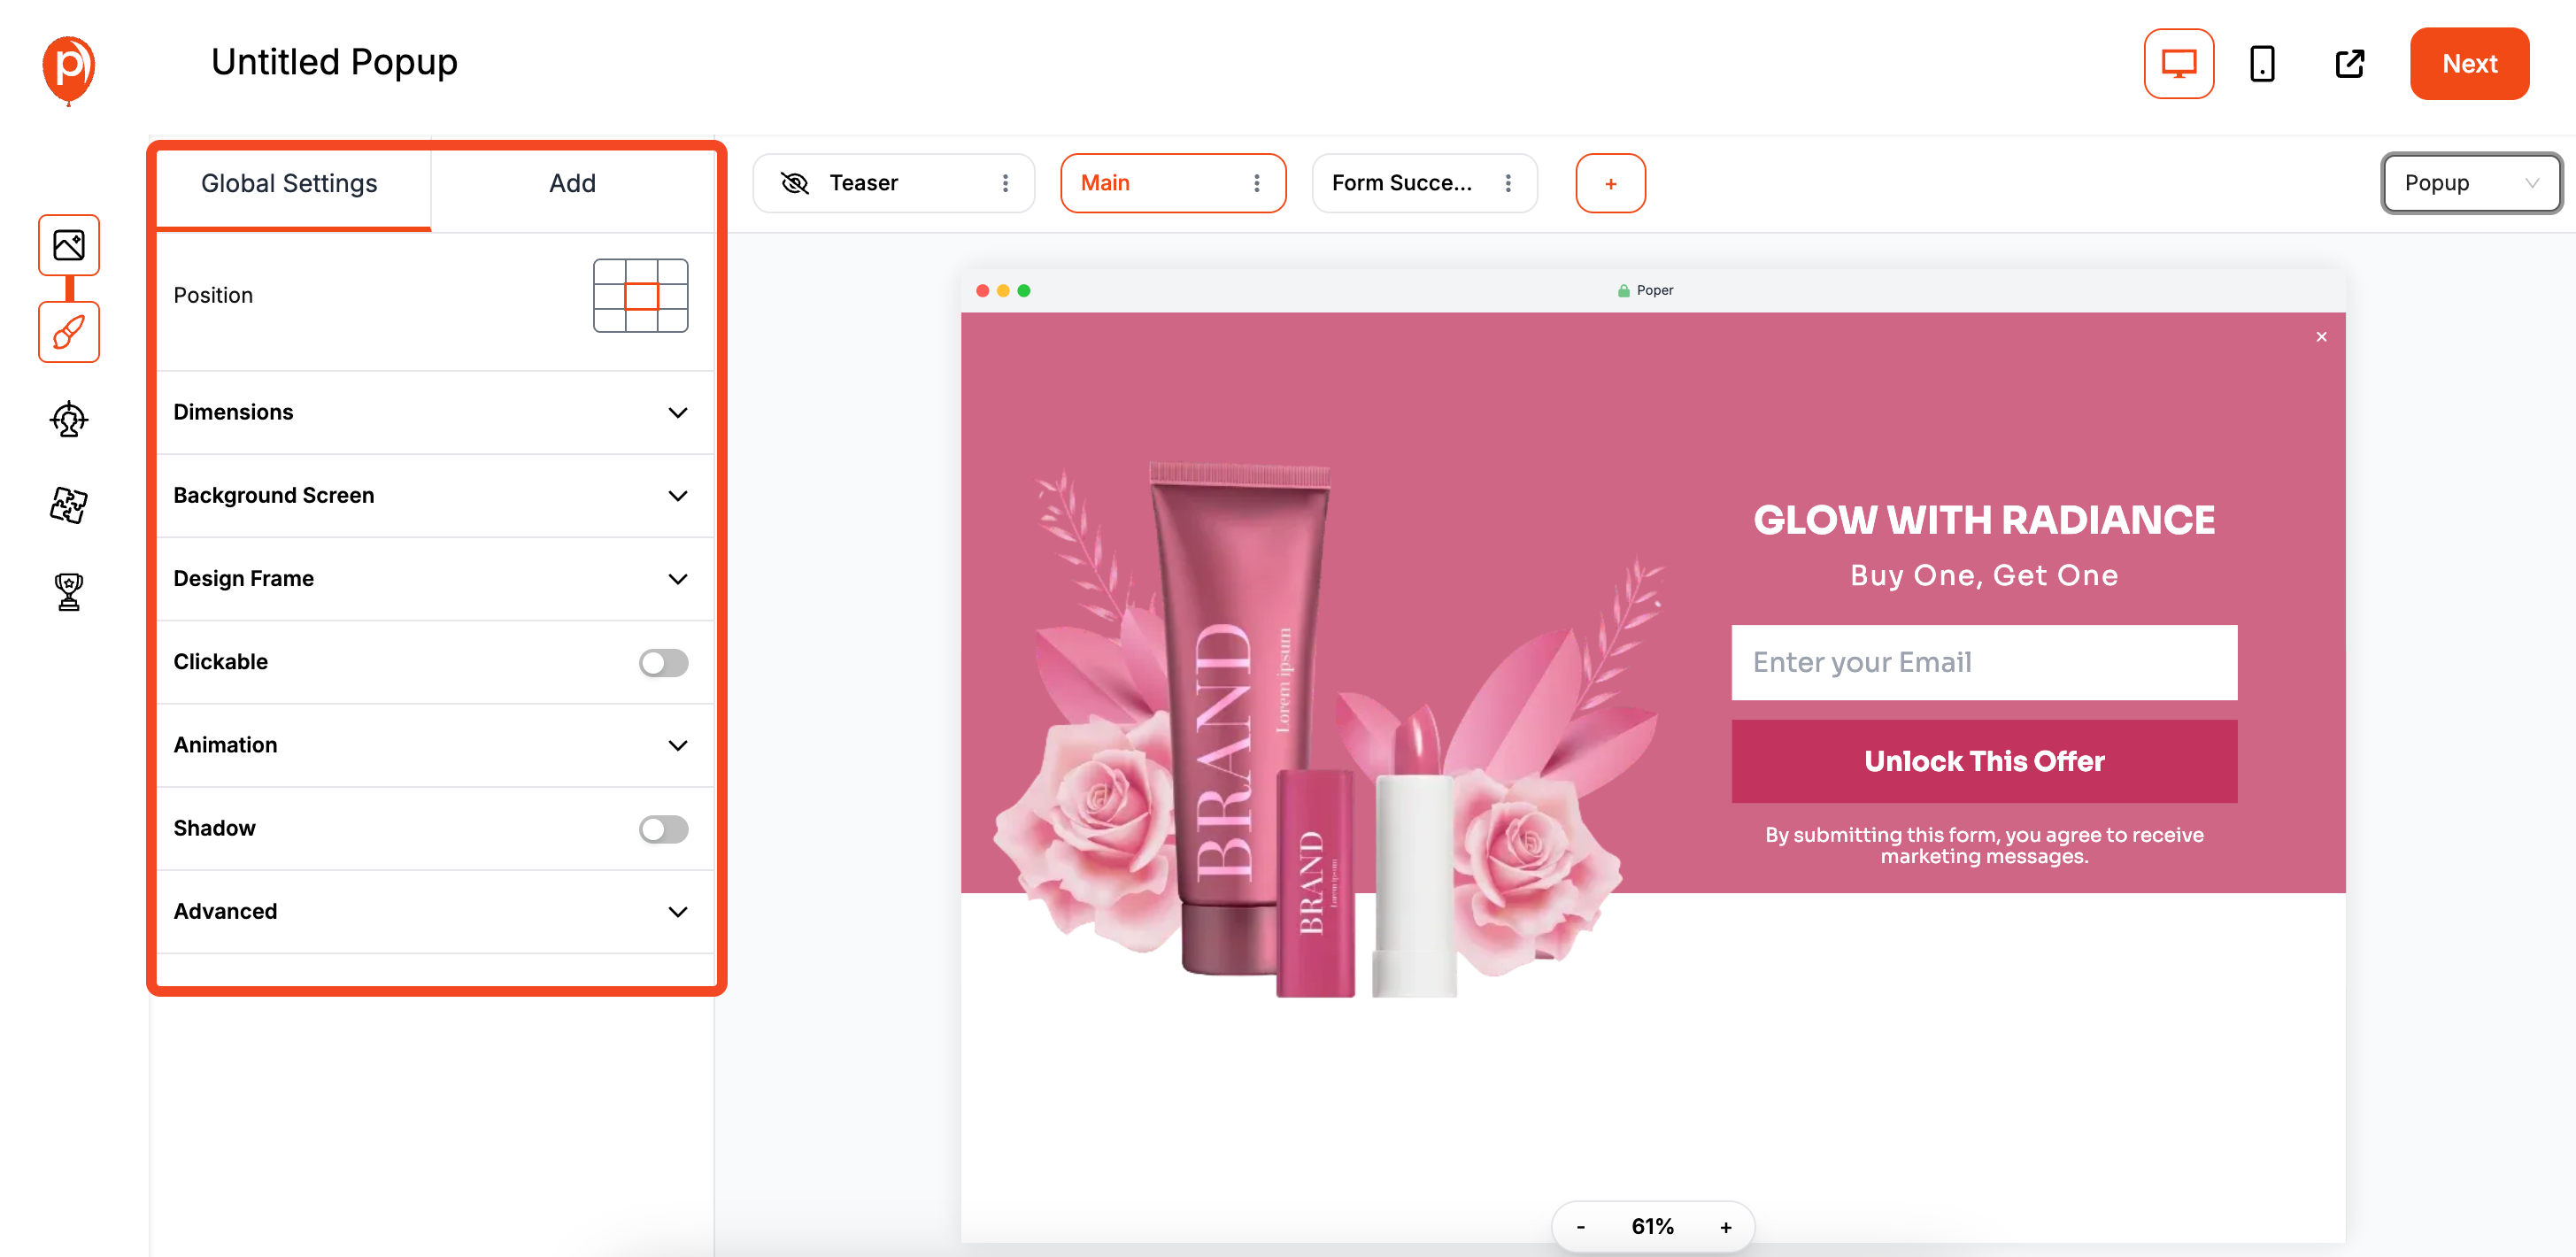
Now, let's make the template your own. In the editor, you can change everything from the text and fonts to the color palette. Click on different elements to edit them. The goal is to make the form look like a natural part of your website.
Want inspiration? Browse our popup template library for proven designs you can adapt to your brand.
Step 4: Change the Campaign Type to "Embed"
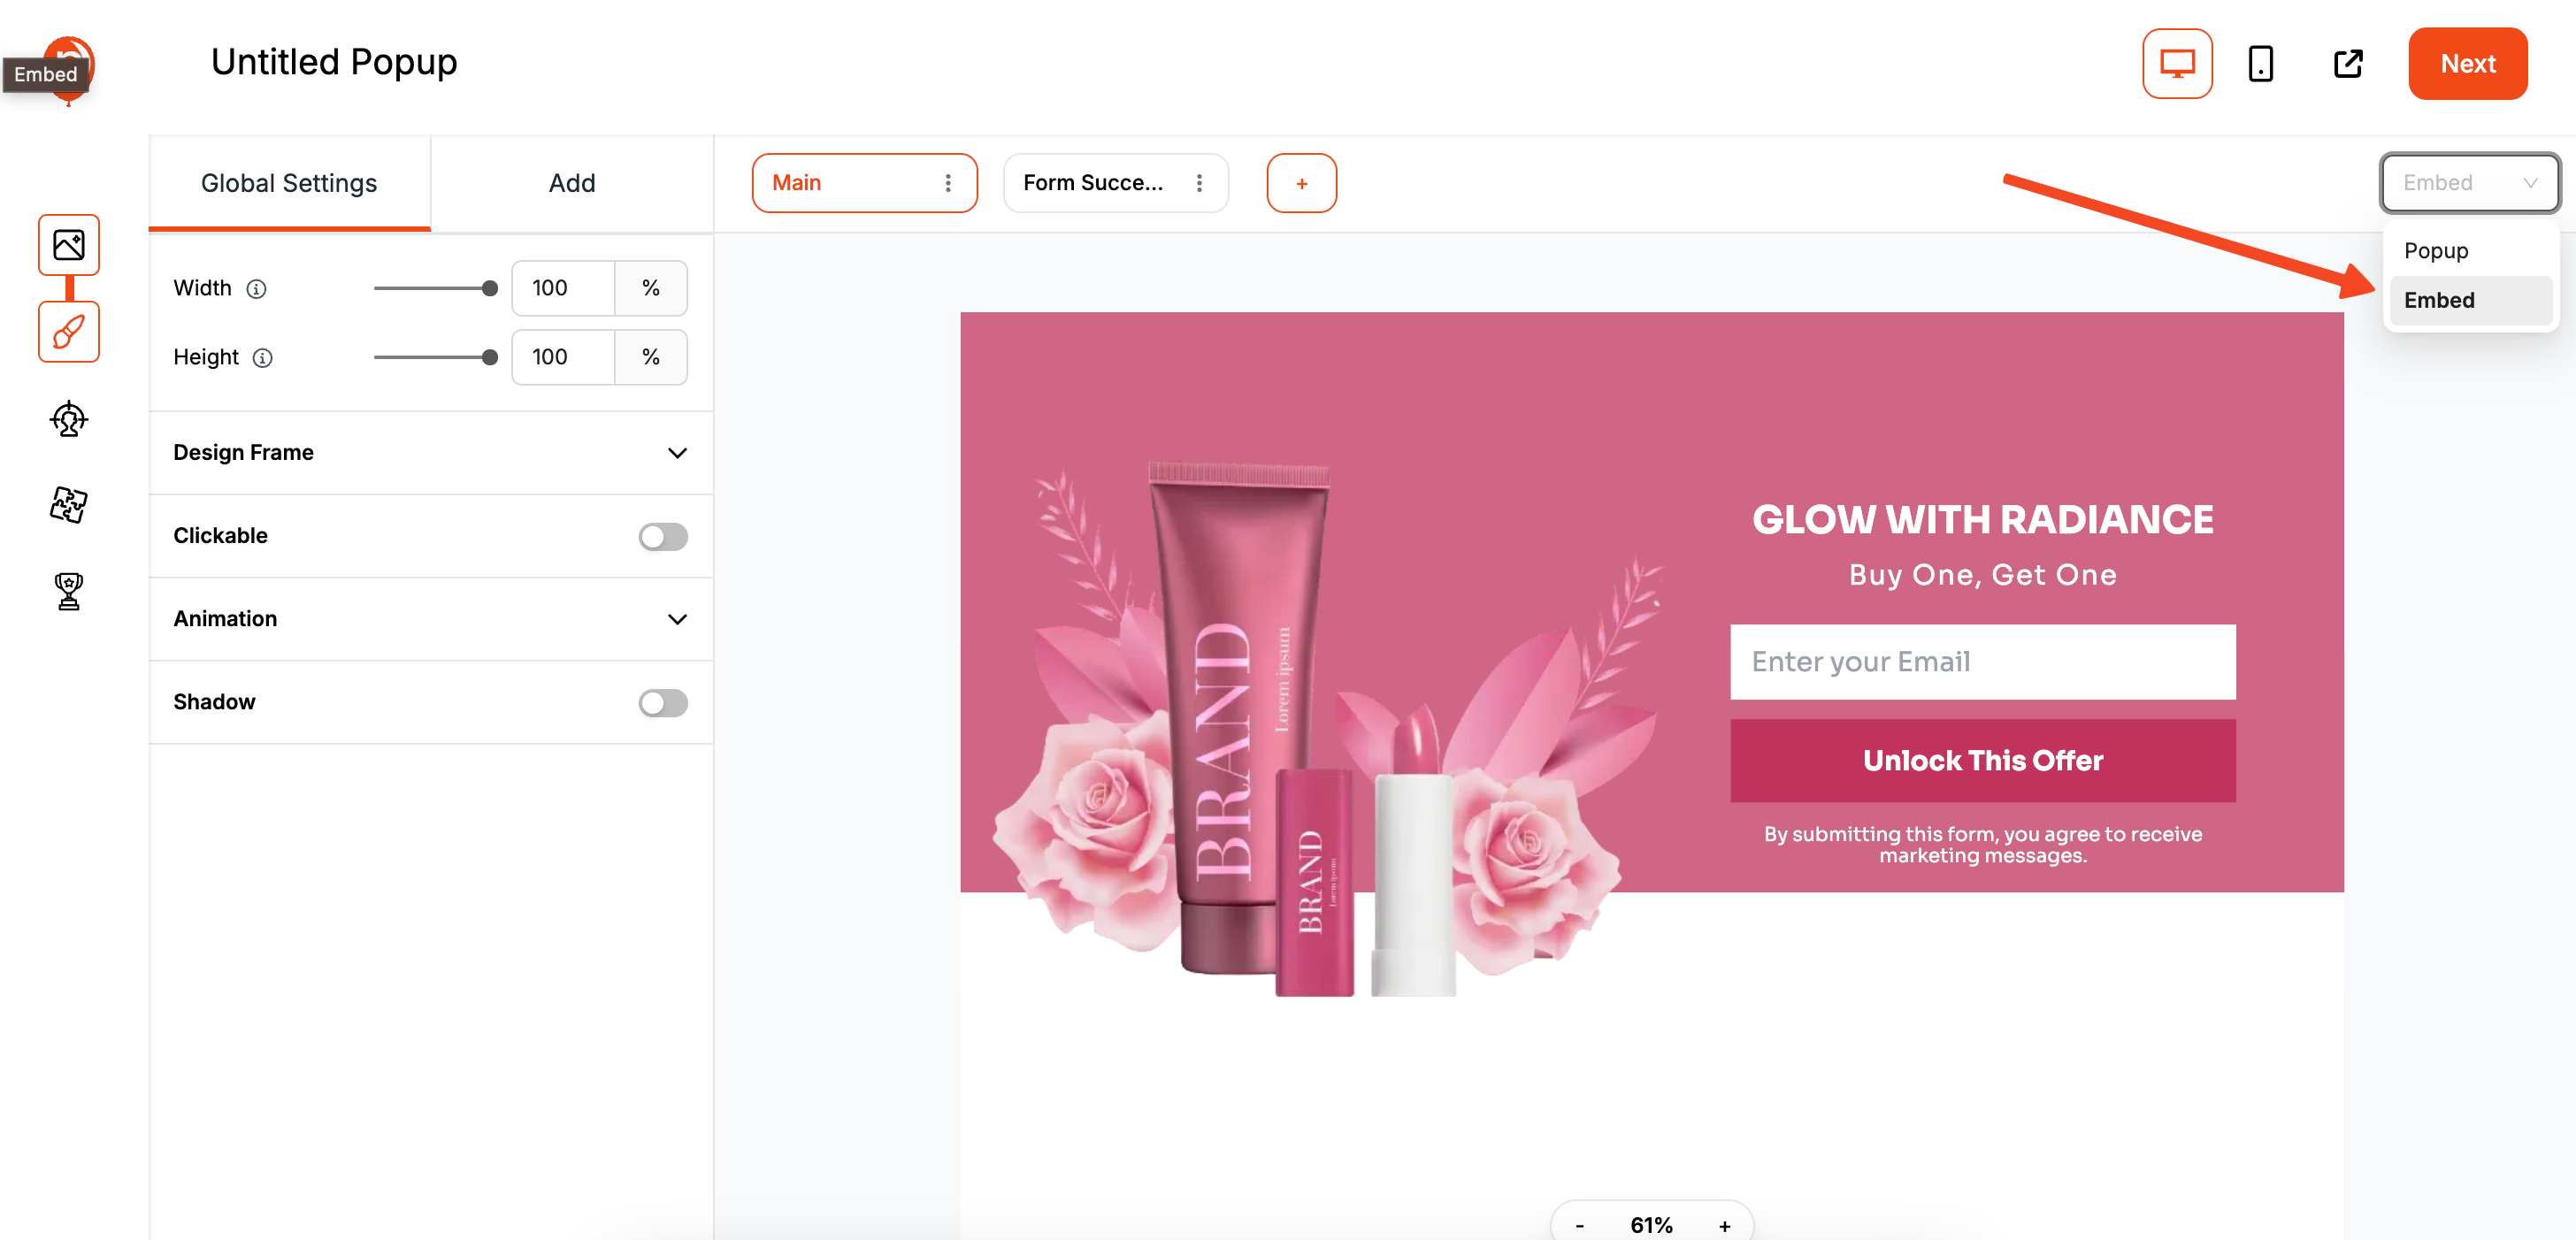
This is where we turn our design into an embedded form. In the top right corner of the editor, you'll see a dropdown menu for the campaign type. Simply change it from “Popup” to “Embed.”
This tells Poper you want this form to appear seamlessly within your page content, rather than popping up over it.
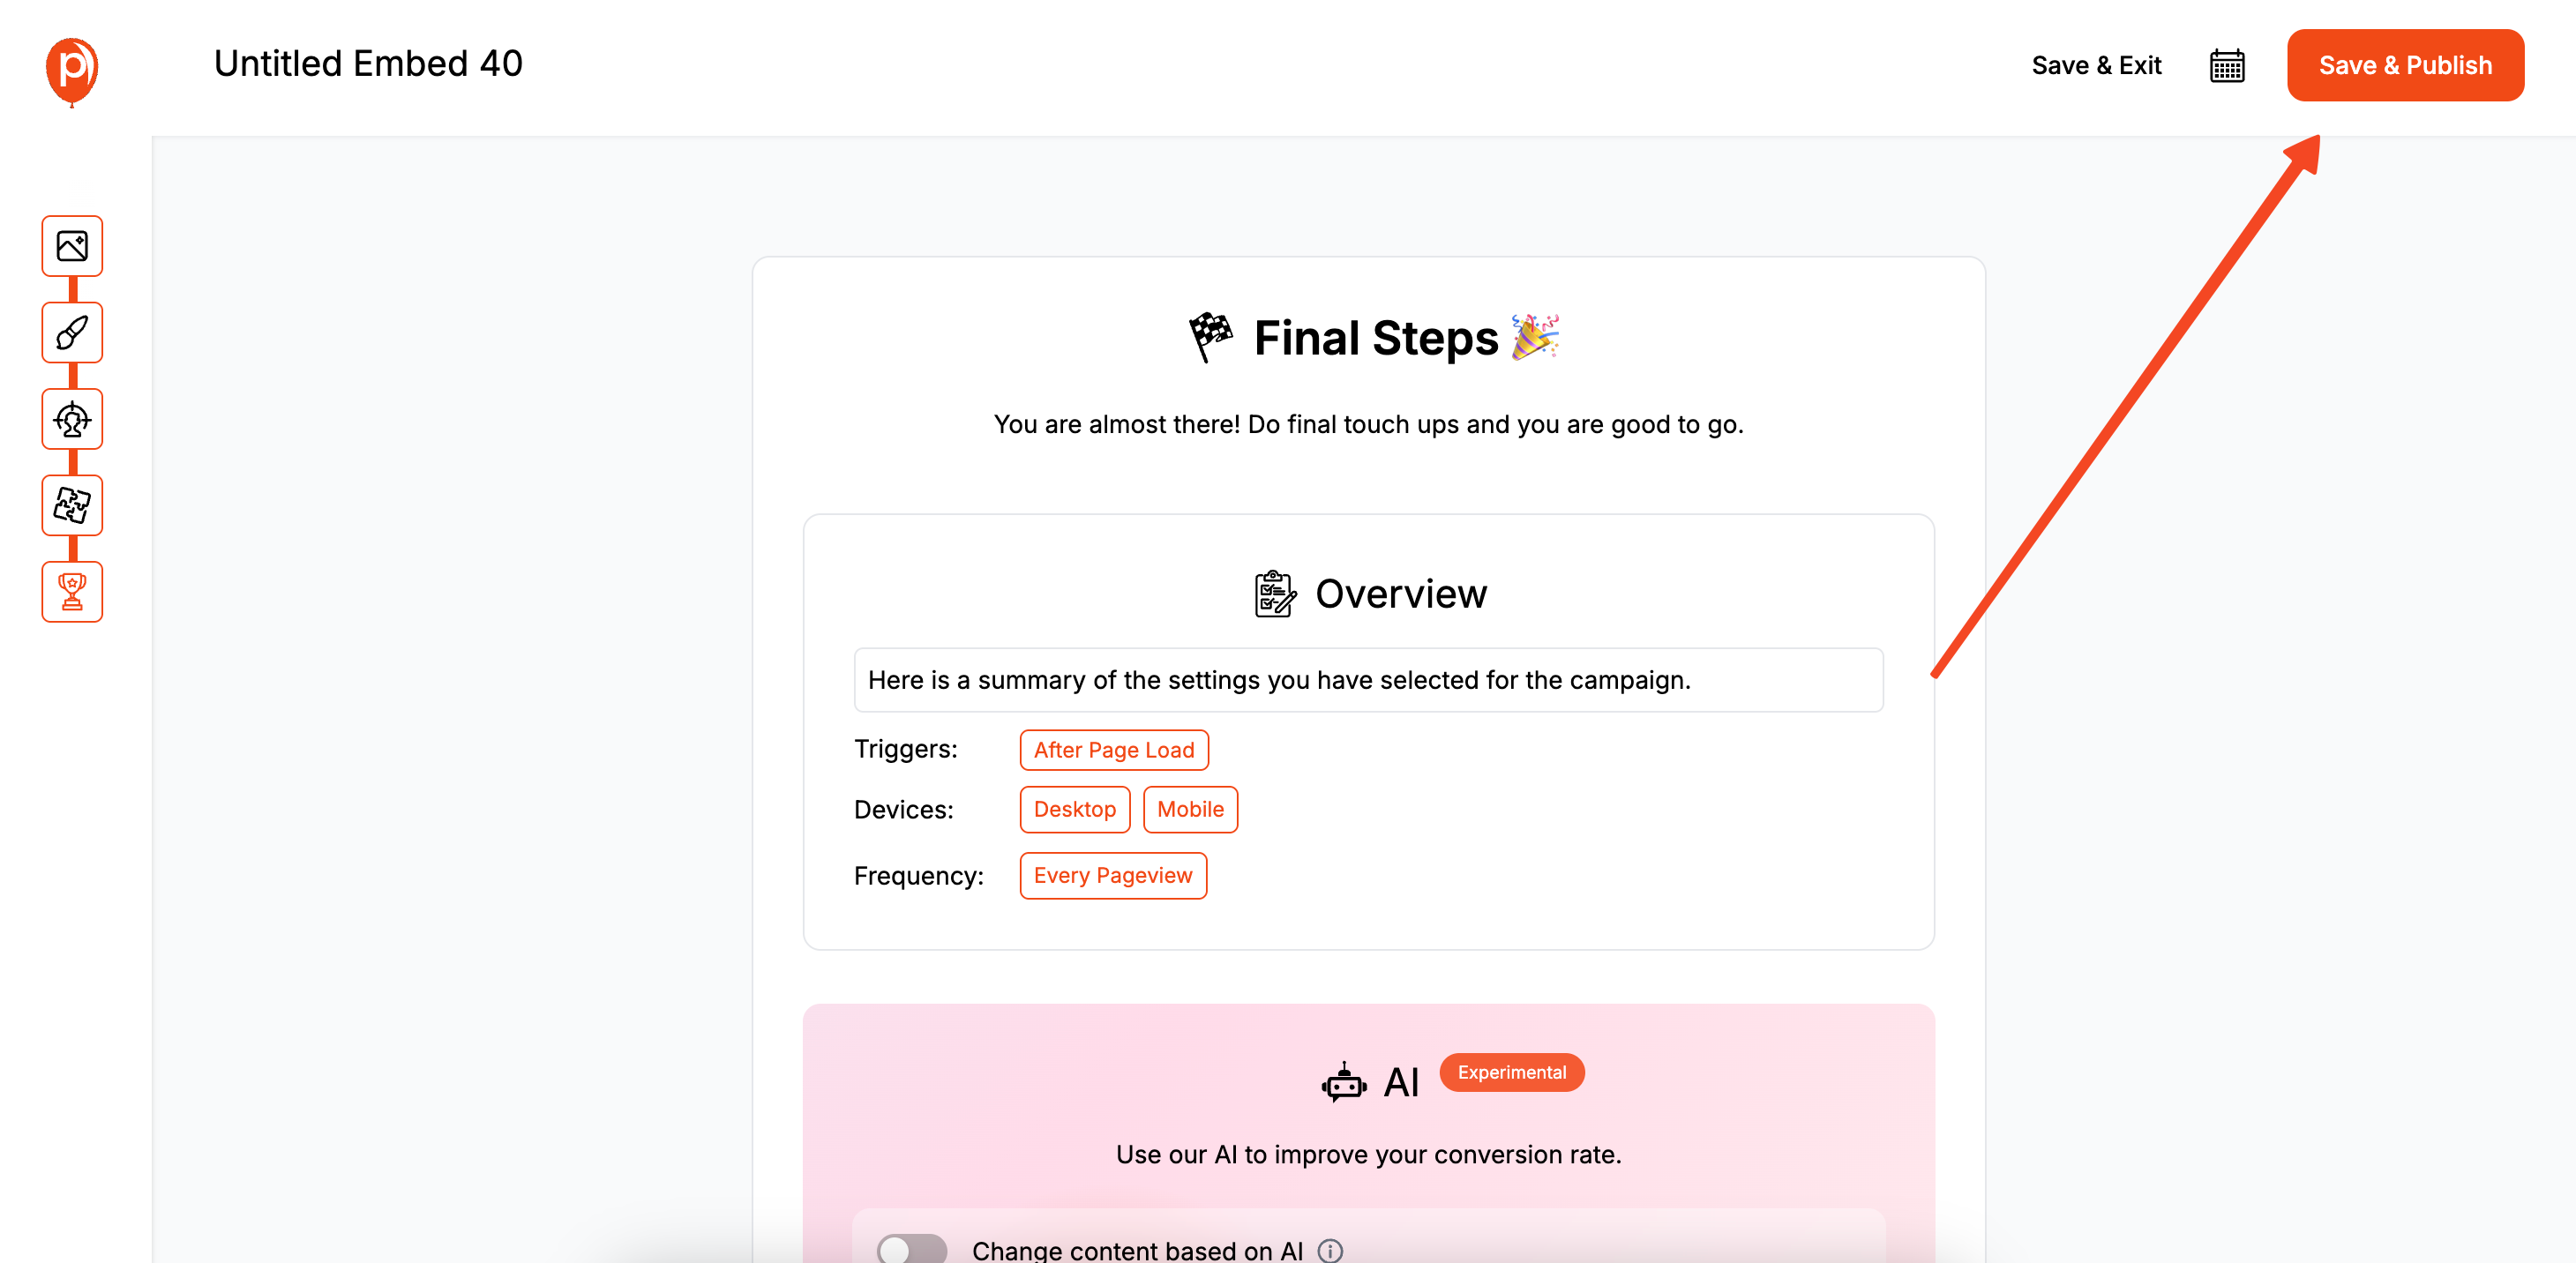
A form that matches your brand builds trust and encourages more signups. Once you’re happy with the design, click “Next” to move on.
Step 5: Set Your Display and Position Rules
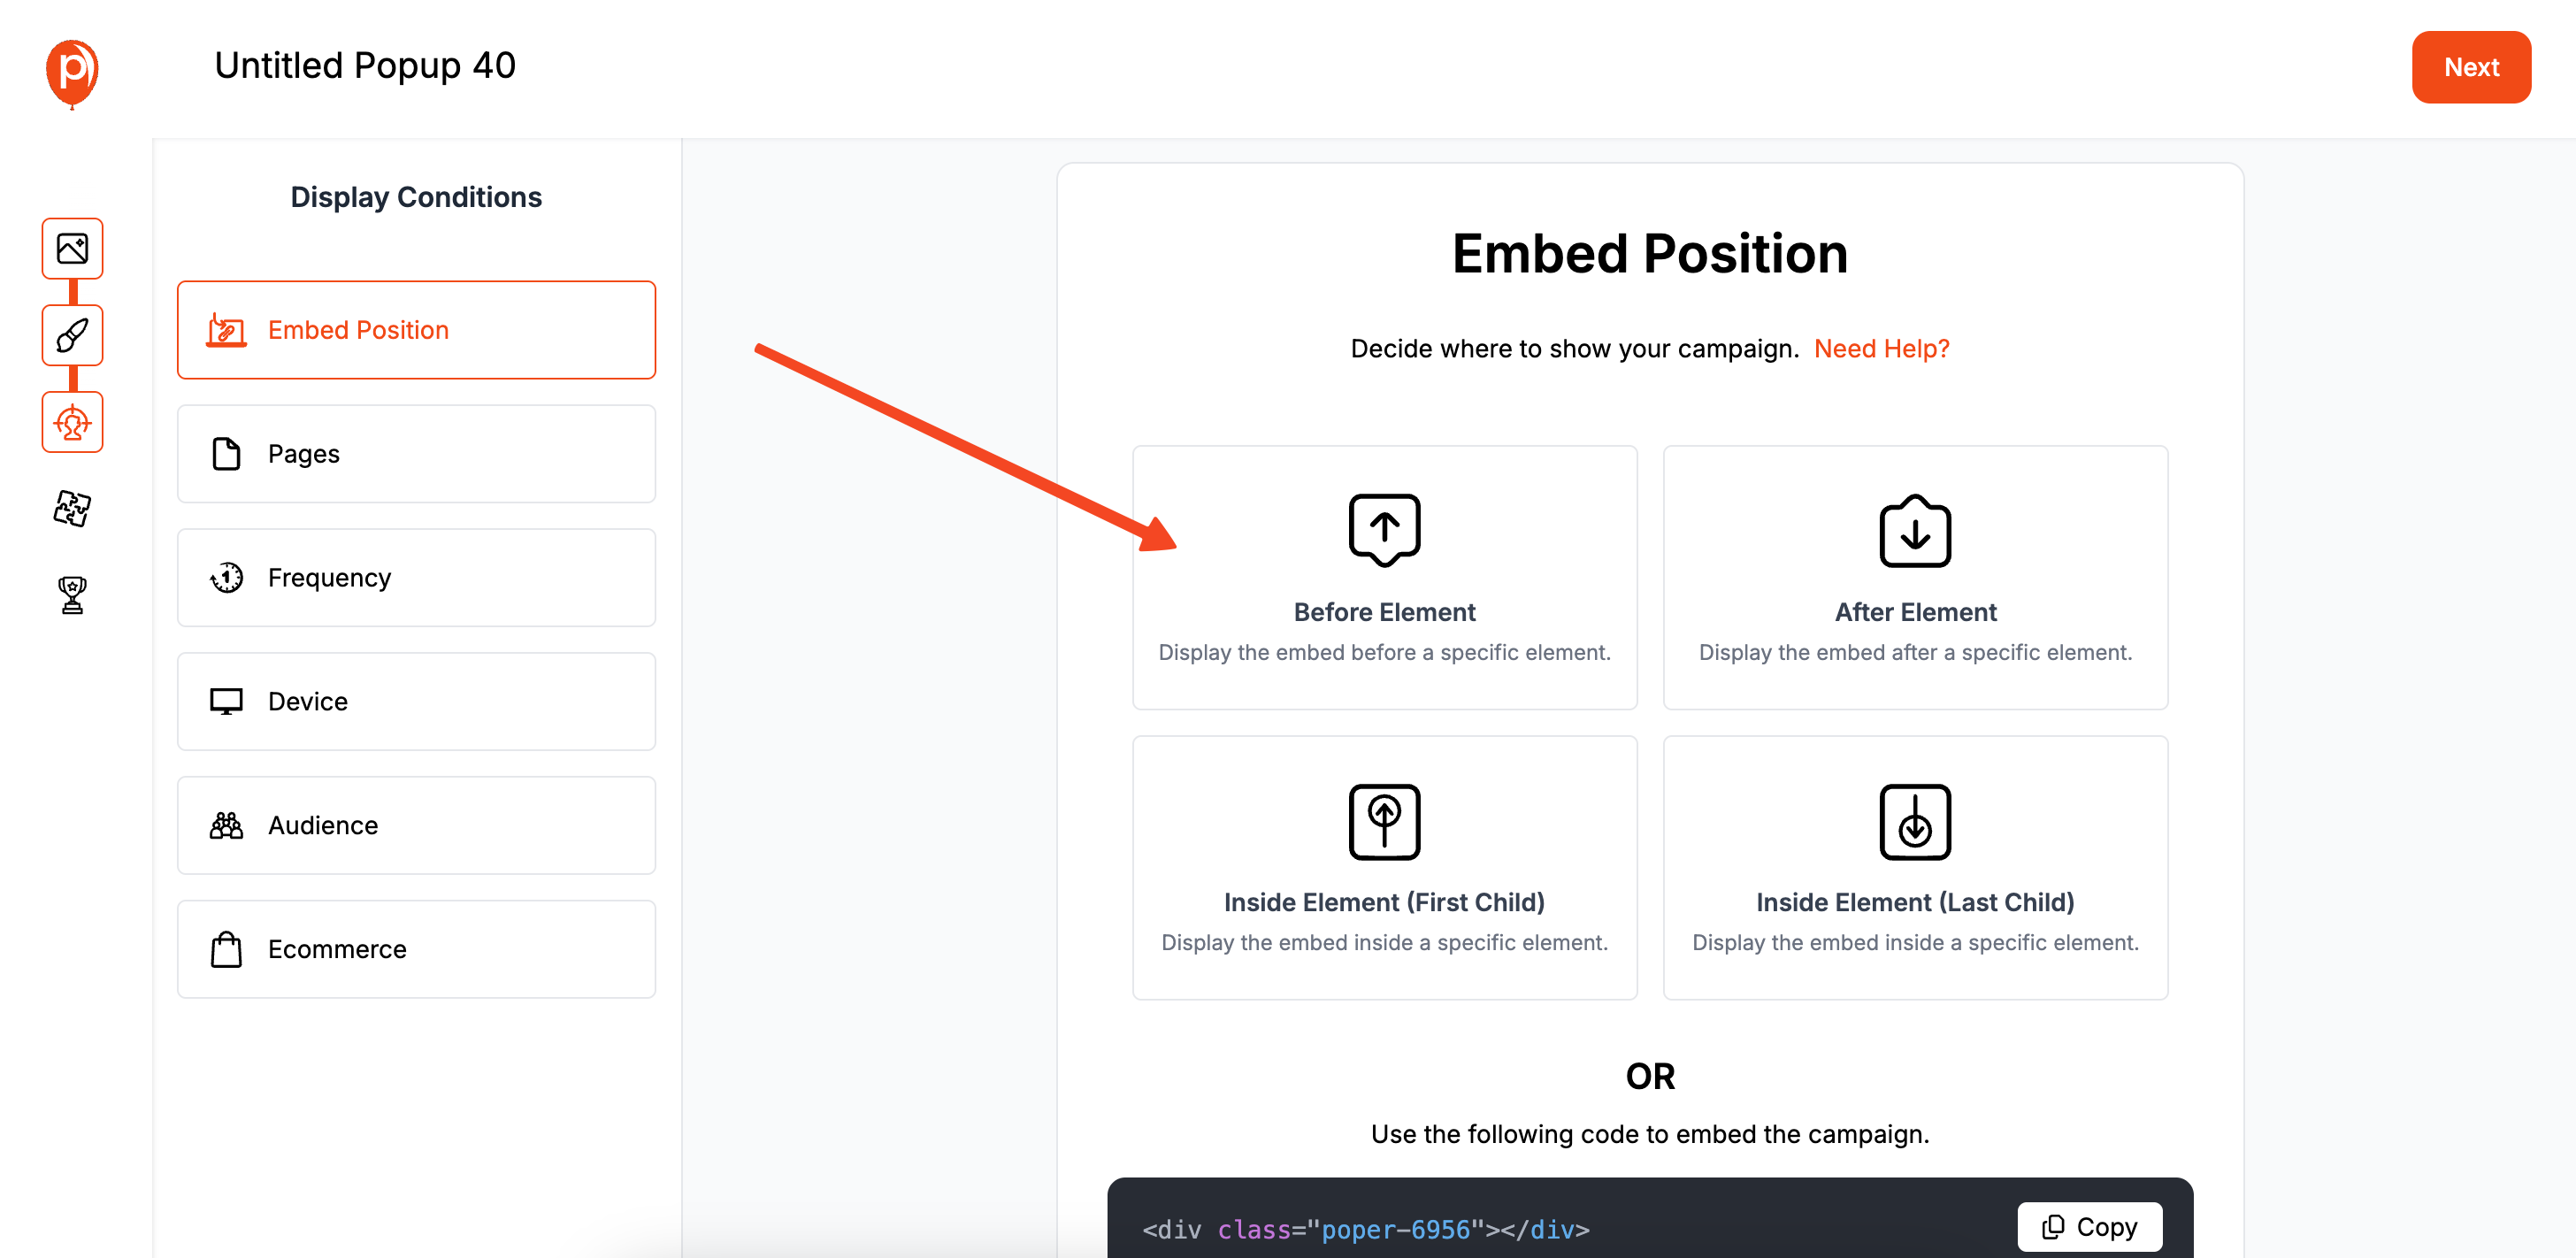
On the “Display Conditions” page, you can decide exactly how your embedded form appears. The “Embed Position” setting lets you automatically place the form before or after specific elements on your page. It’s a powerful way to add the form without touching any code.
Alternatively, you can leave this blank and use the embed code we provide to manually place the form anywhere you want on your site.
Step 6: Connect Your Klaviyo Account
If you're using another marketing platform, see our guides for Flodesk or Mailchimp embed forms as alternatives.
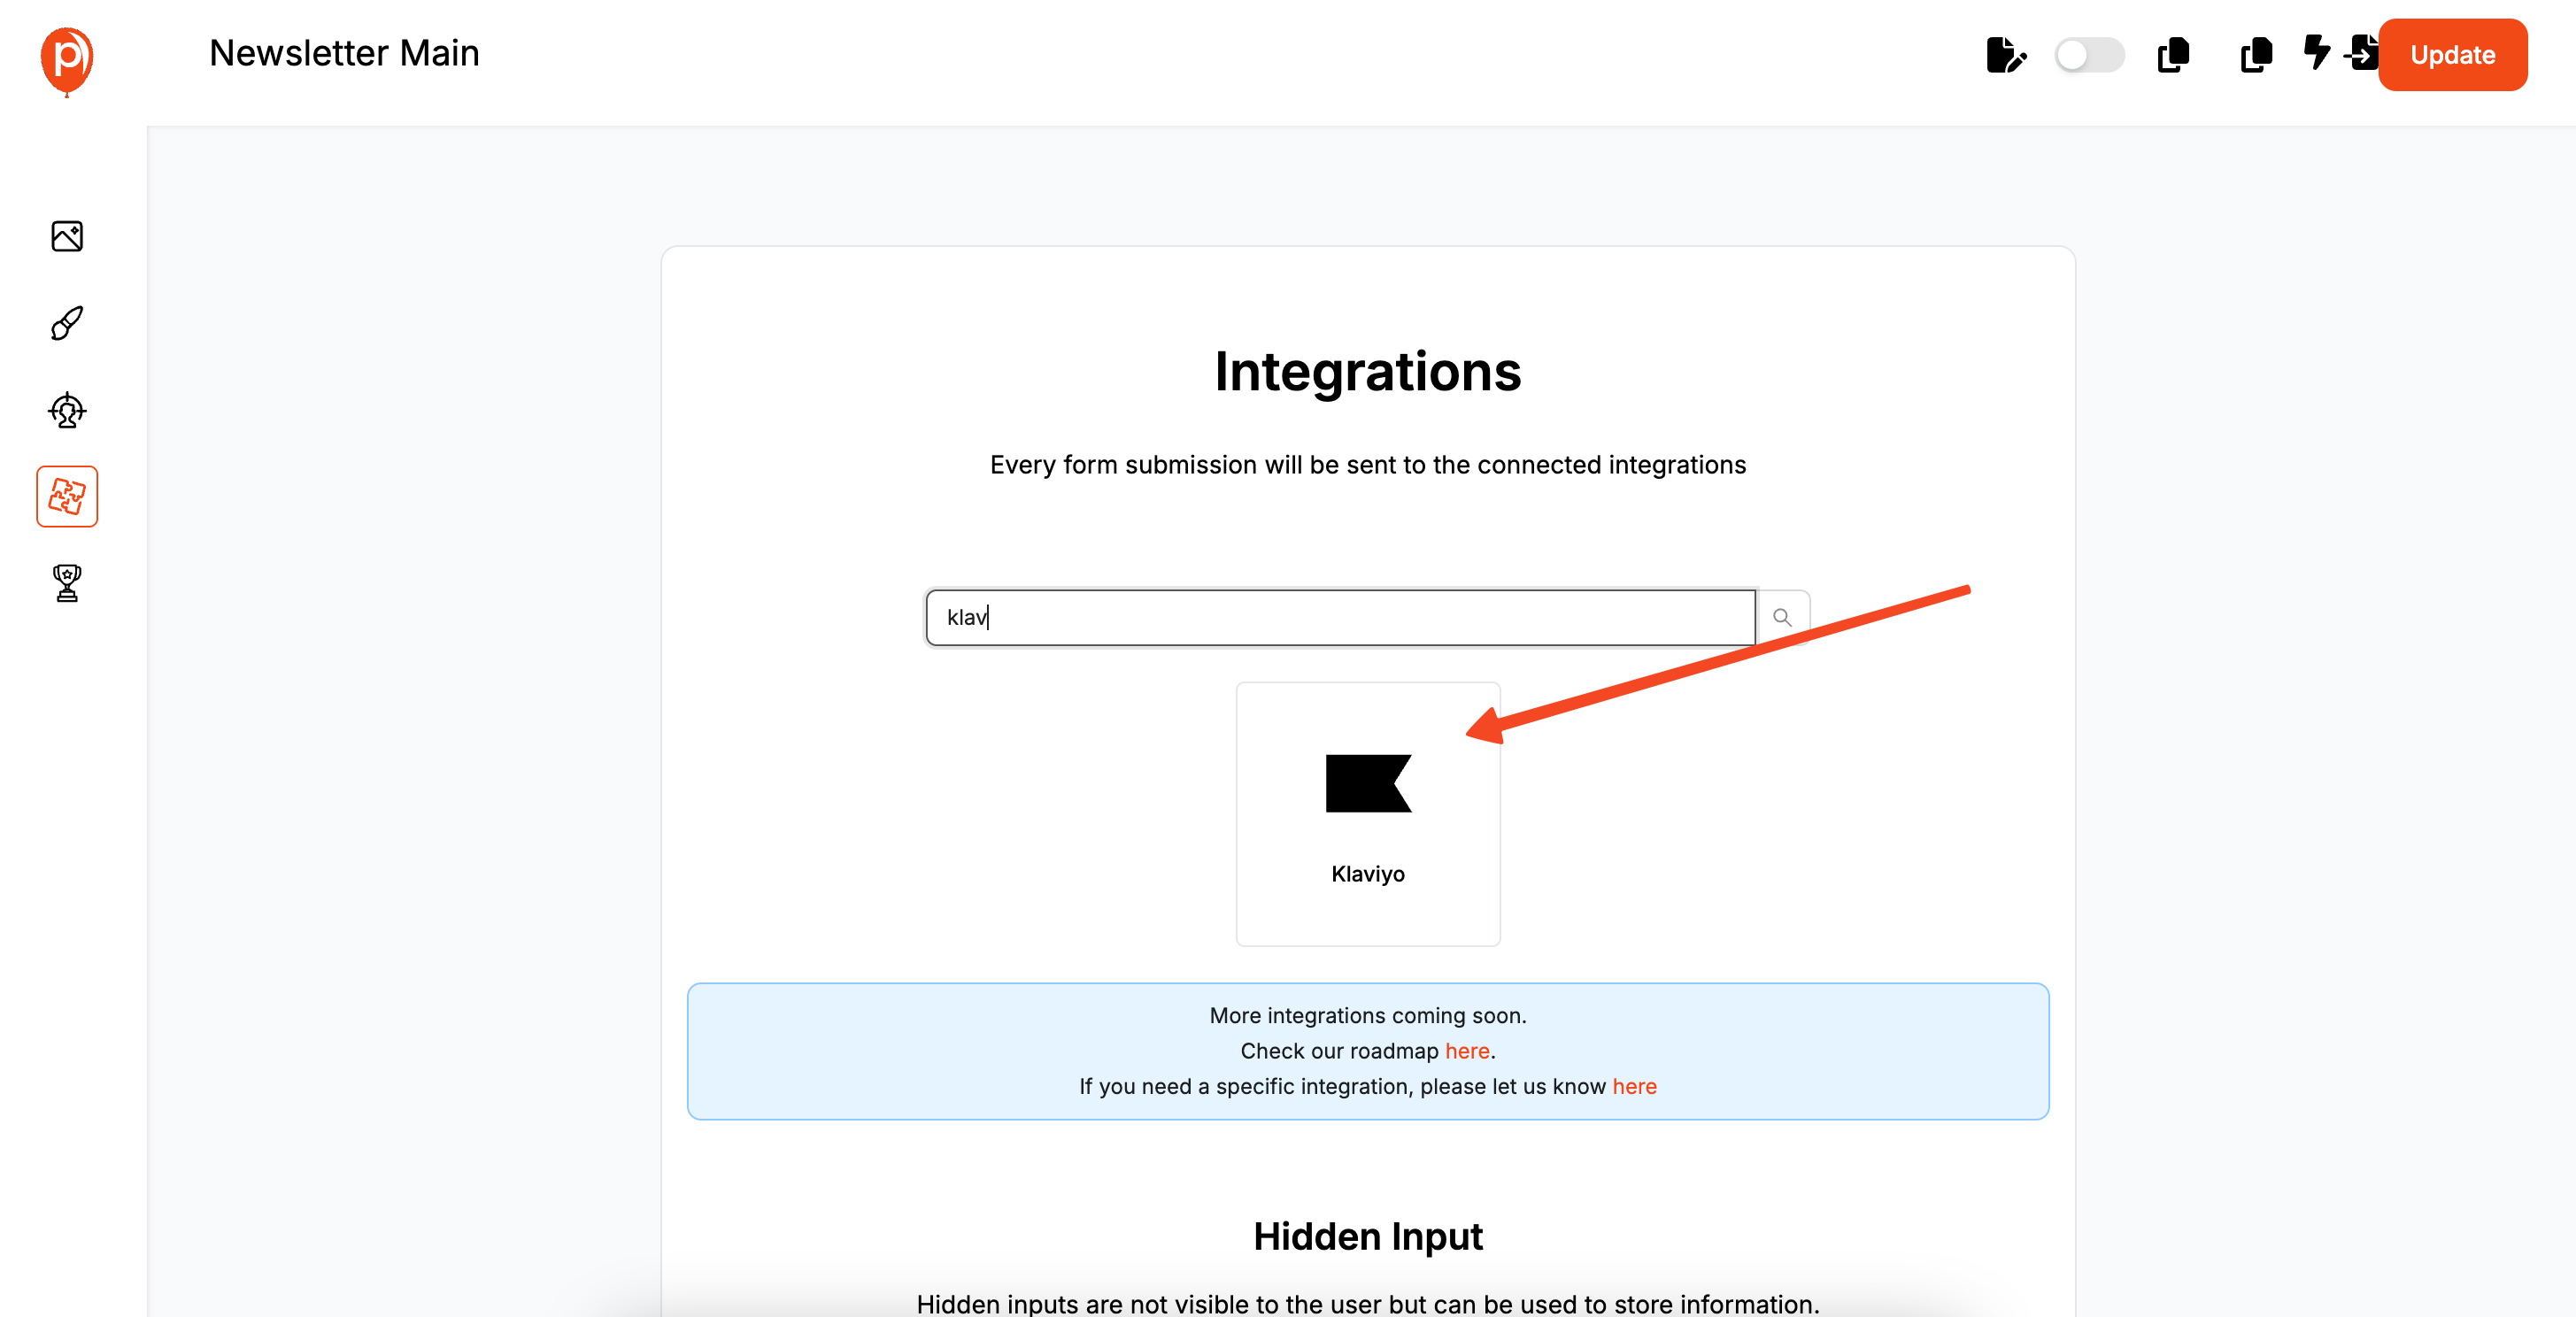
Click “Next” to head to the Integrations page. This is where the magic happens. Find Klaviyo in the list of integrations and select it. If you want a step-by-step walkthrough, check out our easy guide to connecting Klaviyo with Poper.
You'll be prompted to give your account a name and log in to Klaviyo to authorize the connection. This creates a secure link between Poper and your Klaviyo lists.
Step 7: Map Your Form Fields to Klaviyo
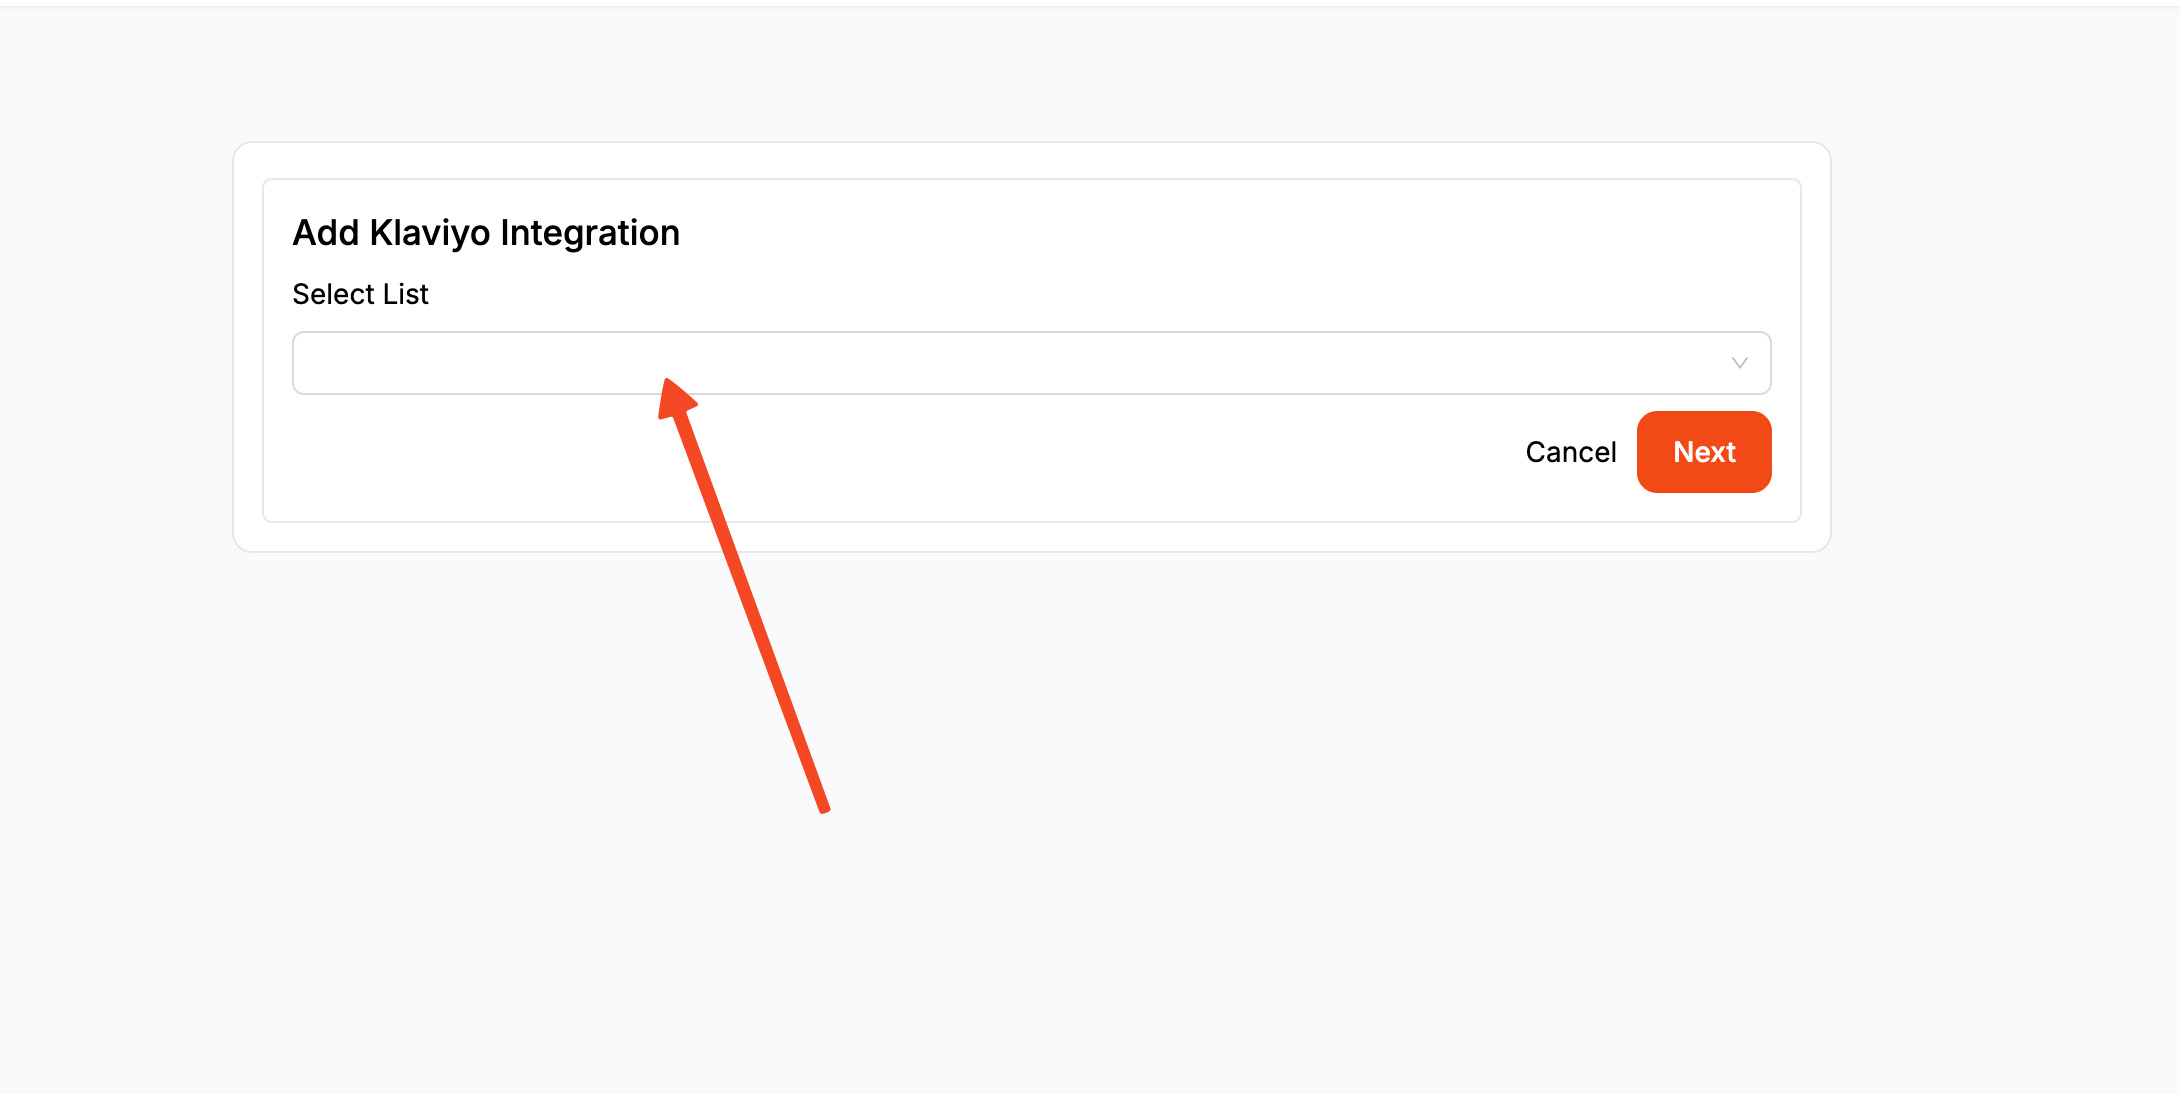
Once connected, you need to tell Poper where to send the data. First, select the exact Klaviyo list where you want your new subscribers to go. You can also add tags here, which is great for segmenting your audience later.
To further refine your audience and increase signup effectiveness, learn more about segmenting audiences for popup campaigns.
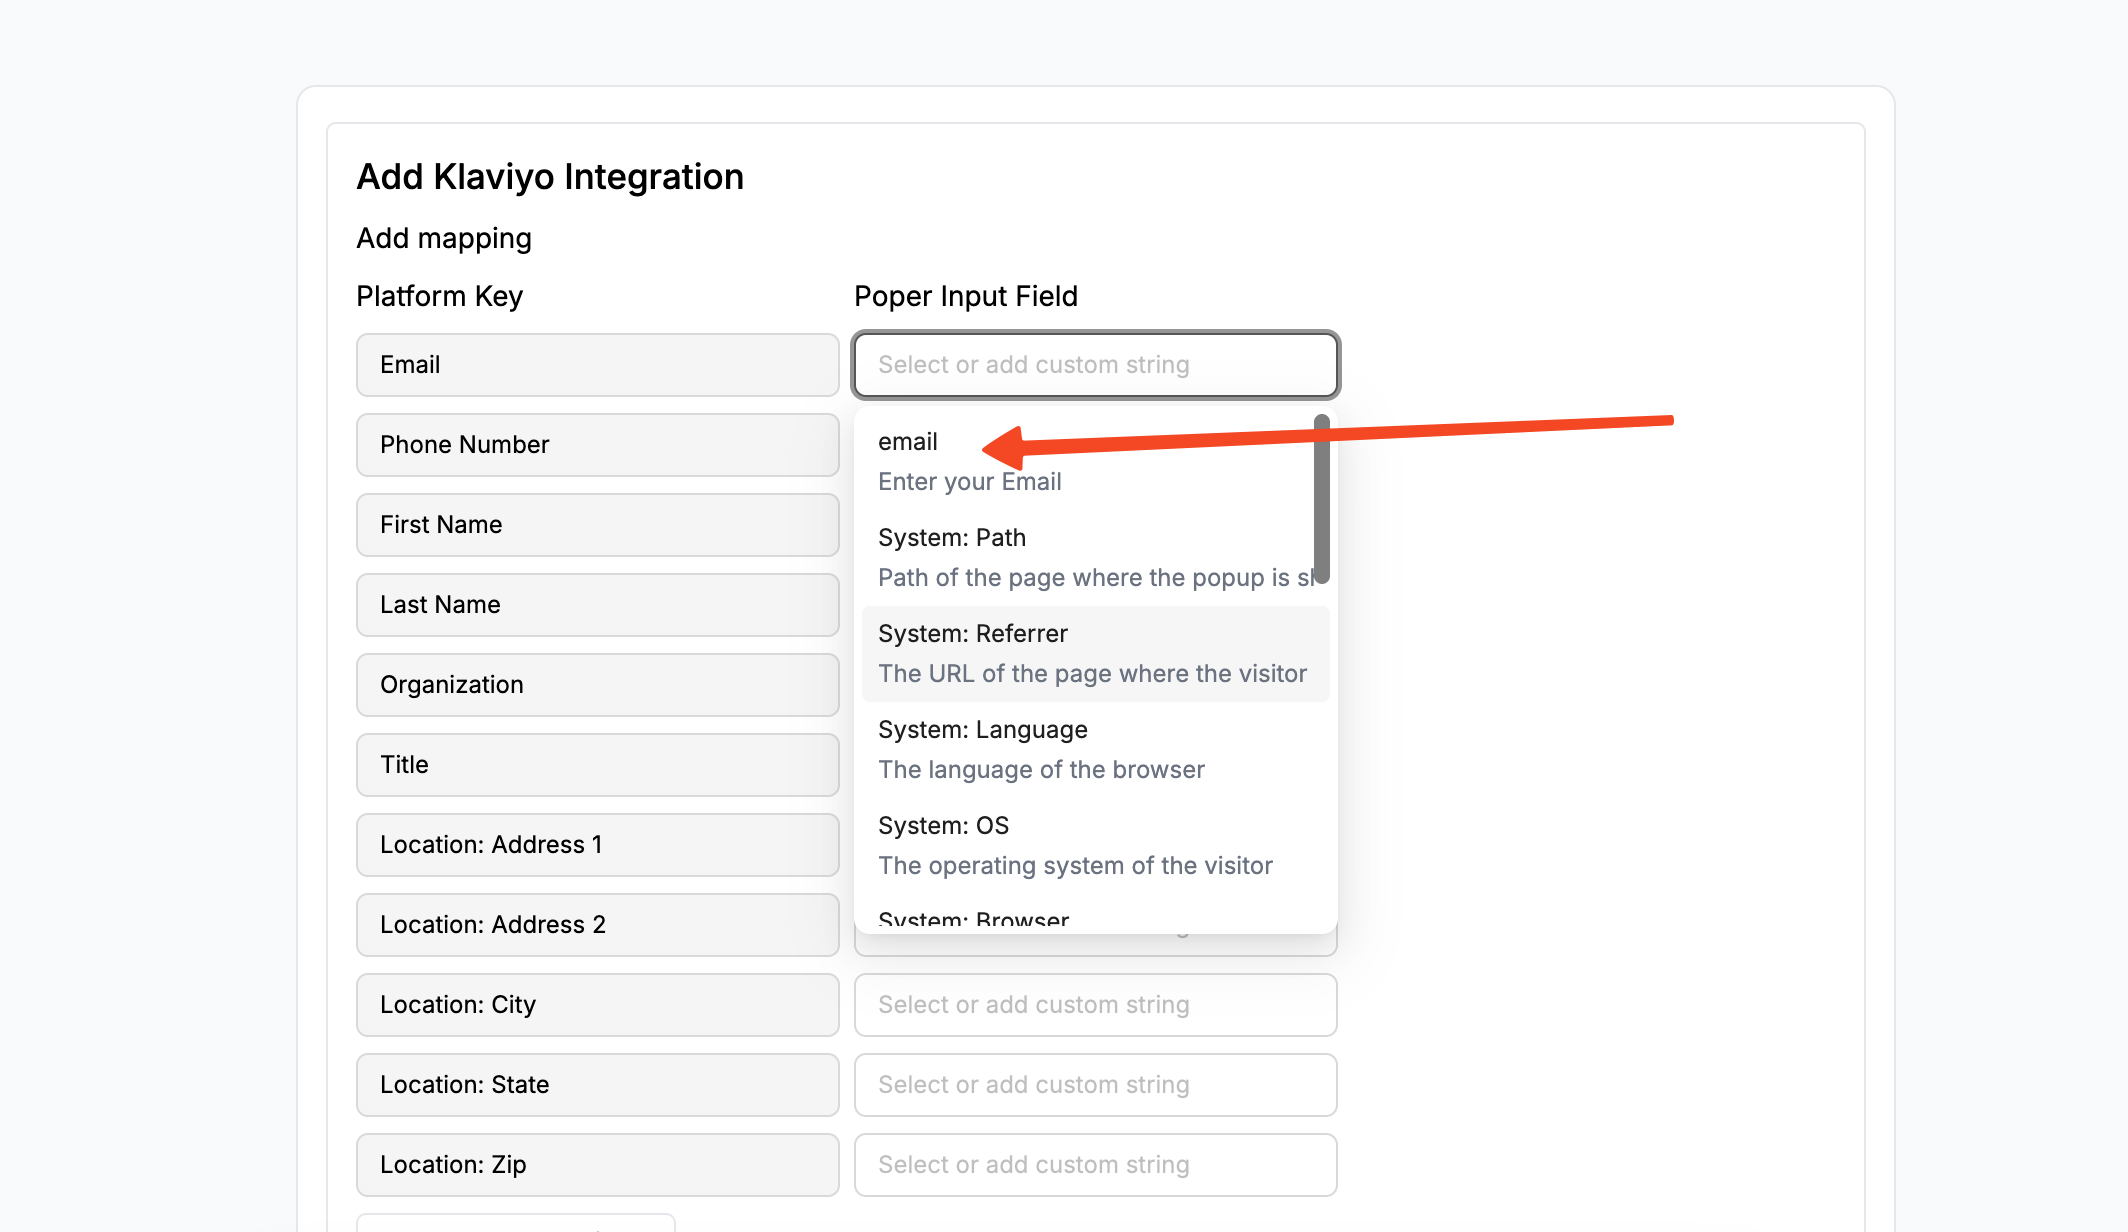
Next, you’ll map the fields. This just means matching the fields in your Poper form (like “Email”) to the corresponding fields in Klaviyo. It ensures every piece of information ends up in the right place.
If you want a more detailed walkthrough of the Klaviyo integration, we have a dedicated guide here: Klaviyo Integration Guide
Step 8: Publish and Install the Poper Snippet
With your form designed and connected, click “Save & Publish.” The final step is to install the main Poper code on your website. You only have to do this once!
Navigate to the “Code” section in the left-hand menu, copy the provided script, and paste it into the <head> section of your website’s HTML. That’s it! Your embedded Klaviyo form will now appear exactly where you configured it to, ready to capture new leads.
Method 2: Creating and Installing Native Klaviyo Signup Forms
This is the most direct and tightly integrated method for Klaviyo users.
Step 1: Create a New Sign-up Form in Klaviyo
Log into your Klaviyo account.
Navigate to Sign-up Forms from the main menu on the left.
Click "Create Sign-up Form." You can browse Klaviyo's extensive template library or start from scratch.
You will be prompted to choose a form type: Popup, Flyout, or Embed. Select the one that fits your goal.
Step 2: Design and Customize Your Form
Use Klaviyo's intuitive editor to customize the form to match your brand.
- Add Blocks: Drag and drop elements like text, images, buttons, and input fields (email, phone number, date, custom properties).
- Style: Adjust fonts, colors, padding, background images, and button styles.
- Multi-Step Forms: You can create multi-step forms to ask for different information progressively (e.g., email on step 1, name and preferences on step 2).
- Success Message: Configure the message or action that happens after a successful submission.
Add Blocks: Drag and drop elements like text, images, buttons, and input fields (email, phone number, date, custom properties).
Style: Adjust fonts, colors, padding, background images, and button styles.
Multi-Step Forms: You can create multi-step forms to ask for different information progressively (e.g., email on step 1, name and preferences on step 2).
Success Message: Configure the message or action that happens after a successful submission.
Step 3: Configure Targeting and Behavior
This is where you control when and where your form appears.
Targeting Tab:
- Display: Choose whether the form appears on desktop, mobile, or both.
- URLs: Show or hide the form on specific pages of your website.
- Visitors: Target based on whether they are new or returning, in a specific Klaviyo list or segment, or based on location. For e-commerce stores (like Shopify), you can even target based on cart content.
Display: Choose whether the form appears on desktop, mobile, or both.
URLs: Show or hide the form on specific pages of your website.
Visitors: Target based on whether they are new or returning, in a specific Klaviyo list or segment, or based on location. For e-commerce stores (like Shopify), you can even target based on cart content.
Behavior Tab (for Popups and Flyouts):
- Triggers: Set when the form appears. Options include:
- Time Delay: After a set number of seconds.
- Scroll Percentage: After the user scrolls a certain amount.
- Exit Intent: When a desktop user shows signs of leaving the site.
- Frequency: Control how often the same visitor sees the form to avoid annoyance.
- Triggers: Set when the form appears. Options include:
Triggers: Set when the form appears. Options include:
- Time Delay: After a set number of seconds.
- Scroll Percentage: After the user scrolls a certain amount.
- Exit Intent: When a desktop user shows signs of leaving the site.
Time Delay: After a set number of seconds.
Scroll Percentage: After the user scrolls a certain amount.
Exit Intent: When a desktop user shows signs of leaving the site.
Frequency: Control how often the same visitor sees the form to avoid annoyance.
Step 4: Add Subscribers to a Klaviyo List
In the form's settings (often on the main button's action), you must select the Klaviyo list where new subscribers will be added. This is essential for triggering your welcome flows.
Step 5: Publish the Form and Get the Installation Code
Once you're happy with your form, click "Publish."
Klaviyo will provide you with an embed code. This is a single JavaScript snippet.
Copy this code.
Step 6: Install the Klaviyo Snippet on Your Website
You only need to install Klaviyo's main sign-up form snippet on your website once. This single snippet will manage the display of all your published popups and flyouts according to their individual targeting rules.
Navigate to your website's backend or theme editor.
Paste the copied Klaviyo snippet just before the closing </body> tag in your site's main HTML template file (e.g., theme.liquid in Shopify, or using a "Insert Headers and Footers" plugin in WordPress).
For Embedded Forms: In addition to the main snippet, you must also paste a specific <div> embed code on the page exactly where you want the embedded form to appear. Klaviyo provides this second snippet for embedded forms.
Klaviyo Native Forms vs. Poper for Klaviyo: Which to Choose?
| Feature | Klaviyo Native Signup Forms | Poper Forms (Klaviyo Integrated) |
| Ease of Use | Very easy, all within Klaviyo ecosystem | Easy, with a dedicated visual editor |
| Design Flexibility | Good, but within Klaviyo's template system | High, with total drag-and-drop control |
| Form Types | Popup, Flyout, Embed, Multi-step | Popup, Flyout, Bar, Embed, Gamified, Multi-step |
| Trigger/Targeting | Robust, with excellent e-commerce targeting | Very advanced, with more diverse rule options |
| Platform | Works best on sites with Klaviyo tracking | Works on any website, platform-agnostic |
| Integration | Seamlessly integrated into Klaviyo | Requires a one-time integration setup with Klaviyo |
Choose Klaviyo's Native Signup Forms When:
You want the absolute tightest integration and prefer to manage everything within Klaviyo.
Klaviyo's native design, trigger, and targeting options meet all of your current needs.
You heavily rely on Klaviyo's deep e-commerce targeting (e.g., cart value).
Choose Poper for Creating Your Klaviyo Signup Forms When:
You need more design freedom or want to create a form type not available in Klaviyo (like a spin-to-win game).
You require more advanced or different types of triggering and targeting rules.
You want to manage all your website popups and forms from a centralized, platform-agnostic dashboard that can integrate with Klaviyo and other tools.
Conclusion
Klaviyo Signup Forms are a fundamental component of any successful list growth strategy. For best practices in maximizing conversions, visit our article on how to increase popup conversion.
Don't forget to check out popups tailored for different scenarios, like exit intent popups and email opt-in popups, for extra conversion power.
Klaviyo's native builder offers a powerful, convenient, and deeply integrated solution for creating effective popups, flyouts, and embedded forms that work seamlessly with its automation features.
Specialized tools like Poper serve as an excellent enhancement or alternative, providing superior design flexibility and more advanced targeting capabilities, all while ensuring every lead is instantly synced to your Klaviyo account.
By understanding the strengths of each approach, you can choose the right tool to create high-converting signup forms that consistently fuel your Klaviyo marketing machine.
Frequently Asked Questions (FAQ)
Do I need to be a developer to install Klaviyo Signup Forms on my site?
No. Klaviyo's integration with platforms like Shopify is often app-based and requires no code. For other sites, installing the Klaviyo snippet is a one-time copy-and-paste action into your site's HTML, which is well-documented and doesn't require development skills.
Can I A/B test Klaviyo Signup Forms?
Yes, Klaviyo has a robust, built-in A/B testing feature for its sign-up forms, allowing you to test different designs, offers, and copy to optimize conversion rates.
What's the best type of Klaviyo Signup Form to use?
It depends on your goal:
* Popup: Best for high-priority offers (e.g., welcome discount).
* Flyout: Good for less intrusive, persistent offers (e.g., newsletter sign-up).
* Embed: Ideal for static, always-visible locations like your website footer or a dedicated "subscribe" page.If I use Poper to create my forms, will I lose Klaviyo's e-commerce targeting?
Poper has its own e-commerce targeting for platforms like Shopify (e.g., targeting based on cart content). However, Klaviyo's native forms will have the deepest access to Klaviyo's own segmentation data for targeting. You would trade some of Klaviyo's native targeting for Poper's advanced design and trigger capabilities.
Can I embed a Klaviyo form inside a Poper popup?
Yes, this is an advanced use case. You could create an "embedded" form in Klaviyo, get its specific <div> embed code, and then paste that code into a "Custom HTML" element within a Poper popup. This would allow you to use Poper's advanced triggers to display a native Klaviyo form.

