
I’ve always loved how iPhones let you add photo widgets to your home screen. It’s a simple, personal touch. I thought, why can’t we do the same for our websites? So, I made sure you could with Poper.
Today, I’ll show you how to create a cool, floating photo widget. It will sit on your page, and when a visitor clicks it, the full-size image will open up. It’s perfect for showcasing product shots, team photos, or even a fun graphic without taking up permanent space. If you want your widget to be visually engaging, be sure your popup is responsive for all devices.
Creating Your Photo Widget: A Step-by-Step Guide
Step 1: Upload Your Image and Get Started

First things first, head over to our quick-start tool at poper.ai/image-to-popup/. Upload the image you want to use as your widget. Don’t worry too much about the position right now; you can fine-tune it later.
Click Generate, and you’ll be prompted to create a Poper account. This saves your progress and gives you access to the full editor, where we’ll do the rest of the setup. Once you're in, just add your website domain to link it to your account.
Step 2: Turn Your Image into a Floating Widget
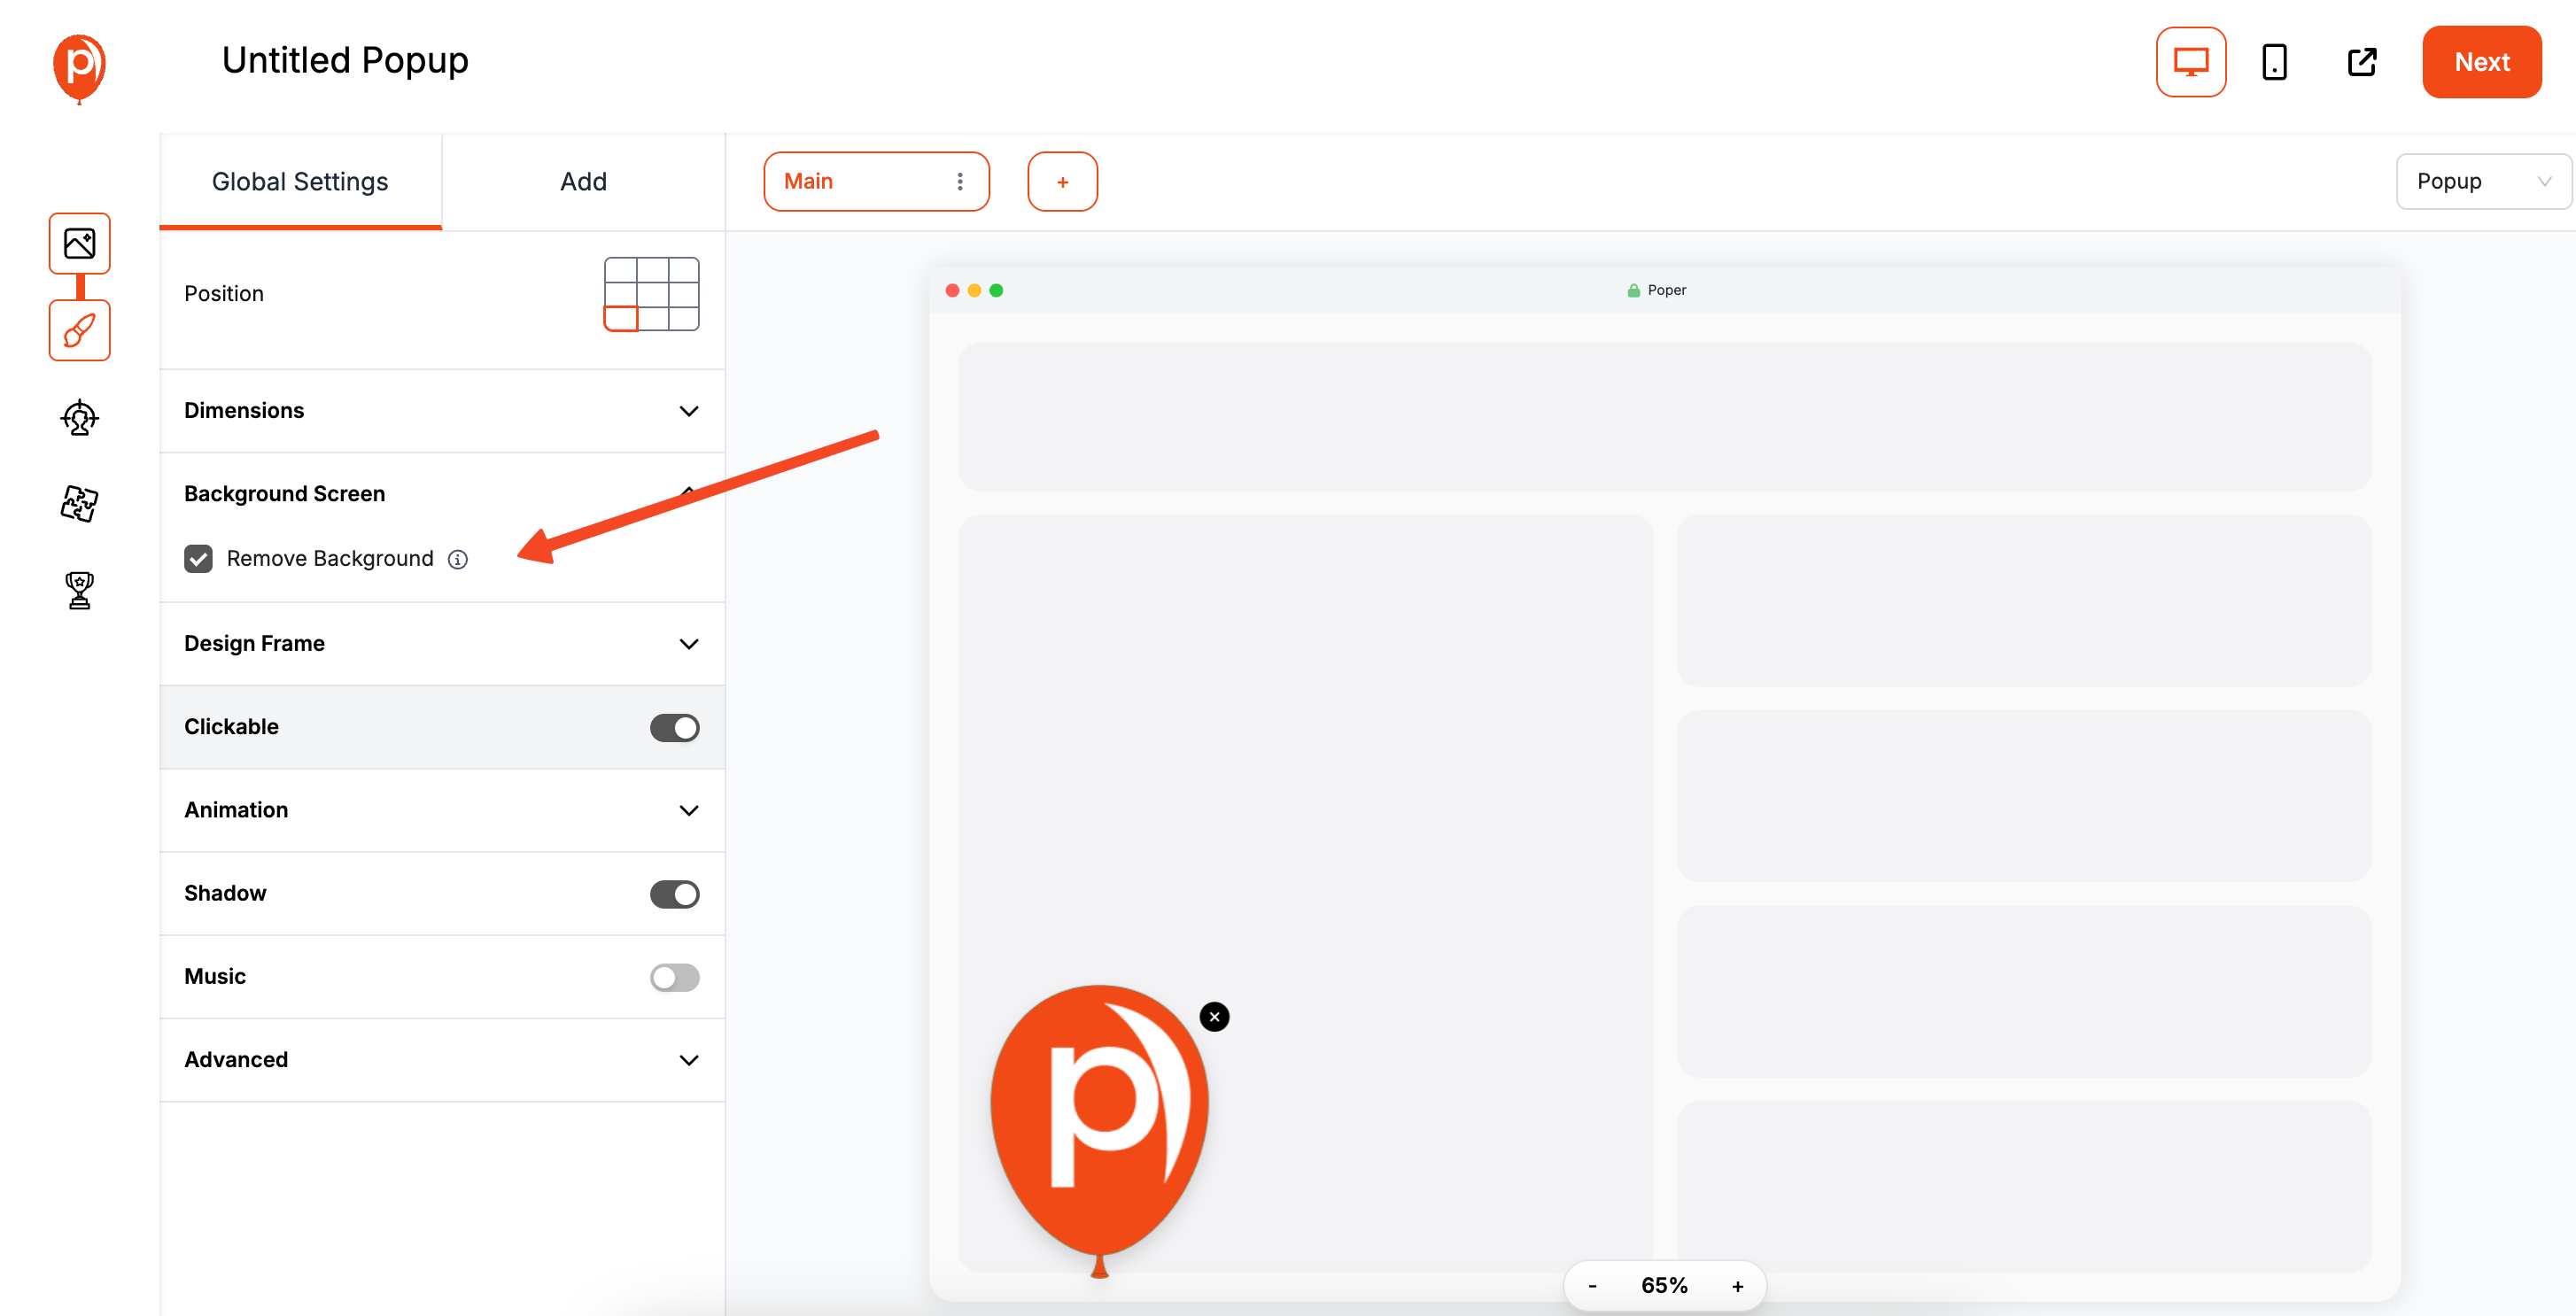
You should now be inside the Poper editor, looking at your image on a background overlay. To make it feel like a widget, we need to get rid of that background. This is the key to making it "float" on your site.
In the editor, navigate to Background Screen and select the Remove background option. You’ll immediately see your image standing alone. This ensures it feels like a native part of your website, not an intrusive popup.
Step 3: Set Up the Full-Screen Image View
A widget is great, but your visitors need to be able to see the full picture when they click it. To do this, we'll create a second screen for our campaign. Think of "Steps" in Poper as different screens.
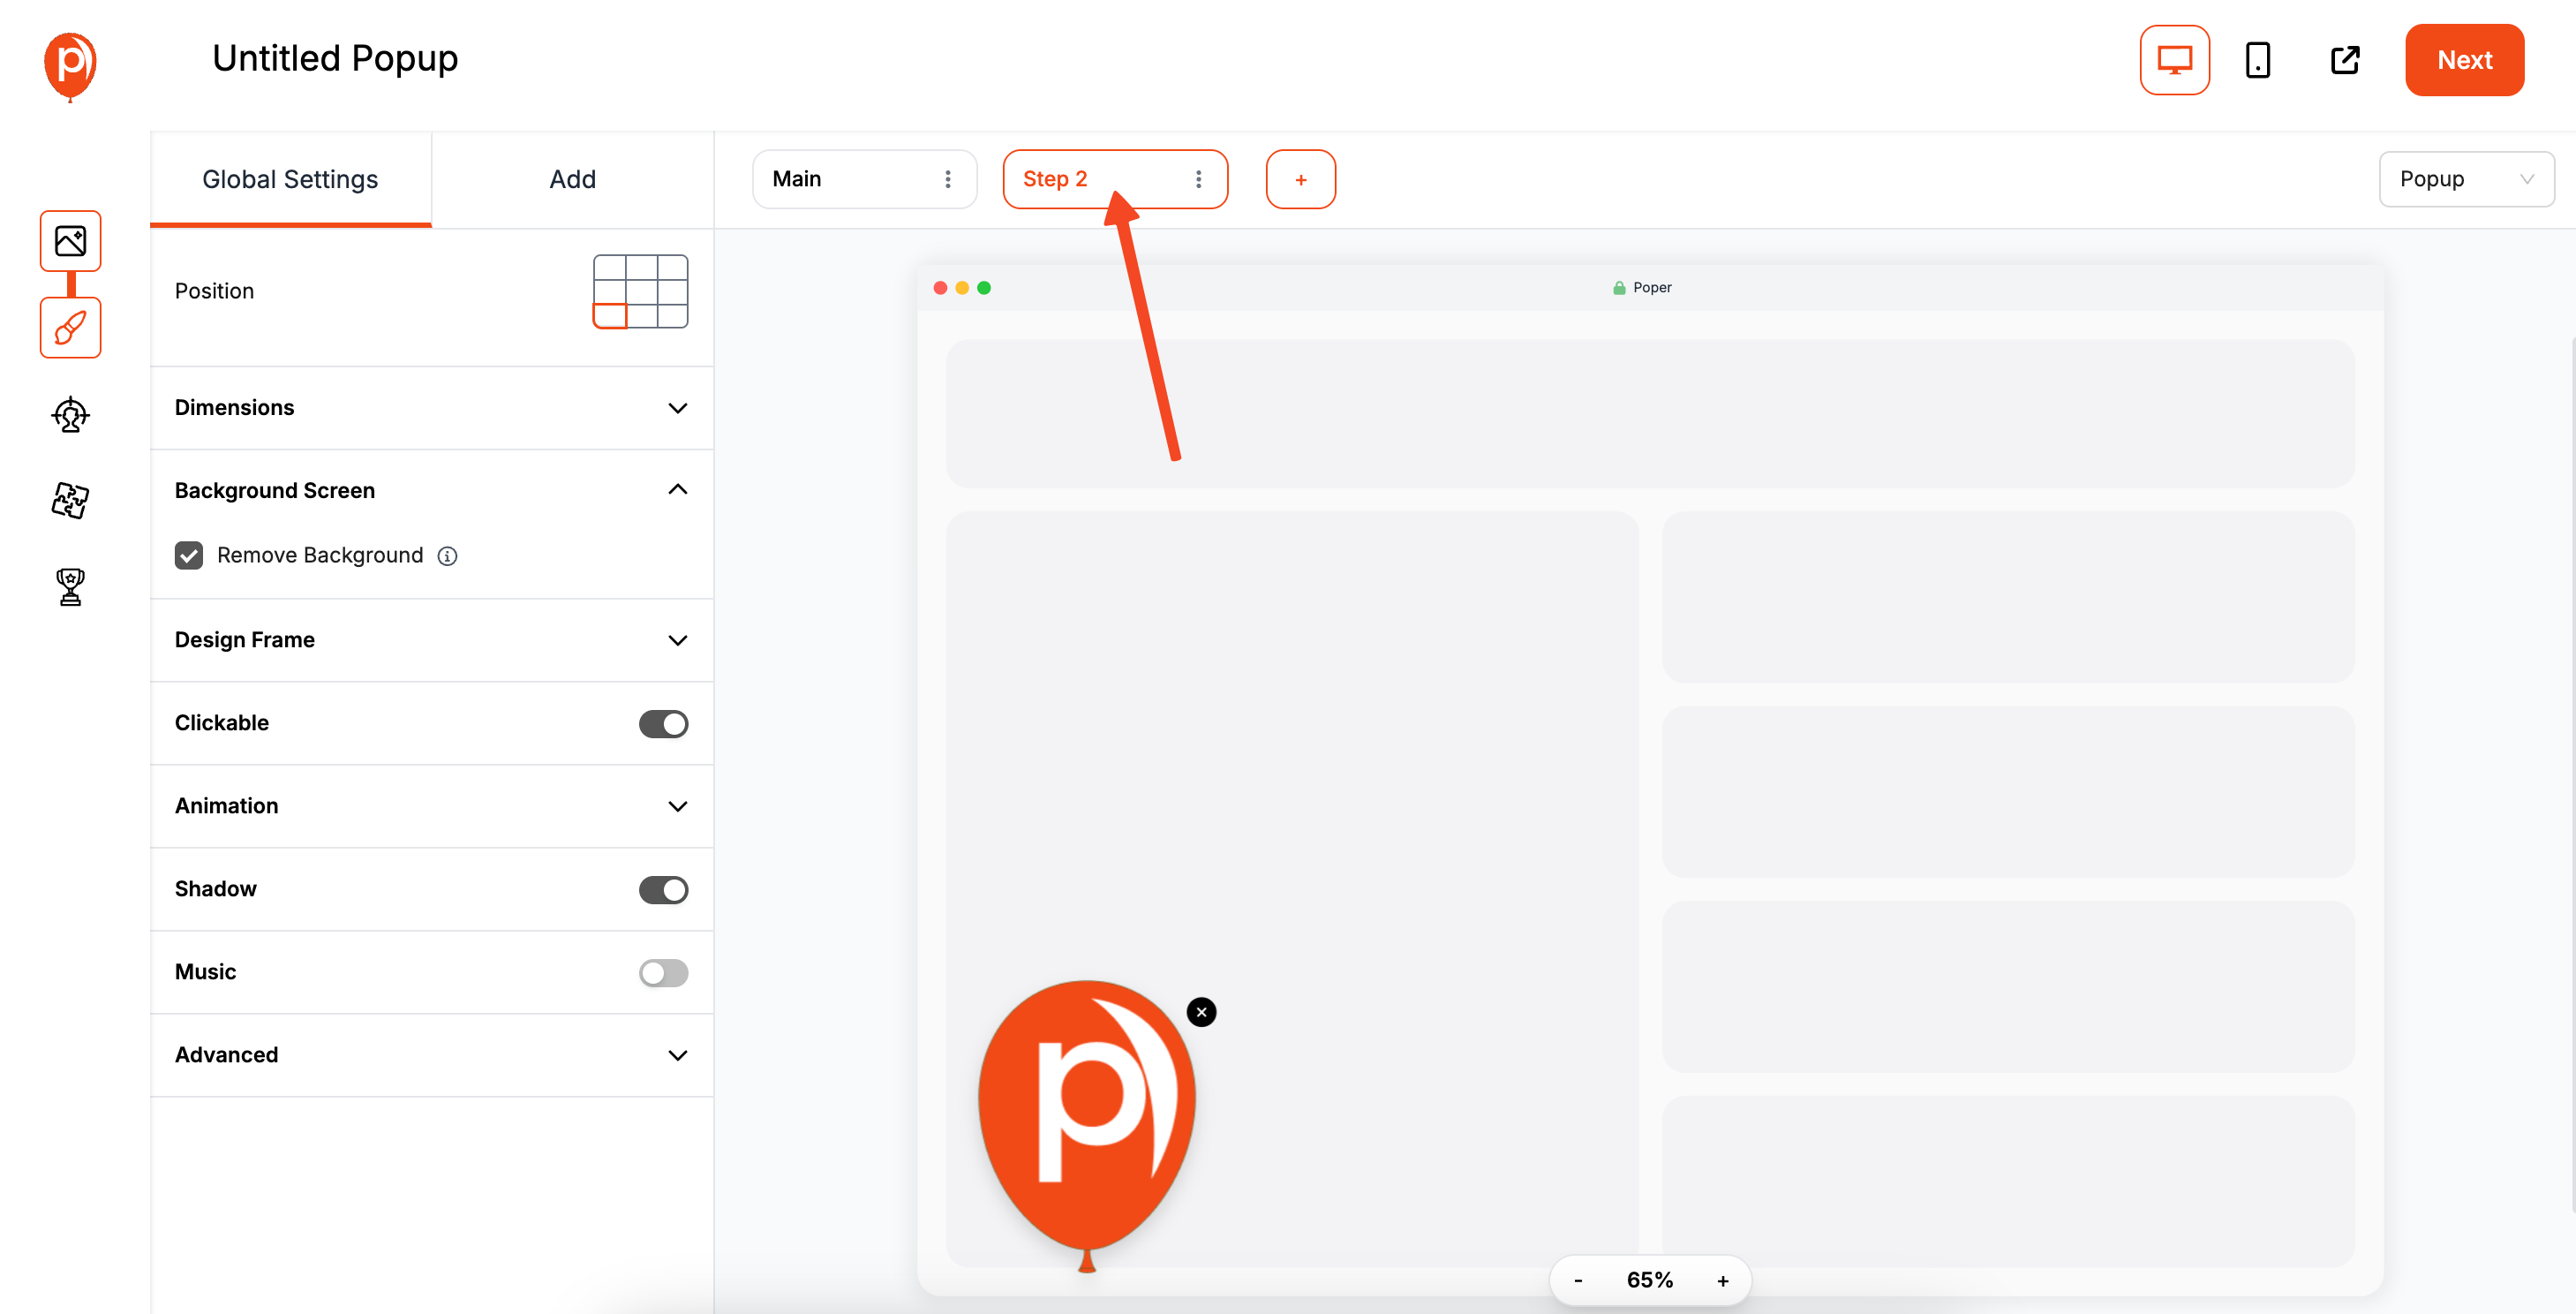
Click the plus icon (+) in the top bar to add a new step. We’ll call this "Step 2." Here, make the image larger so it's the main focus. If you want to learn more about making clickable images generate a popup, check the detailed guide on how to make a click on an image generate a popup.
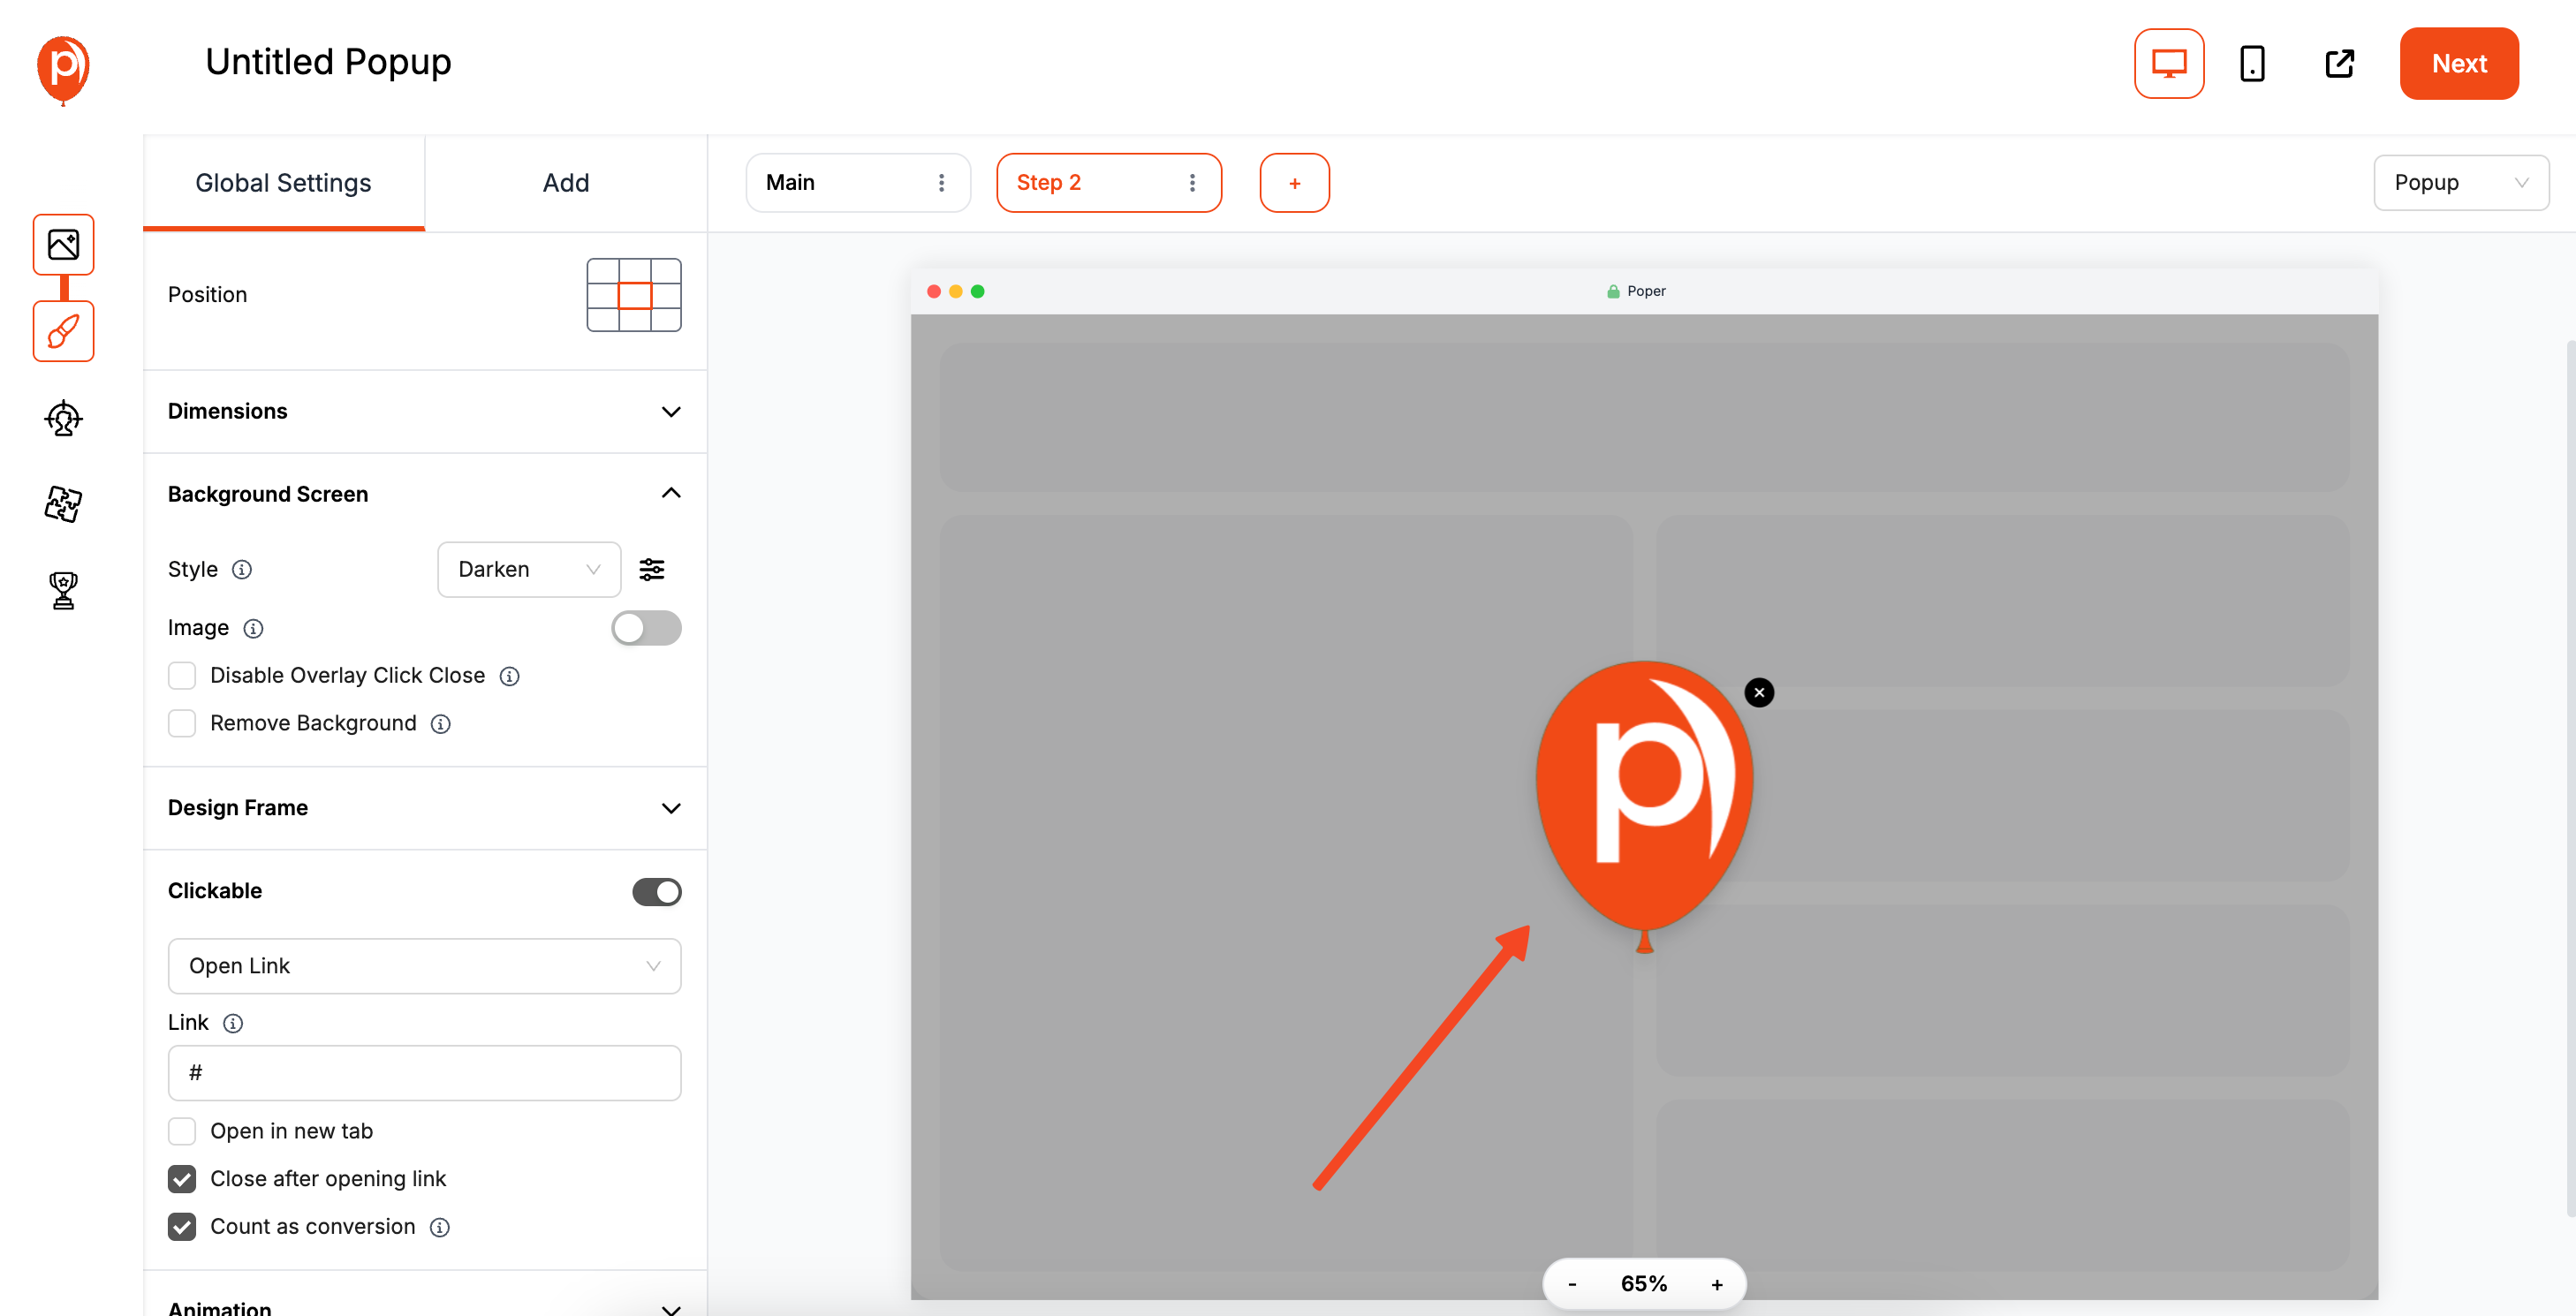
Just as importantly, turn the background screen back on for this step. This gives users a familiar way to close the large image by clicking outside of it.
Step 4: Make Your Widget Clickable
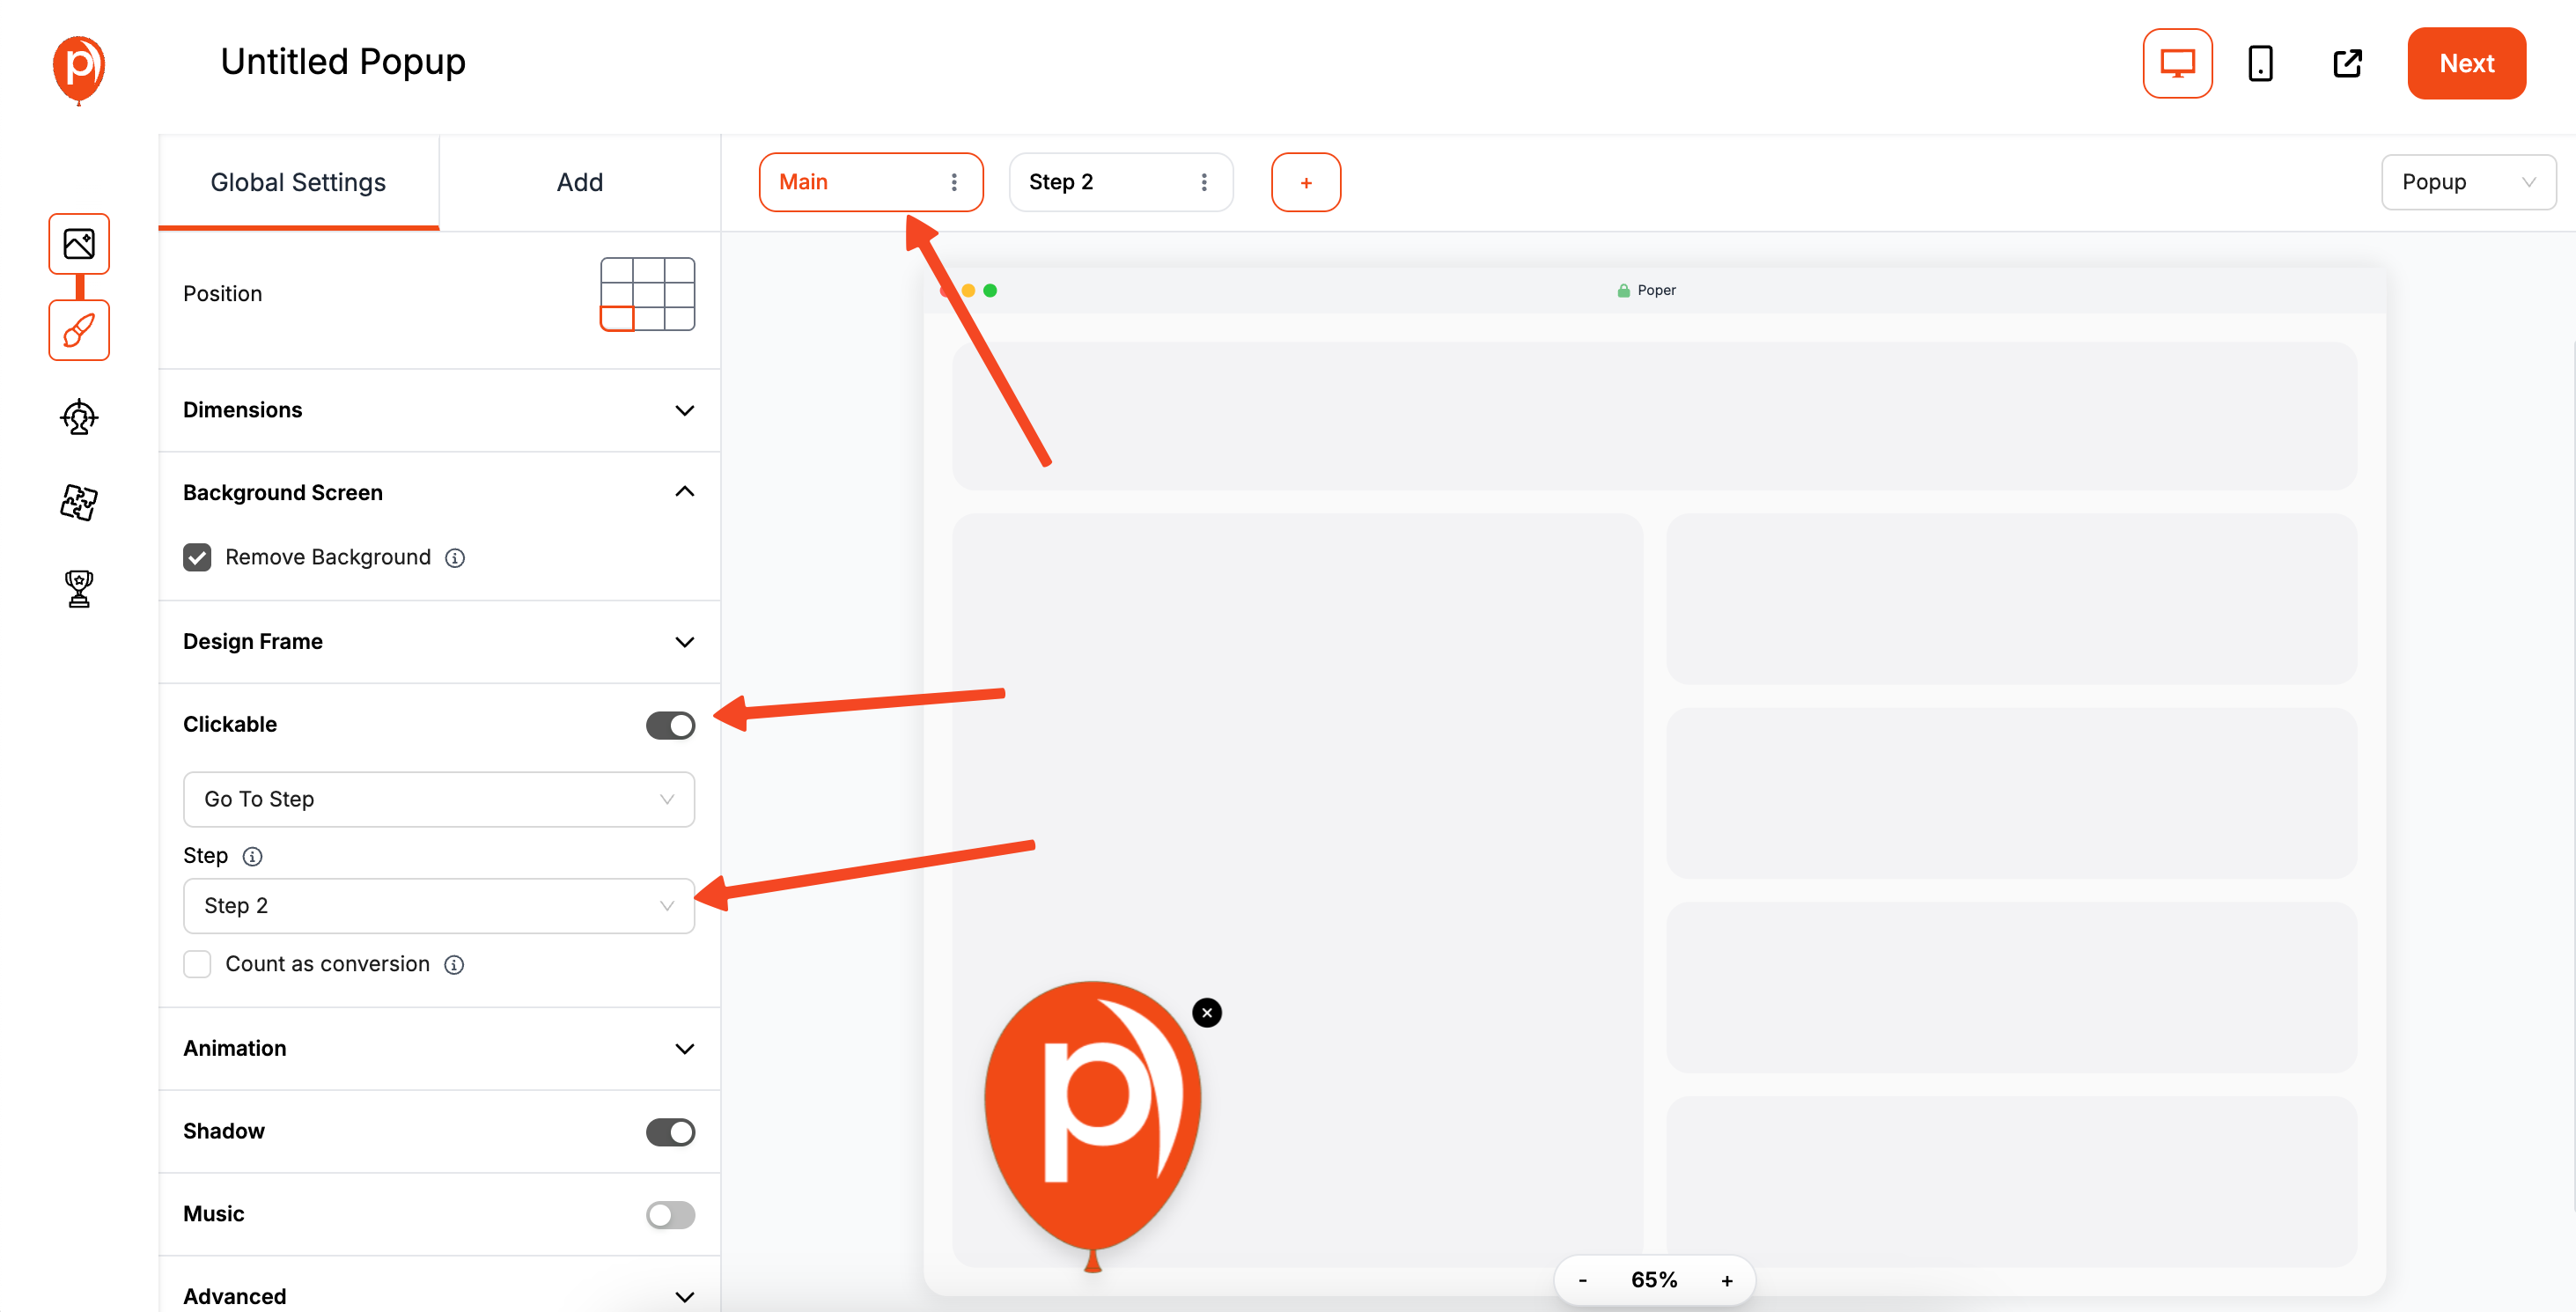
Now we need to connect the two steps. We want the small floating widget (Step 1) to open the large image (Step 2) when someone clicks it.
Go back to your main widget design in Step 1. In the settings for your image, turn on the Clickable option. From the dropdown menu, select Go To Step and then choose Step 2. It’s that simple. You’ve now created the interactive link between your widget and its expanded view.
Step 5: Choose Where and When Your Widget Appears

You have total control over who sees your widget and when. After clicking Next, you’ll see our trigger and display condition settings. Triggers determine when the widget appears (like immediately on page load), while Display Conditions determine where (like only on your blog pages).
For a widget, I usually recommend setting the trigger to On Page Load with a 0-second delay. Then, in Display Conditions, you can choose the specific pages where you want it to show up. This prevents it from appearing on pages where it might not be relevant, like a checkout or contact page. If you want to explore more about popups that appear on page load, read our guide on show popup on page load.
Step 6: Publish and Install Your Widget

Once you’re happy with the look and the targeting, click Save & Publish. Your widget is now live and ready to be installed!
To get it on your website, navigate to the Code section in your Poper dashboard. Add your domain if you haven’t already, and then use the Custom Code method. Just copy the single line of code we provide and paste it into your website's HTML, usually before the closing </head> tag.
And that’s it! Your custom photo widget will now be live on your site, ready to engage visitors in a new, visual way.
How to Make a Photo a Widget on Your Phone (iOS & Android)
This is the most common reason people search for this term. It's about personalizing your phone's home screen.
On an iPhone (iOS 14 and later)
You'll need a third-party app for this, as Apple's native Photos widget doesn't let you choose a specific picture. The most popular free app is Widgetsmith.
Step 1: Download Widgetsmith
Go to the App Store, search for "Widgetsmith," and download the app.
Step 2: Add a Photo to the Widgetsmith App
Open the Widgetsmith app.
You can create widgets in three sizes: Small, Medium, or Large. Tap "Add Small Widget," "Add Medium Widget," or "Add Large Widget" to start.
Tap on the new widget you just created to customize it.
Tap on the default style (e.g., "Date").
Scroll down to the "Custom" section and select "Photo."
Tap the "Selected Photo" tab at the bottom, then tap "Choose Photo" and select the image you want from your library.
Use the back arrow to return to the widget preview, then tap "Save." You can rename the widget to make it easier to find (e.g., "Family Photo").
Step 3: Add the Widgetsmith Widget to Your Home Screen
Go to your iPhone's home screen.
Press and hold on an empty area until the apps start to jiggle.
Tap the plus icon (+) in the top-left corner.
Scroll down and select Widgetsmith from the list of apps.
Choose the size of the widget you created (Small, Medium, or Large) and tap "Add Widget."
The widget will appear on your home screen. If it's not showing the correct photo, tap the widget while the icons are still jiggling.
Tap on the "Widget" field and select the named widget you created in Step 2 (e.g., "Family Photo").
Tap outside the options and then tap "Done." Your photo widget is now set up!
On an Android Phone
Most modern Android phones have a built-in Photos or Gallery widget that makes this process much easier.
Press and hold on an empty space on your home screen.
Tap on "Widgets" from the menu that appears.
Scroll through the list of available widgets until you find "Photos," "Google Photos," or your phone's native "Gallery" app.
Press and hold the widget you want (e.g., "Your memories" or a simple "Photo frame") and drag it to your desired spot on the home screen.
The widget will often prompt you to select a specific photo or album to display. Choose your photo, and you're done!
Conclusion
Knowing how to make a photo a widget allows you to personalize your digital environment and create more engaging experiences.
For your iPhone or Android, third-party apps like Widgetsmith or built-in Photos widgets make it easy to add a personal touch to your home screen.
For WordPress websites, the native Image block is a simple and effective way to add photos to your sidebars and footers.
For any website, using a creative tool like Poper allows you to build advanced, interactive photo widgets that can showcase images in a dynamic and user-friendly way.
By choosing the right tool for the right platform, you can easily turn any photo into a functional and beautiful widget.
Frequently Asked questions (FAQ)
Why can't I choose a specific photo for the native Photos widget on my iPhone?
Apple's native Photos widget is designed to surface "Featured Photos" and "Memories" curated by the Photos app's algorithm. To display a single, specific photo of your choice, you need to use a third-party app like Widgetsmith or Photo Widget.
Will a photo widget slow down my website?
A single, well-optimized image will have a negligible impact on your site speed. Always make sure your images are compressed for the web to ensure fast loading times, whether you're adding them via WordPress or a tool like Poper.
Can I link the photo in my WordPress image widget to another page?
Yes. When you add an Image block in the WordPress widget editor, there is an option to "Insert link." You can link it to any internal or external URL.
What is the benefit of making a photo a clickable widget on a website?
It saves valuable screen space. You can display a small, unobtrusive thumbnail or icon (the widget) that doesn't clutter the page. Users who are interested can then click it to see the full-size image in a lightbox or popup, creating a clean and interactive experience.
Can I add text or other elements to the Poper photo widget?
Yes. The Poper editor is a free-form canvas. You can add text boxes, buttons, or other graphics alongside your image in both "Step 1" (the widget view) and "Step 2" (the popup view) to create a more detailed and interactive campaign.

