
For e-commerce businesses running on Shopify and leveraging Klaviyo for powerful email marketing and customer segmentation, capturing leads directly from your storefront is paramount. A Klaviyo Popup for Shopify is a highly effective tool to grow your email list, announce promotions, and recover abandoning visitors.
This guide will explore two primary methods to implement popups on your Shopify store that feed directly into your Klaviyo account:
Using Klaviyo's native Sign-up Forms specifically designed for and deeply integrated with Shopify.
Employing a specialized popup builder like Poper, which offers extensive design and triggering capabilities, and then seamlessly integrating it with both Shopify and Klaviyo.
Why Use a Klaviyo Popup on Your Shopify Store?
Grow Your Email List: Directly capture email addresses from Shopify visitors and add them to your Klaviyo lists for targeted campaigns.
Increase Sales: Offer discounts, free shipping, or promotions via popups to encourage purchases.
Reduce Cart Abandonment: Use exit-intent popups to re-engage shoppers before they leave.
Personalized Offers: Segment subscribers in Klaviyo based on how they signed up and send tailored follow-up emails.
Seamless Integration: Keep your e-commerce (Shopify) and email marketing (Klaviyo) platforms tightly synced.
Method 1: Using Poper for Advanced Popups on Shopify, Integrated with Klaviyo
First things first, let’s build the popup inside your Poper account. This is where you’ll handle the design and connect everything to Klaviyo before we touch your Shopify store.
Step 1: Choose a Template That Fits Your Brand
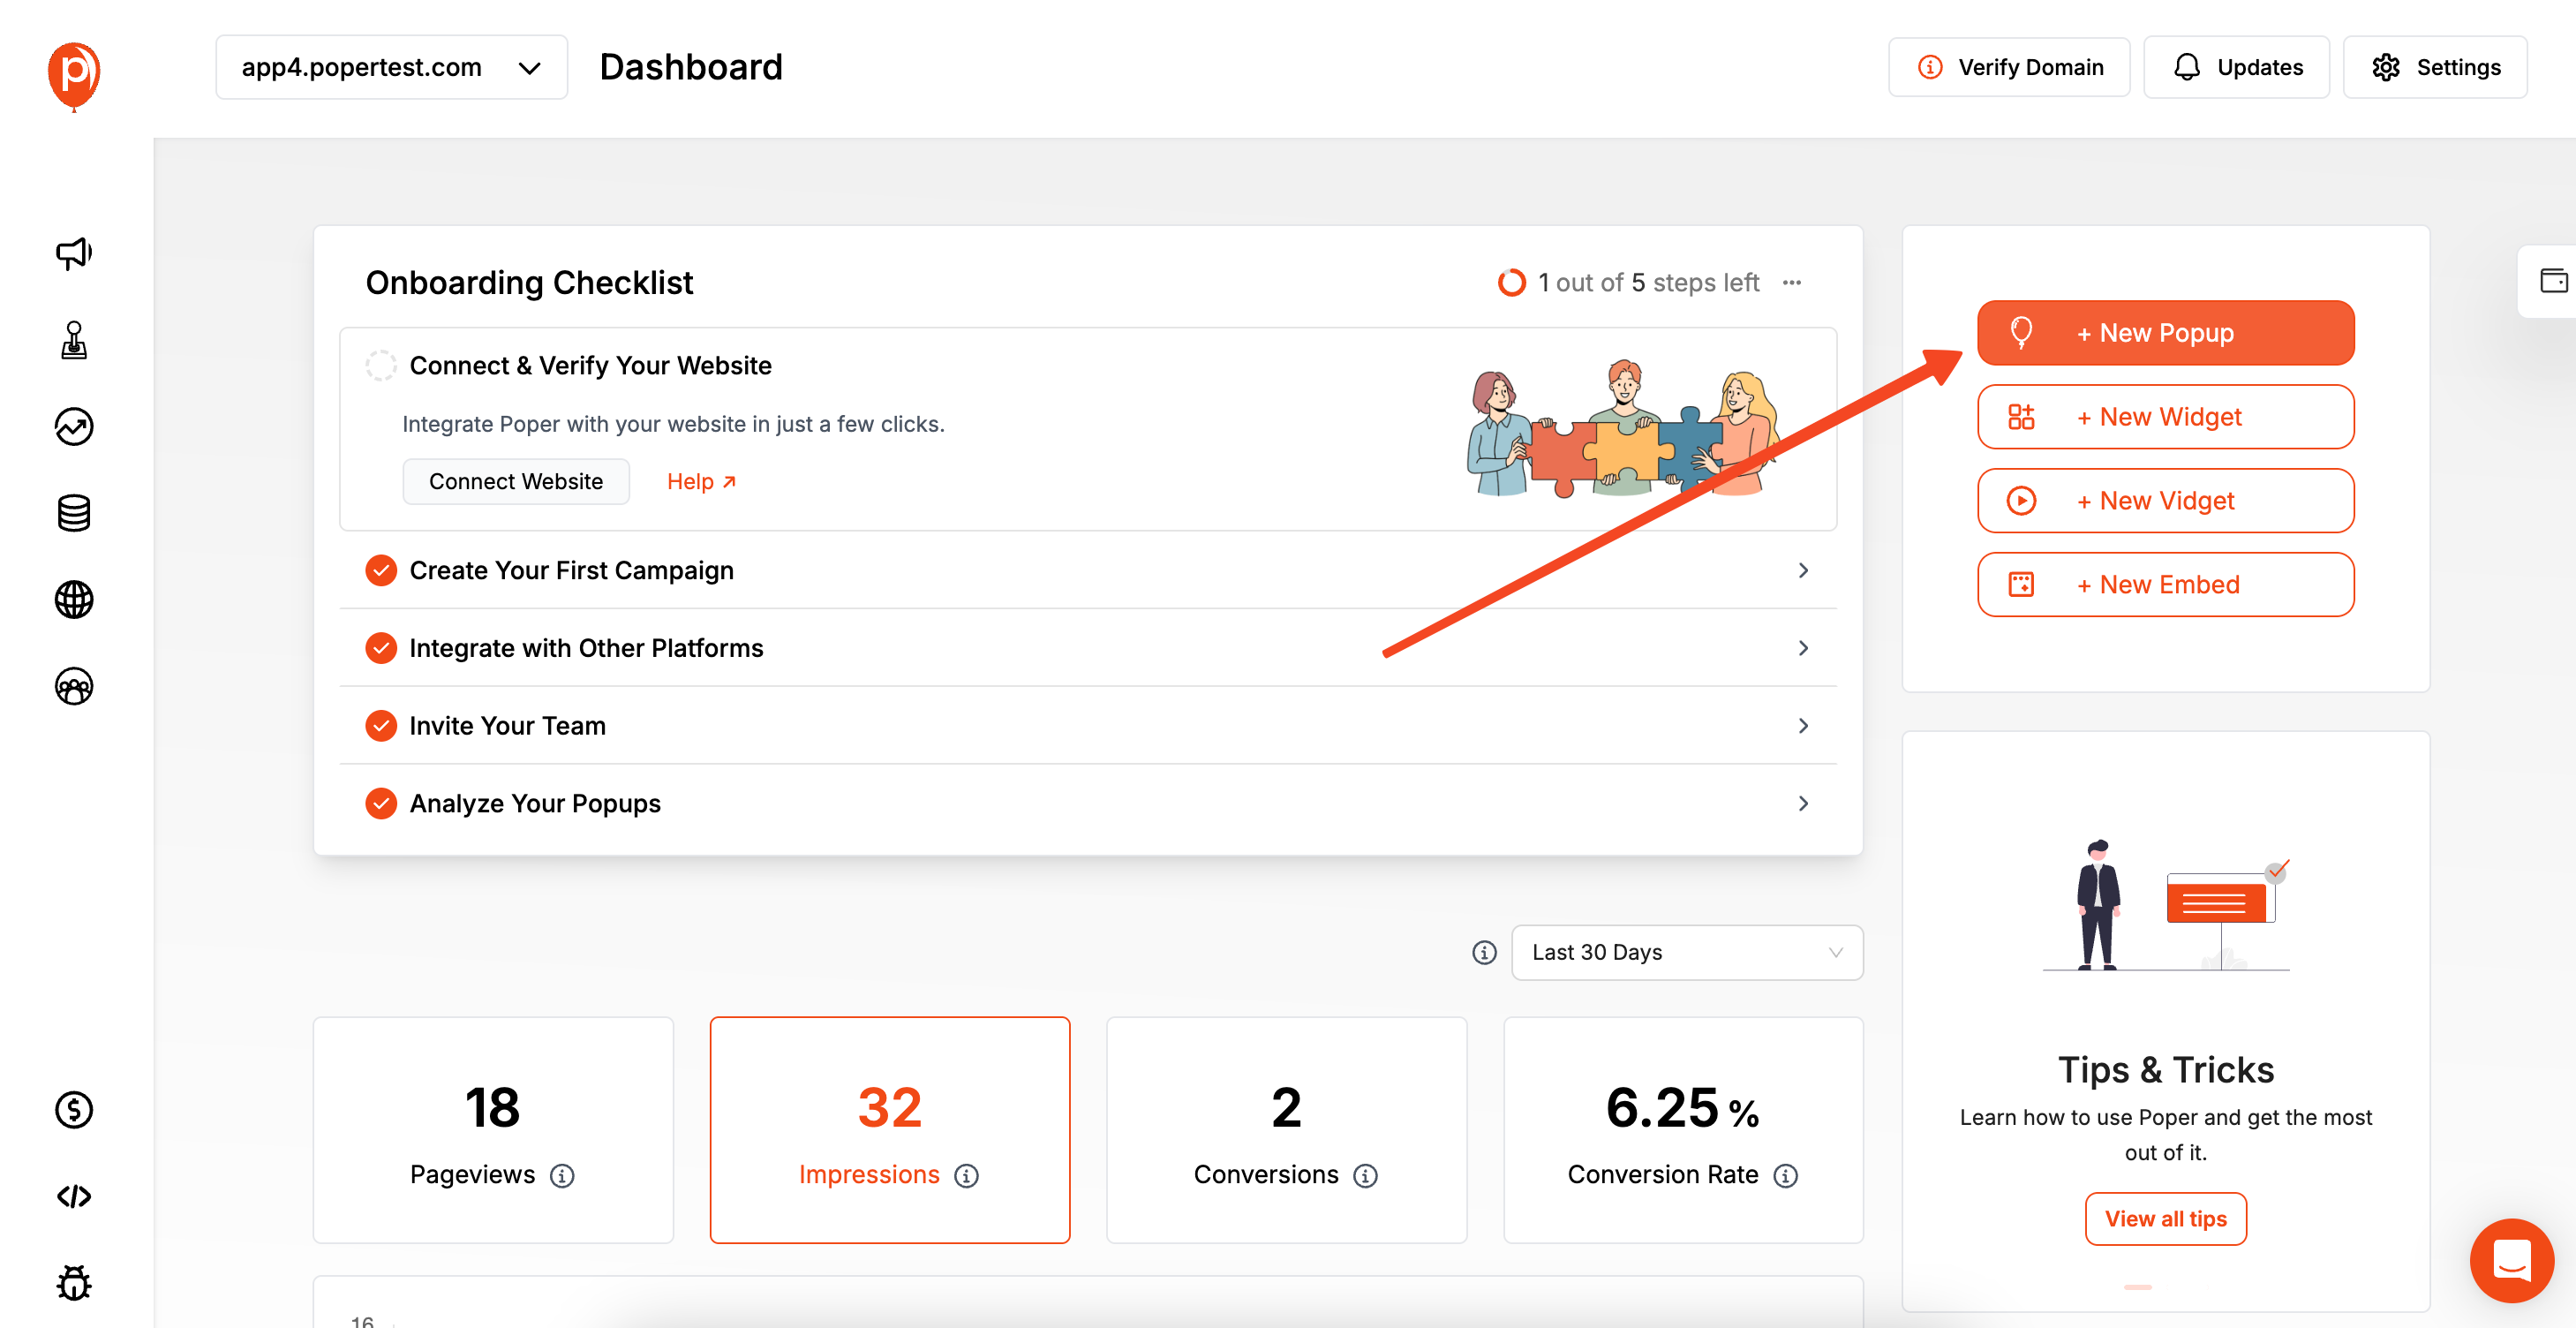
After logging into Poper and adding your store’s domain, click the "New Popup" button. I always recommend you "Choose From Templates." We've designed hundreds of them to give you a head start. In the search bar, just type "newsletter" and pick one that matches your store’s style.
Starting with a template saves you time because the layout and core elements are already in place. You’re not starting from a blank screen, which makes the next step much faster.
Step 2: Customize Your Popup’s Design
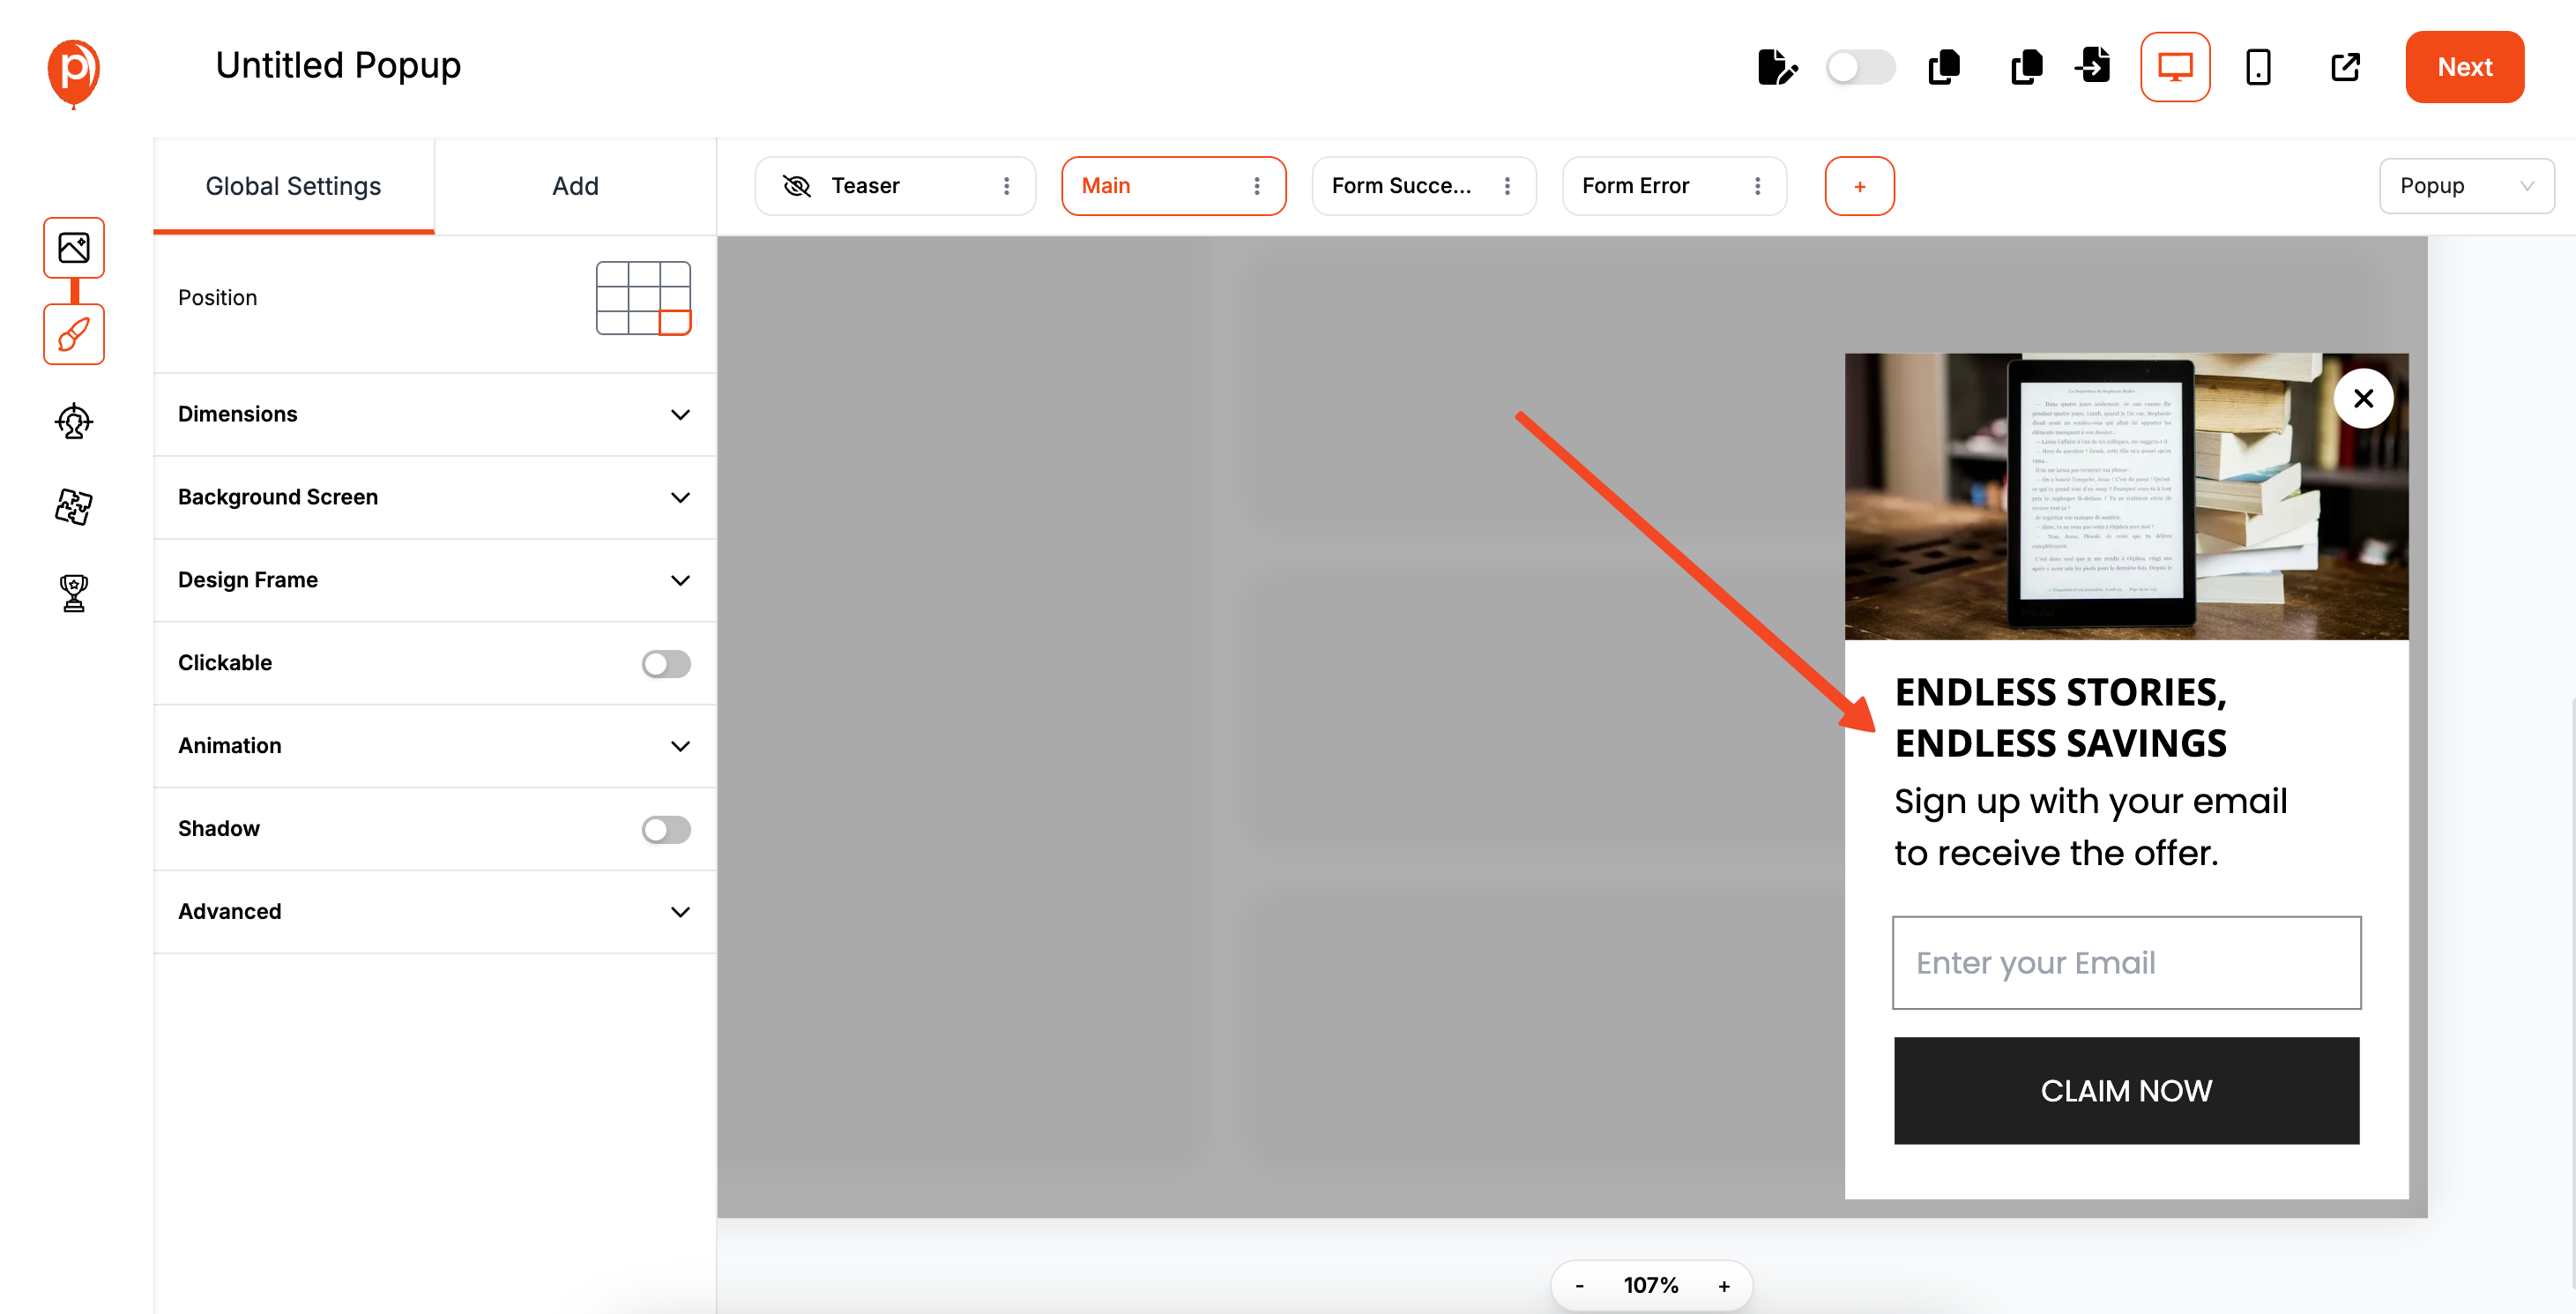
This will take you to our popup editor. Here, you can click on any element—text, buttons, images—to change it. Head over to the ‘Design Settings’ to adjust the fonts and color palette to perfectly match your brand.
A common mistake I see is overcrowding a popup. Keep it simple: a compelling headline, a short description, and the email field. This clarity is what gets people to sign up. Once it looks good, click "Next."
Step 3: Set Your Display Rules
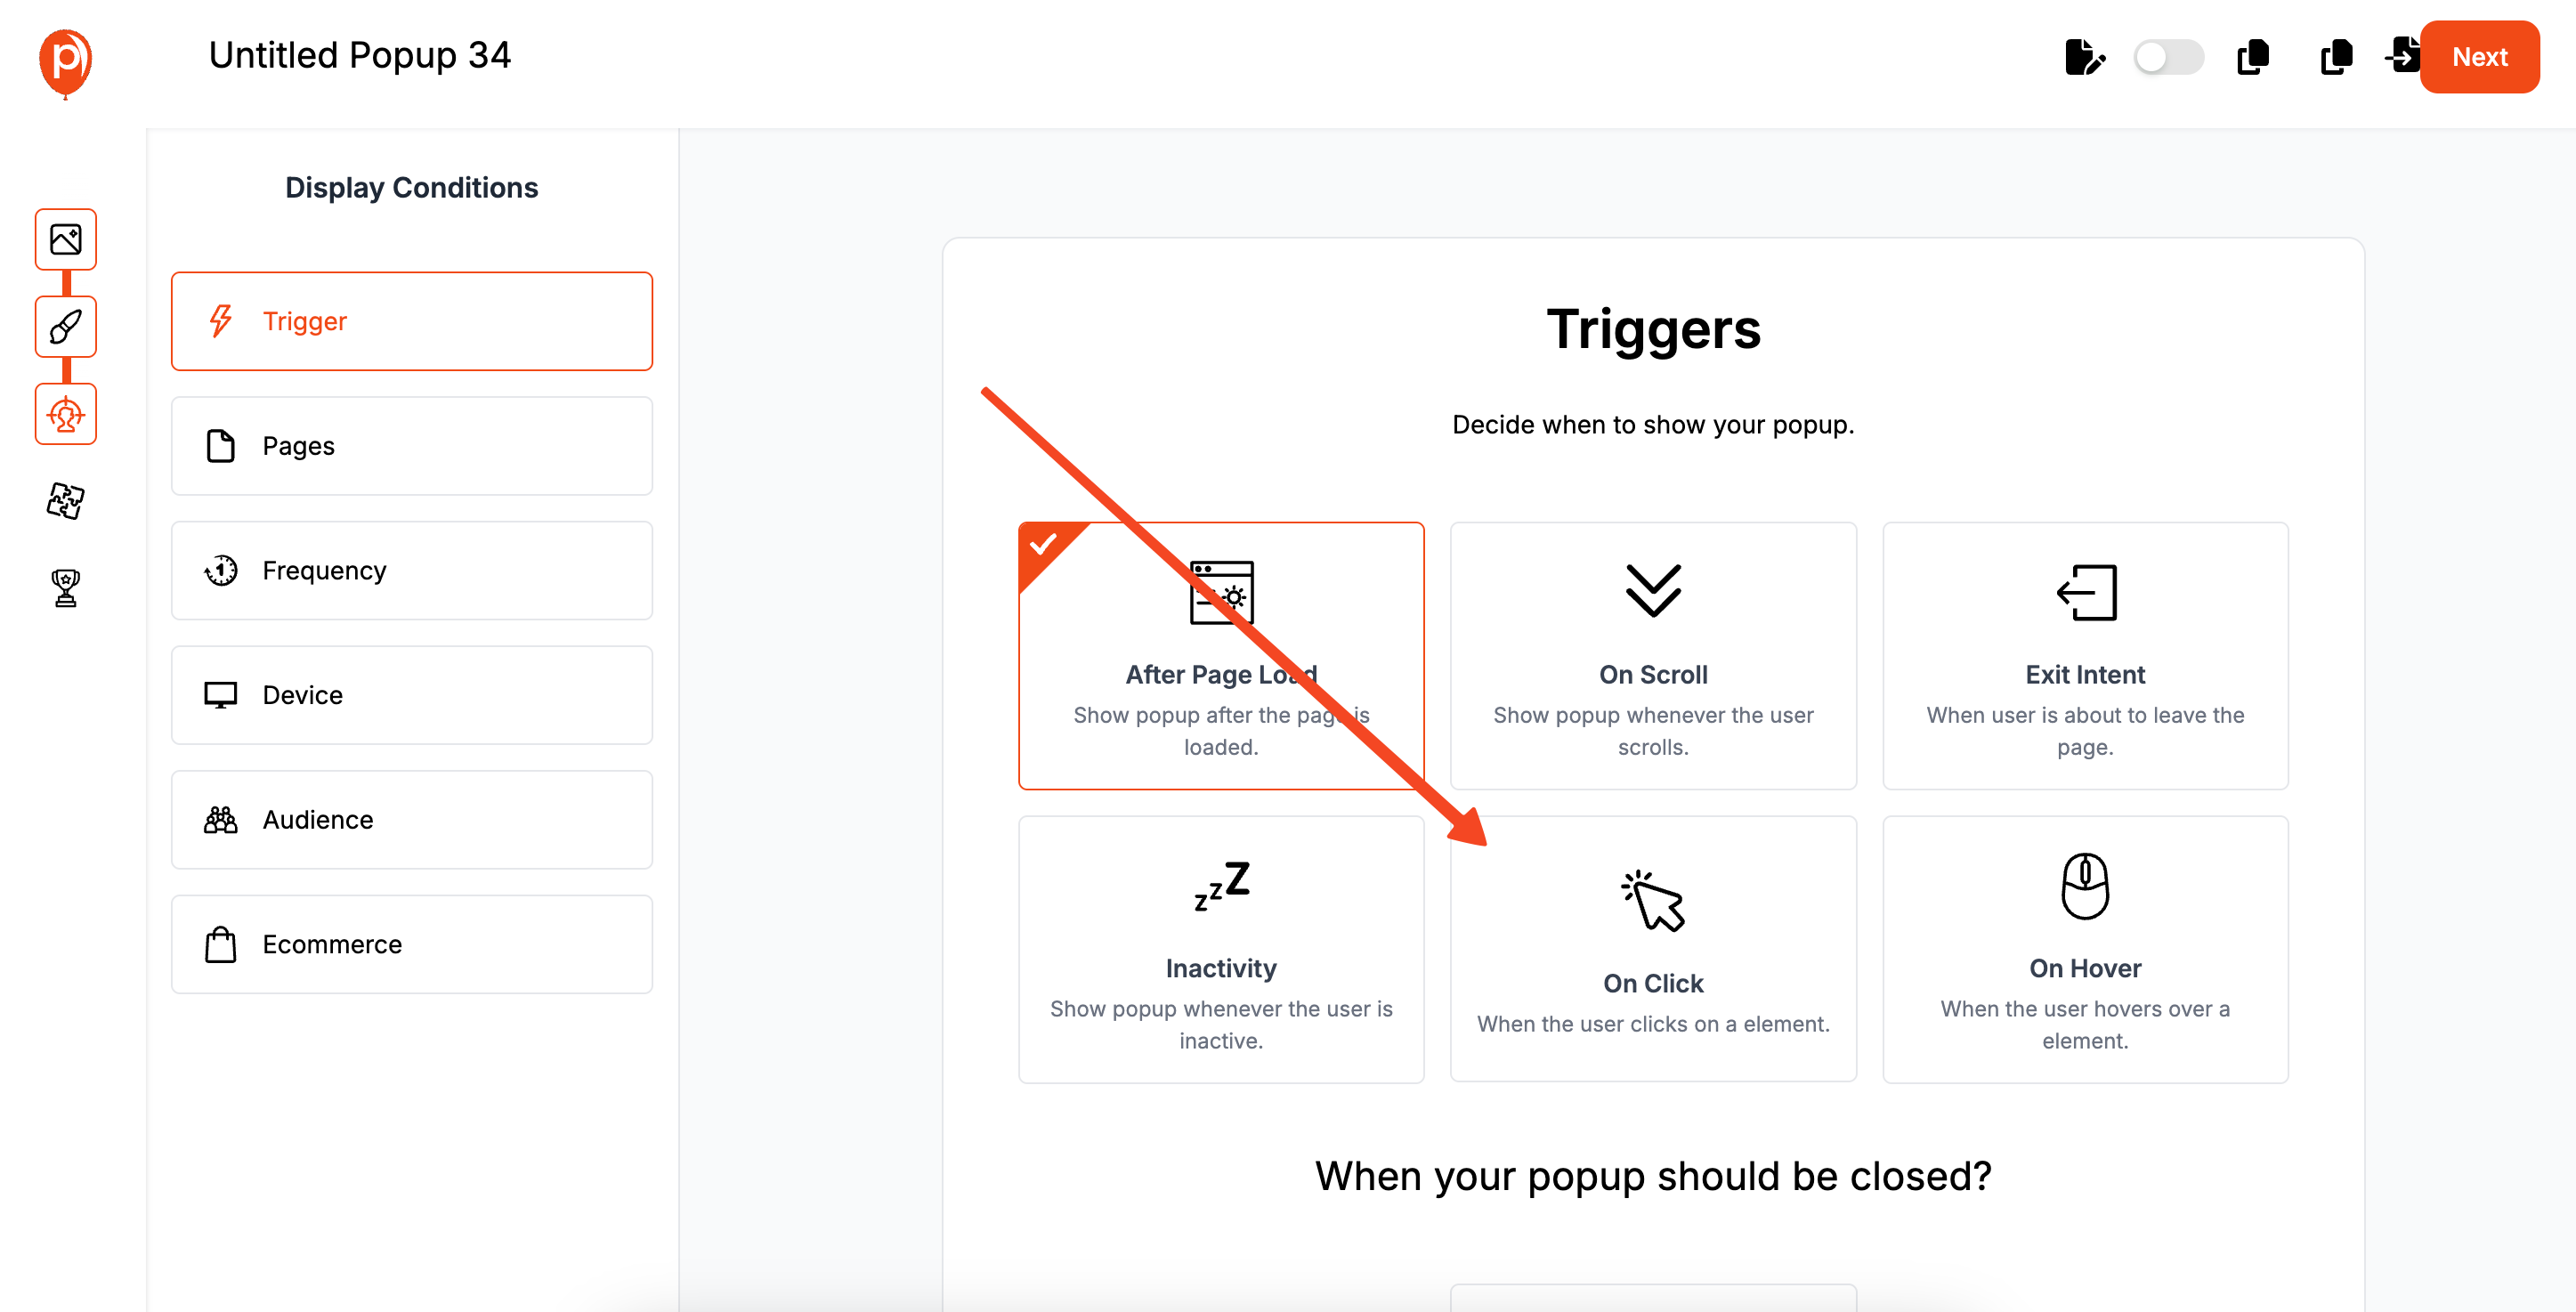
On the next screen, you’ll find the "Display Conditions." This is where the magic happens. You can decide to show the popup only on certain pages, after a visitor has been on your site for 10 seconds, or even when they are about to leave.
Setting these rules is crucial. It ensures your popup feels helpful, not annoying. For a newsletter signup, showing it after a visitor has browsed a page or two is a great strategy.
Step 4: Connect Poper to Your Klaviyo Account
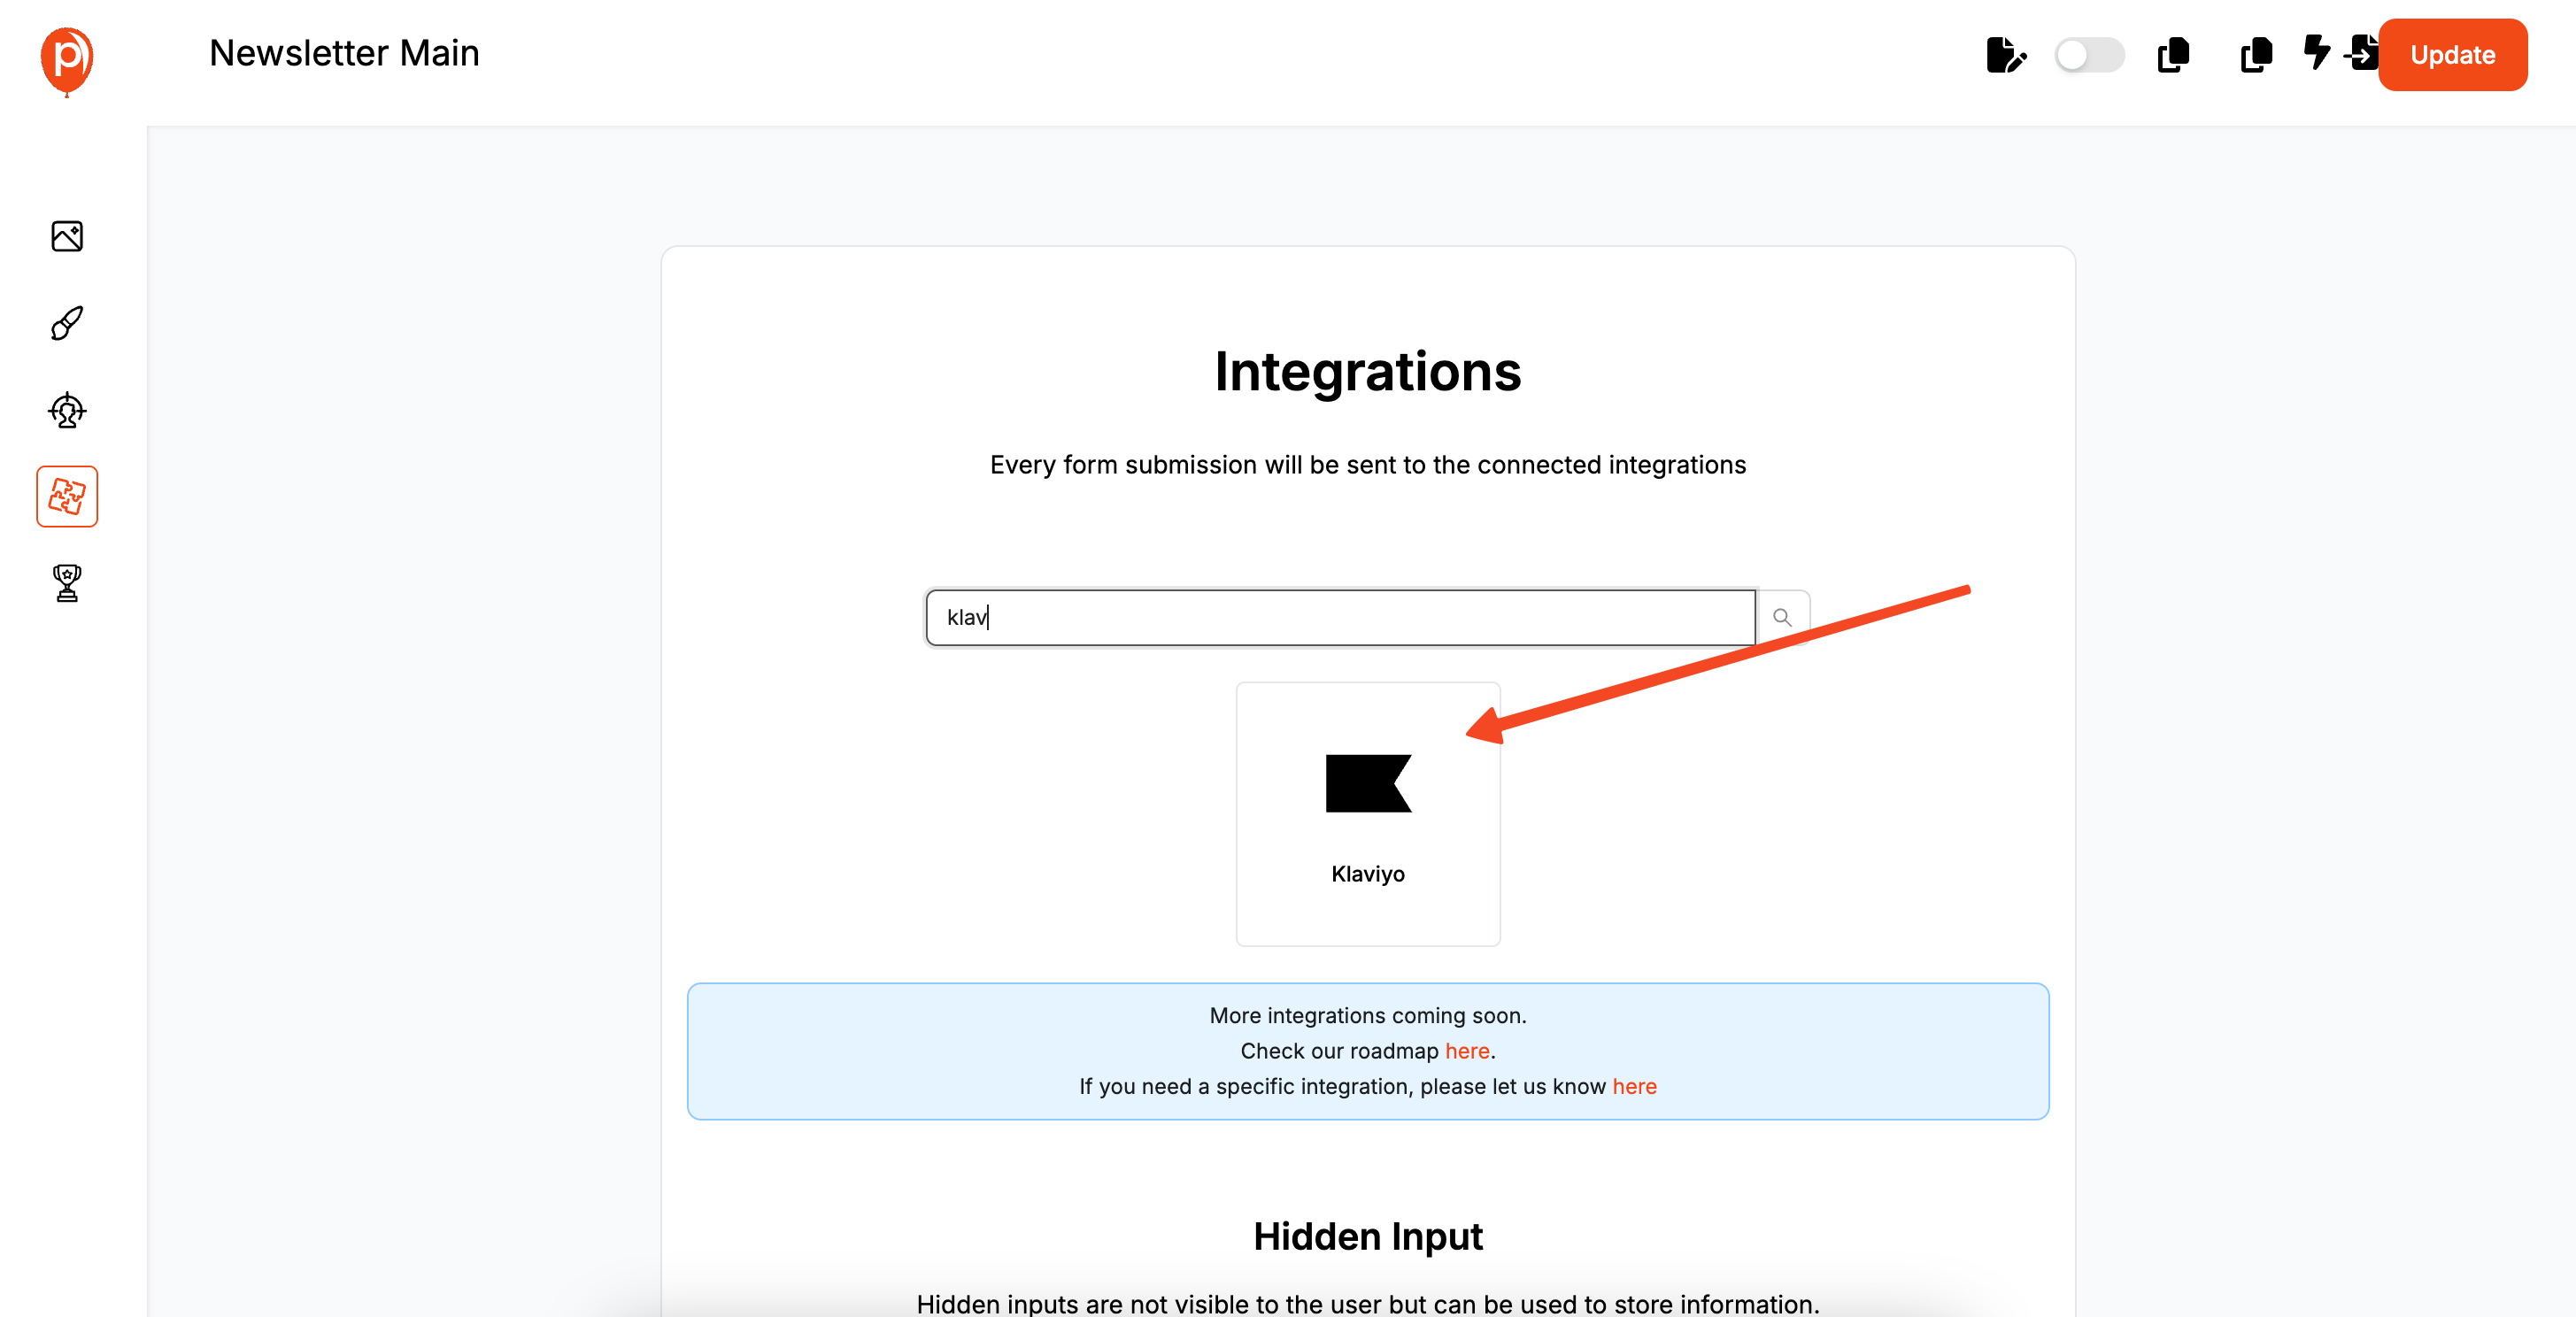
Now, click "Next" to go to the "Integrations" tab and select Klaviyo from the list. We’ll ask for an account name—this is just for your reference inside Poper (e.g., "My Store's Klaviyo"). After that, a window will pop up asking you to log in to your Klaviyo account to securely connect it.
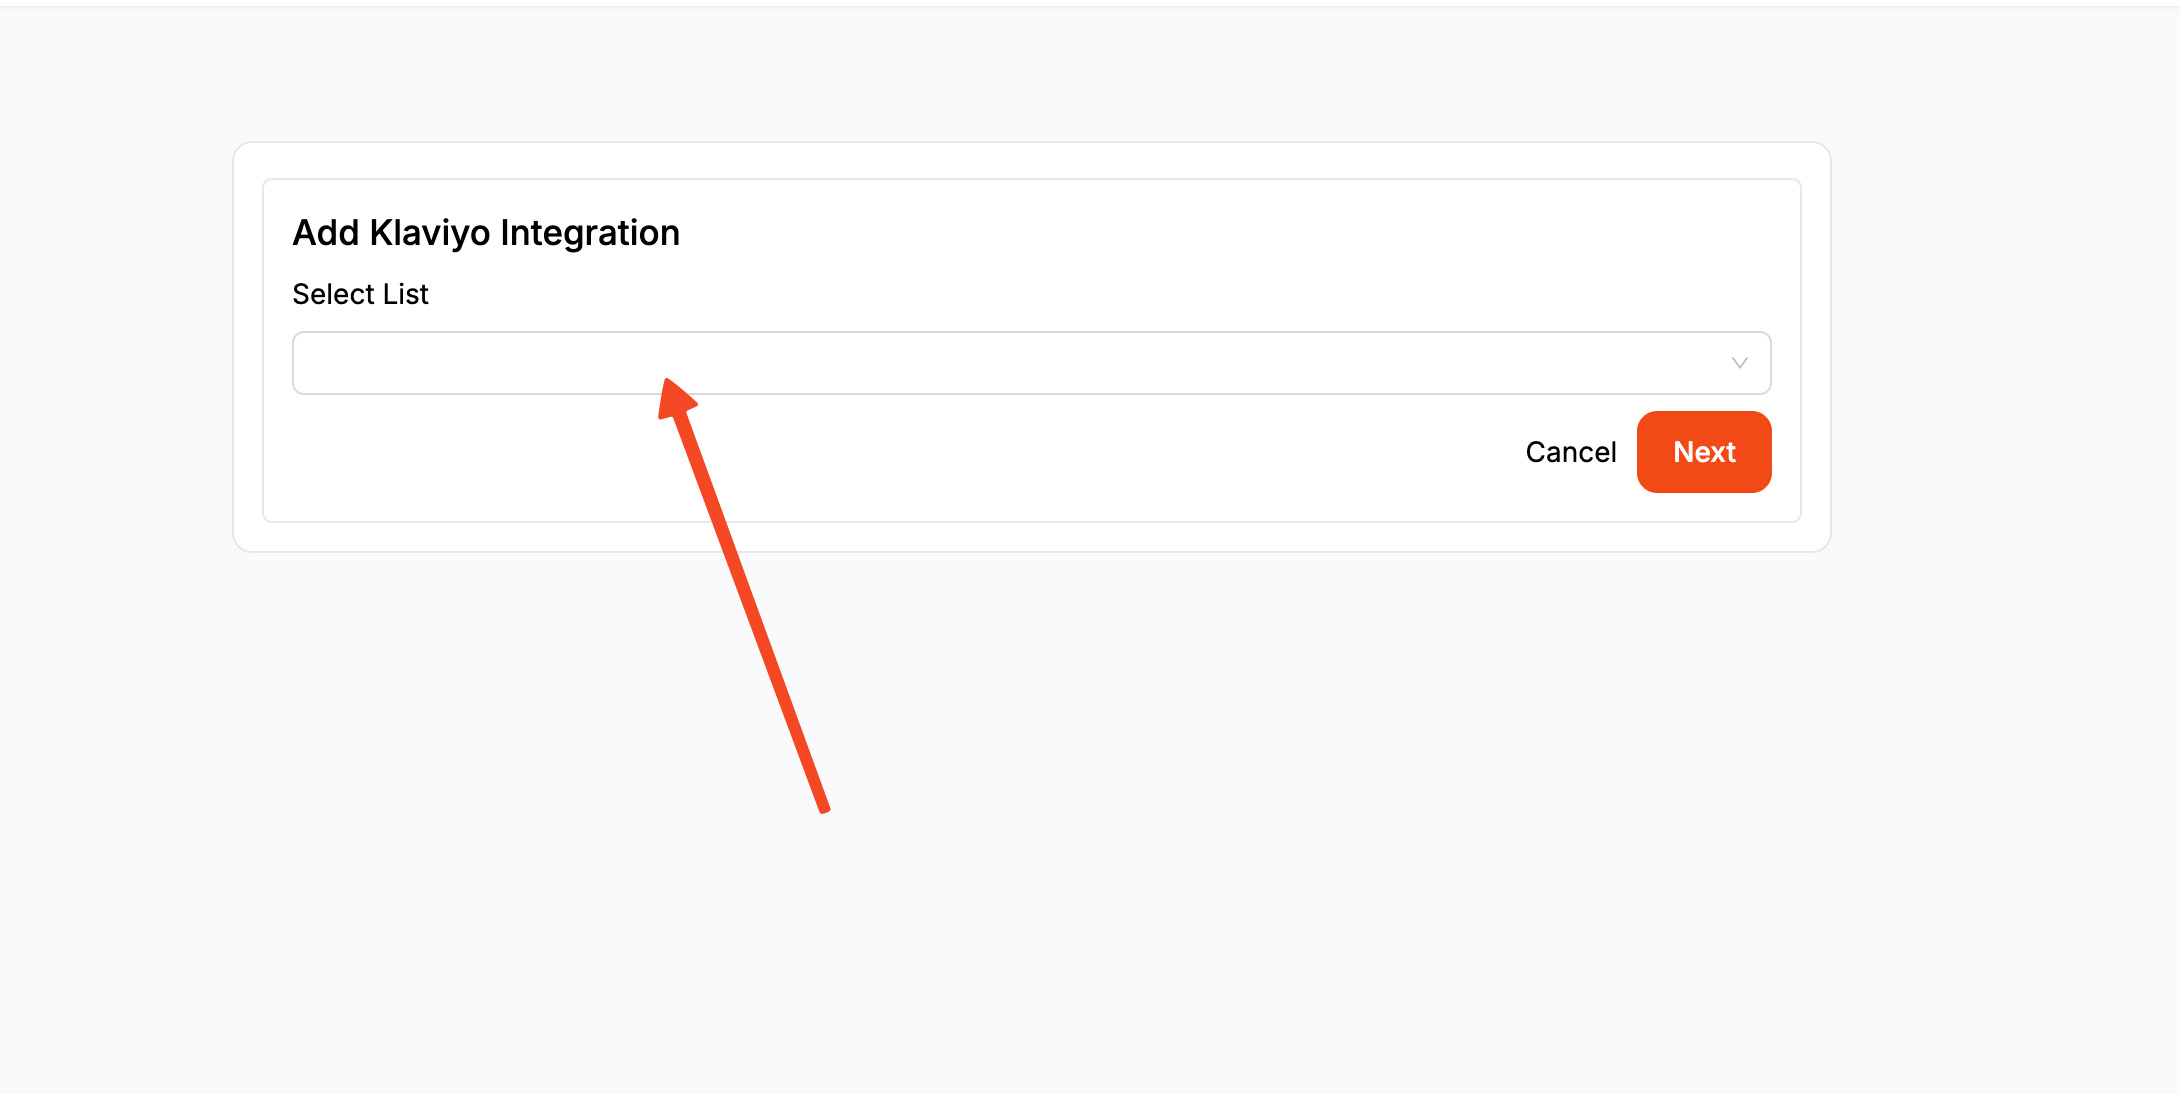
Once connected, you can select the exact Klaviyo list where you want your new contacts to go. You can even add tags, like "popup-signup," so you know exactly where these leads came from.
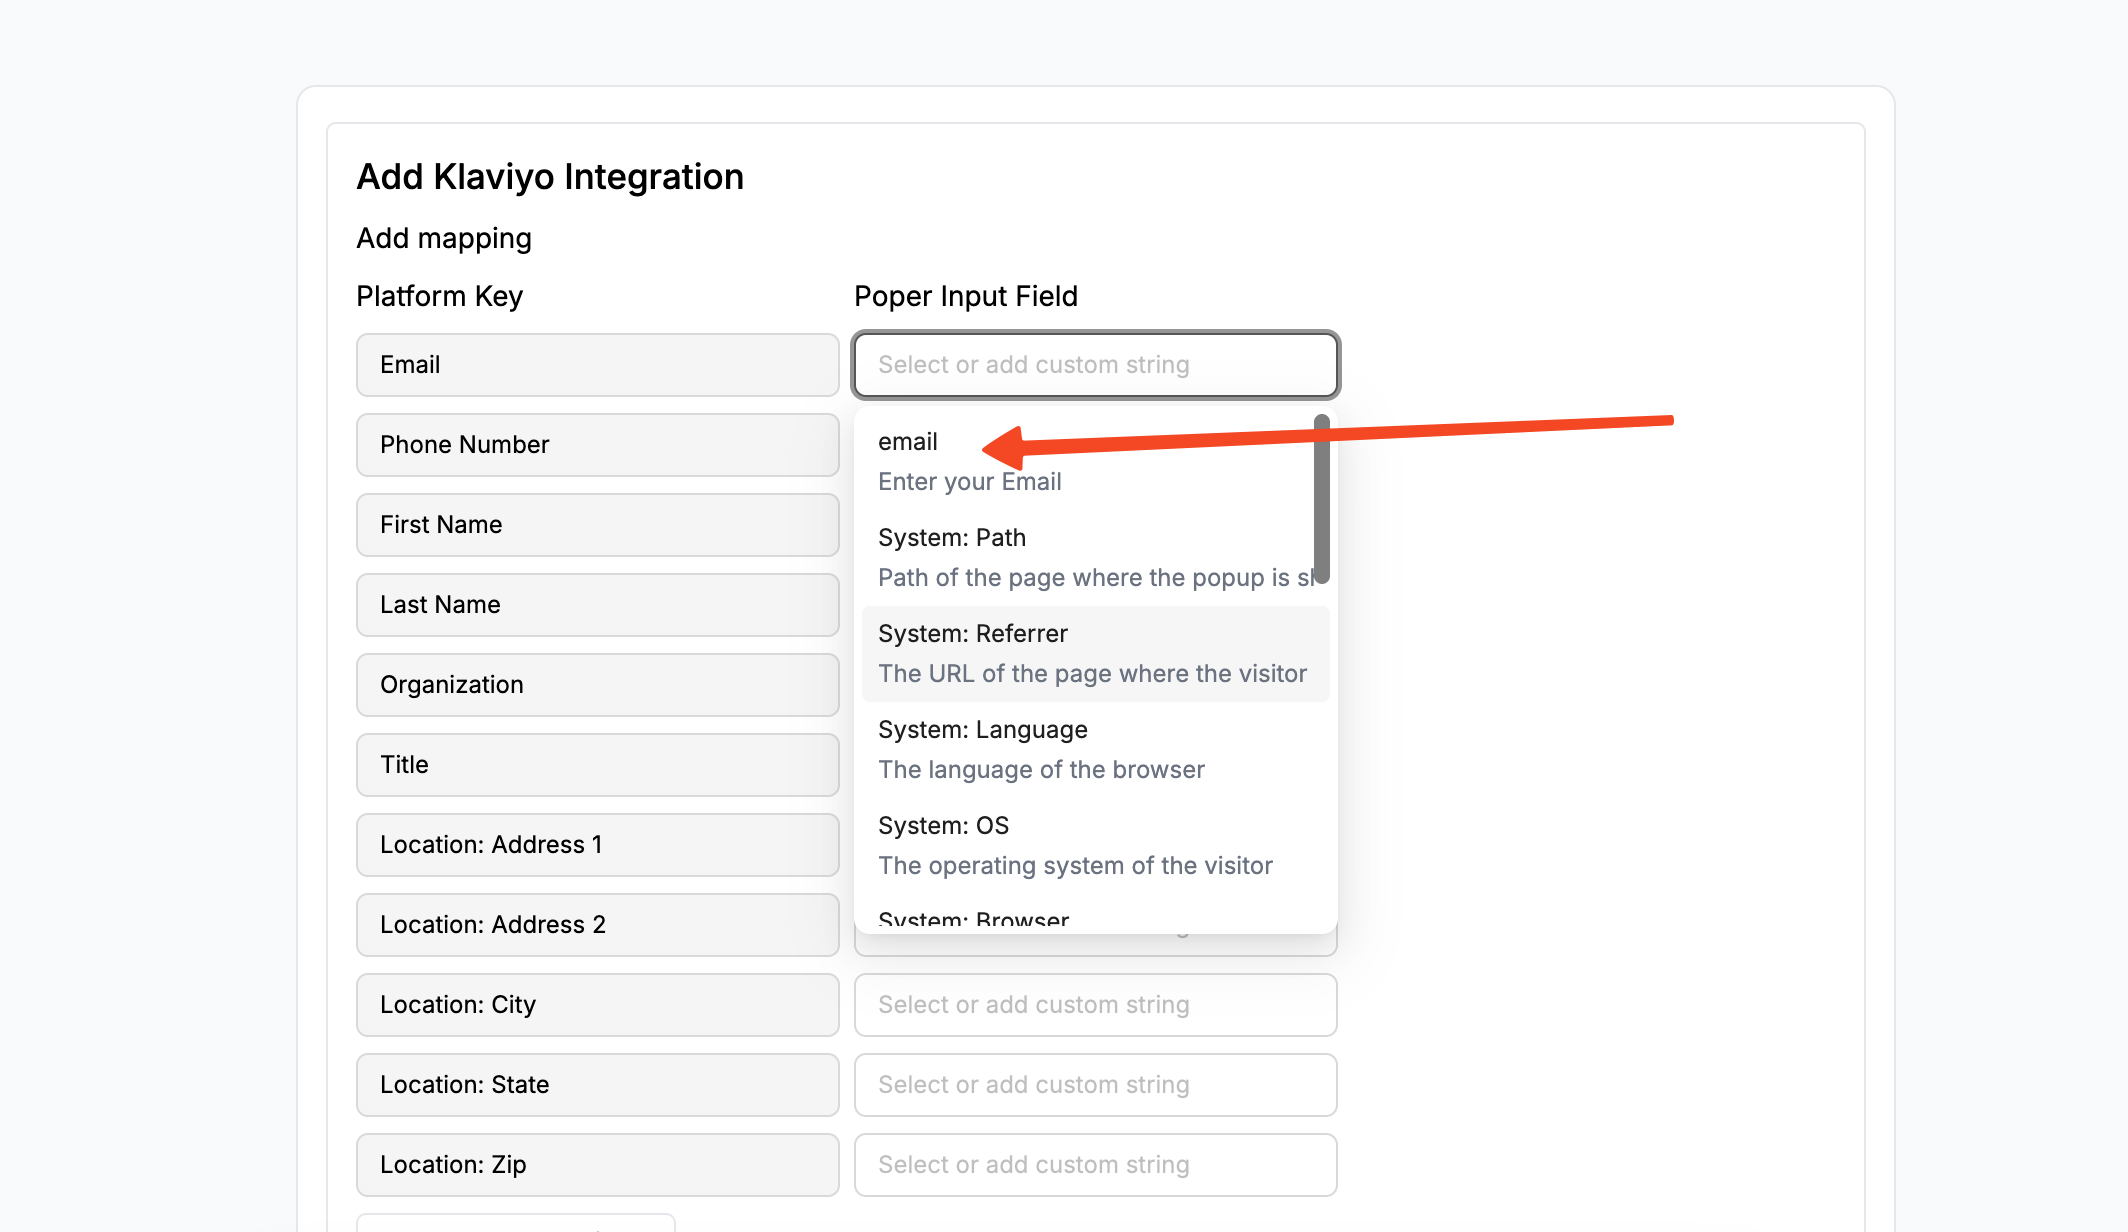
Finally, you’ll map the fields. This just means telling Poper that the "email" field in your popup should go to the "email" field in Klaviyo.
If you need a more detailed walkthrough of this step, we have a specific guide right here: Klaviyo Integration Guide.
Step 5: Save and Publish Your Campaign
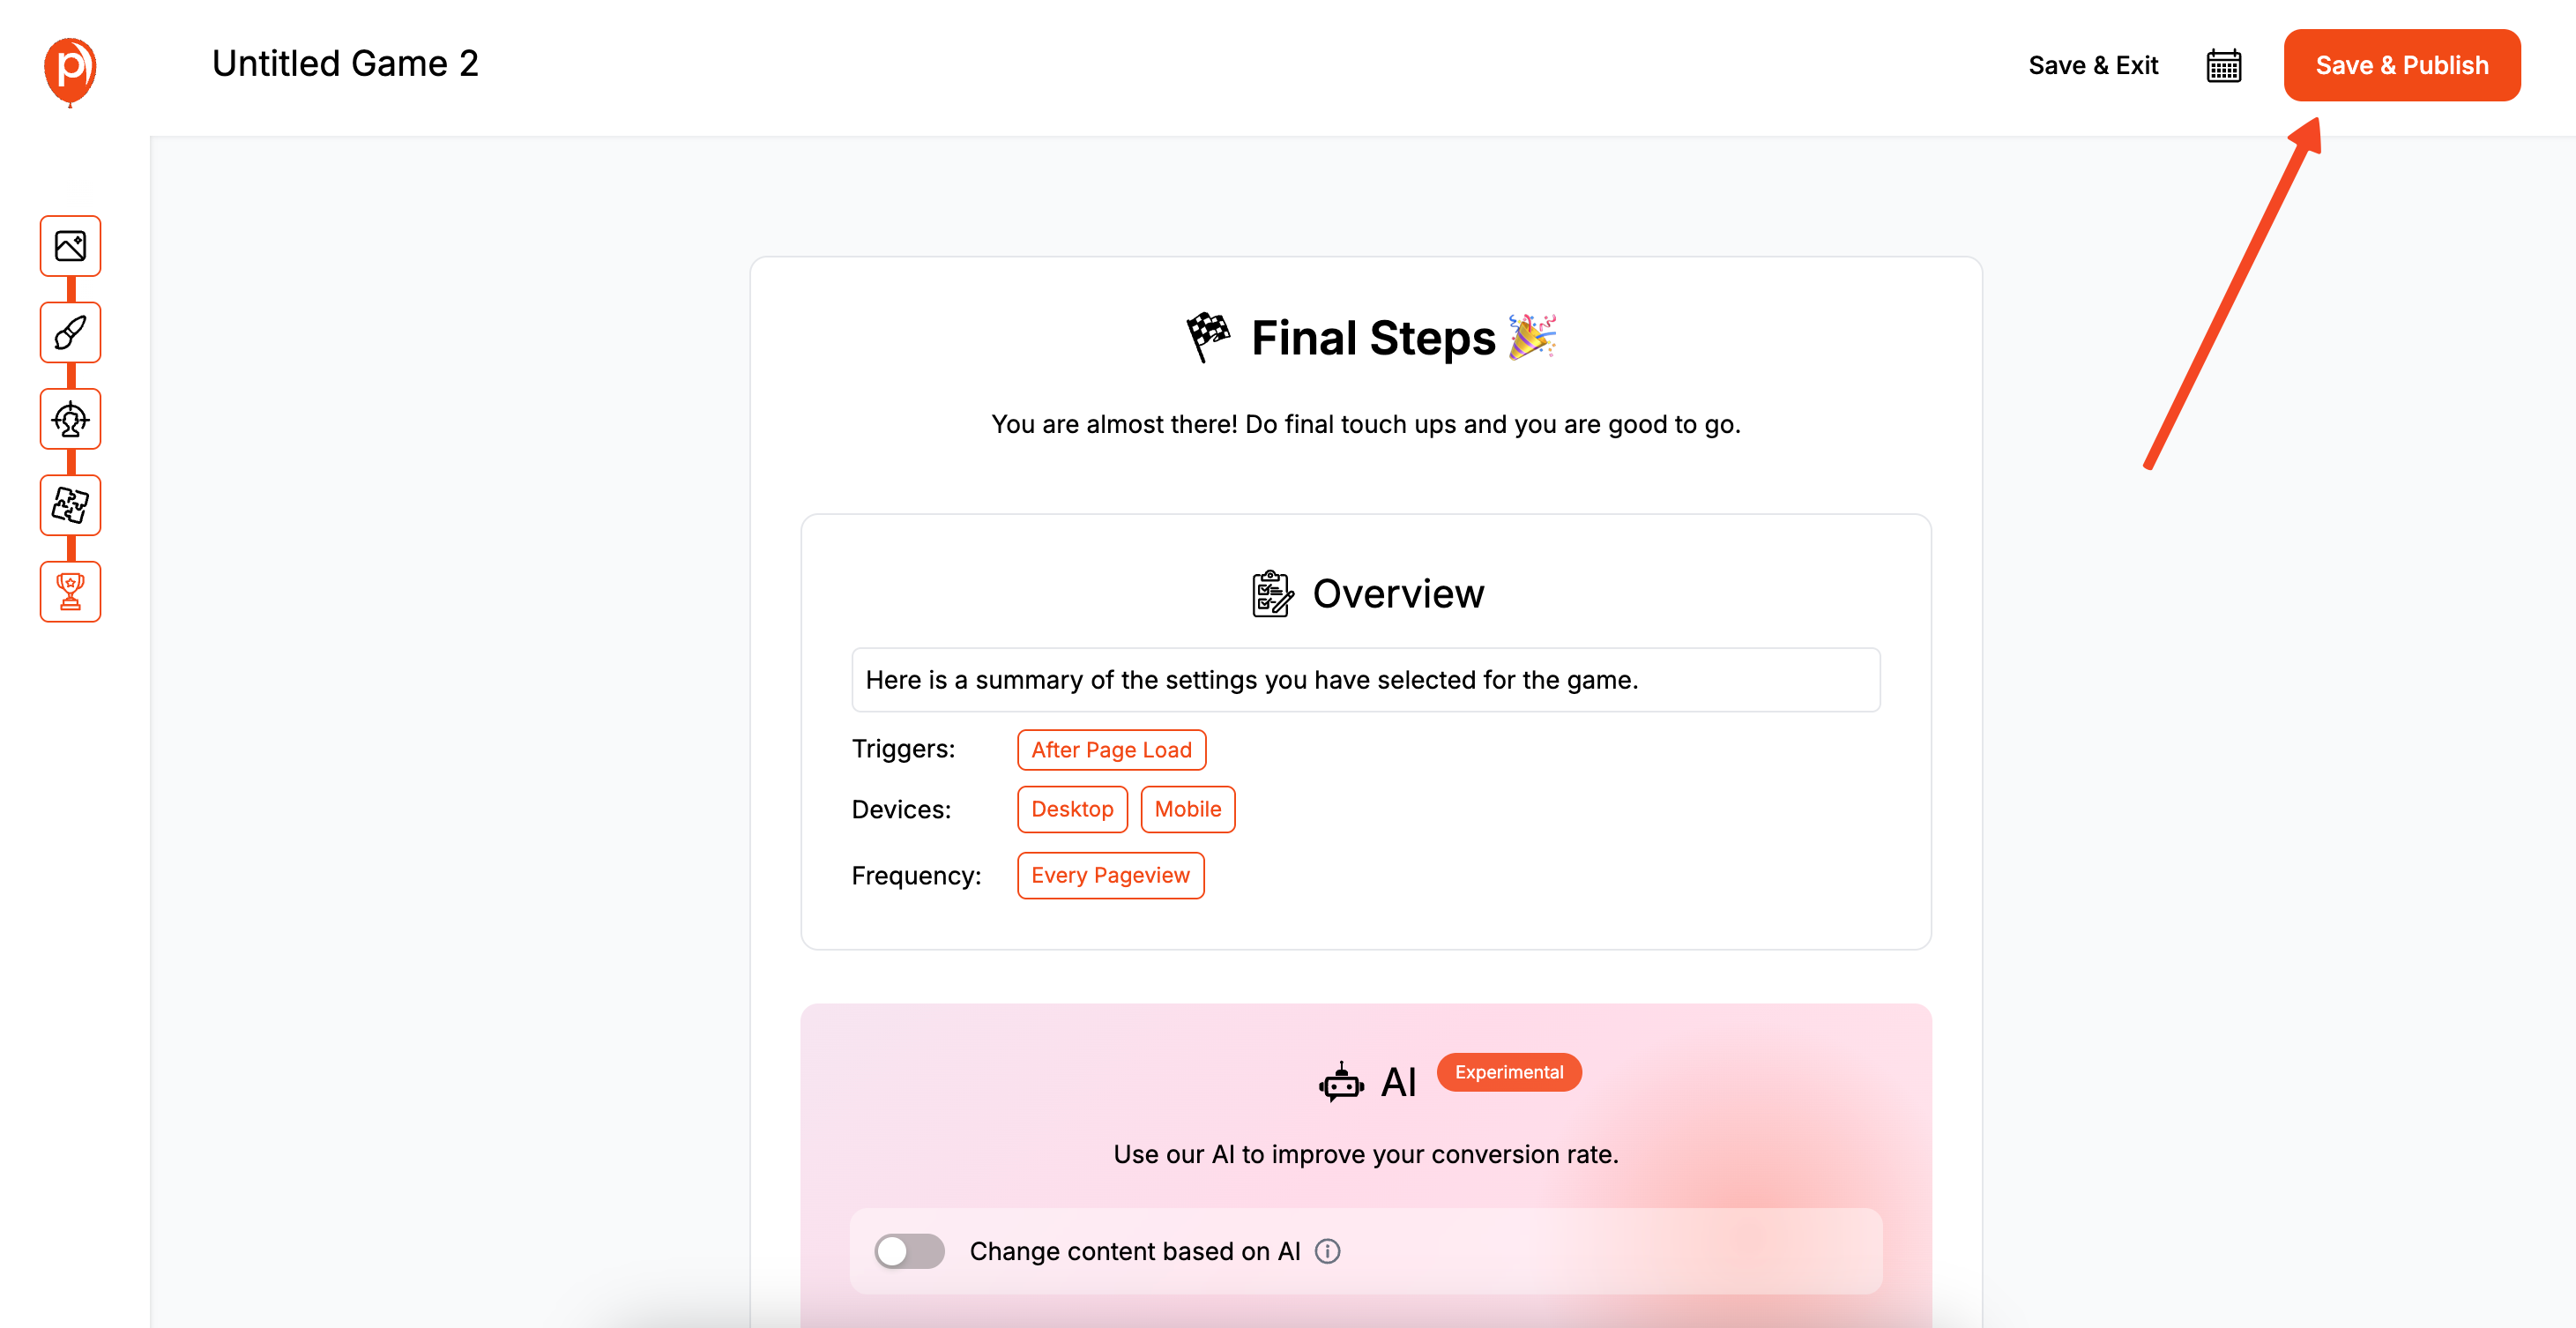
Once you're happy with the design, targeting, and integration, just hit the "Save & Publish" button. This makes your popup campaign active in our system. The final step is to make sure it can appear on your Shopify store.
Installing Poper on Your Shopify Store
For Poper to display your popup, you only need to add one small piece of code to your Shopify theme. You do this once, and it works for all your future Poper campaigns.
Step 6: Get Your Poper Code Snippet
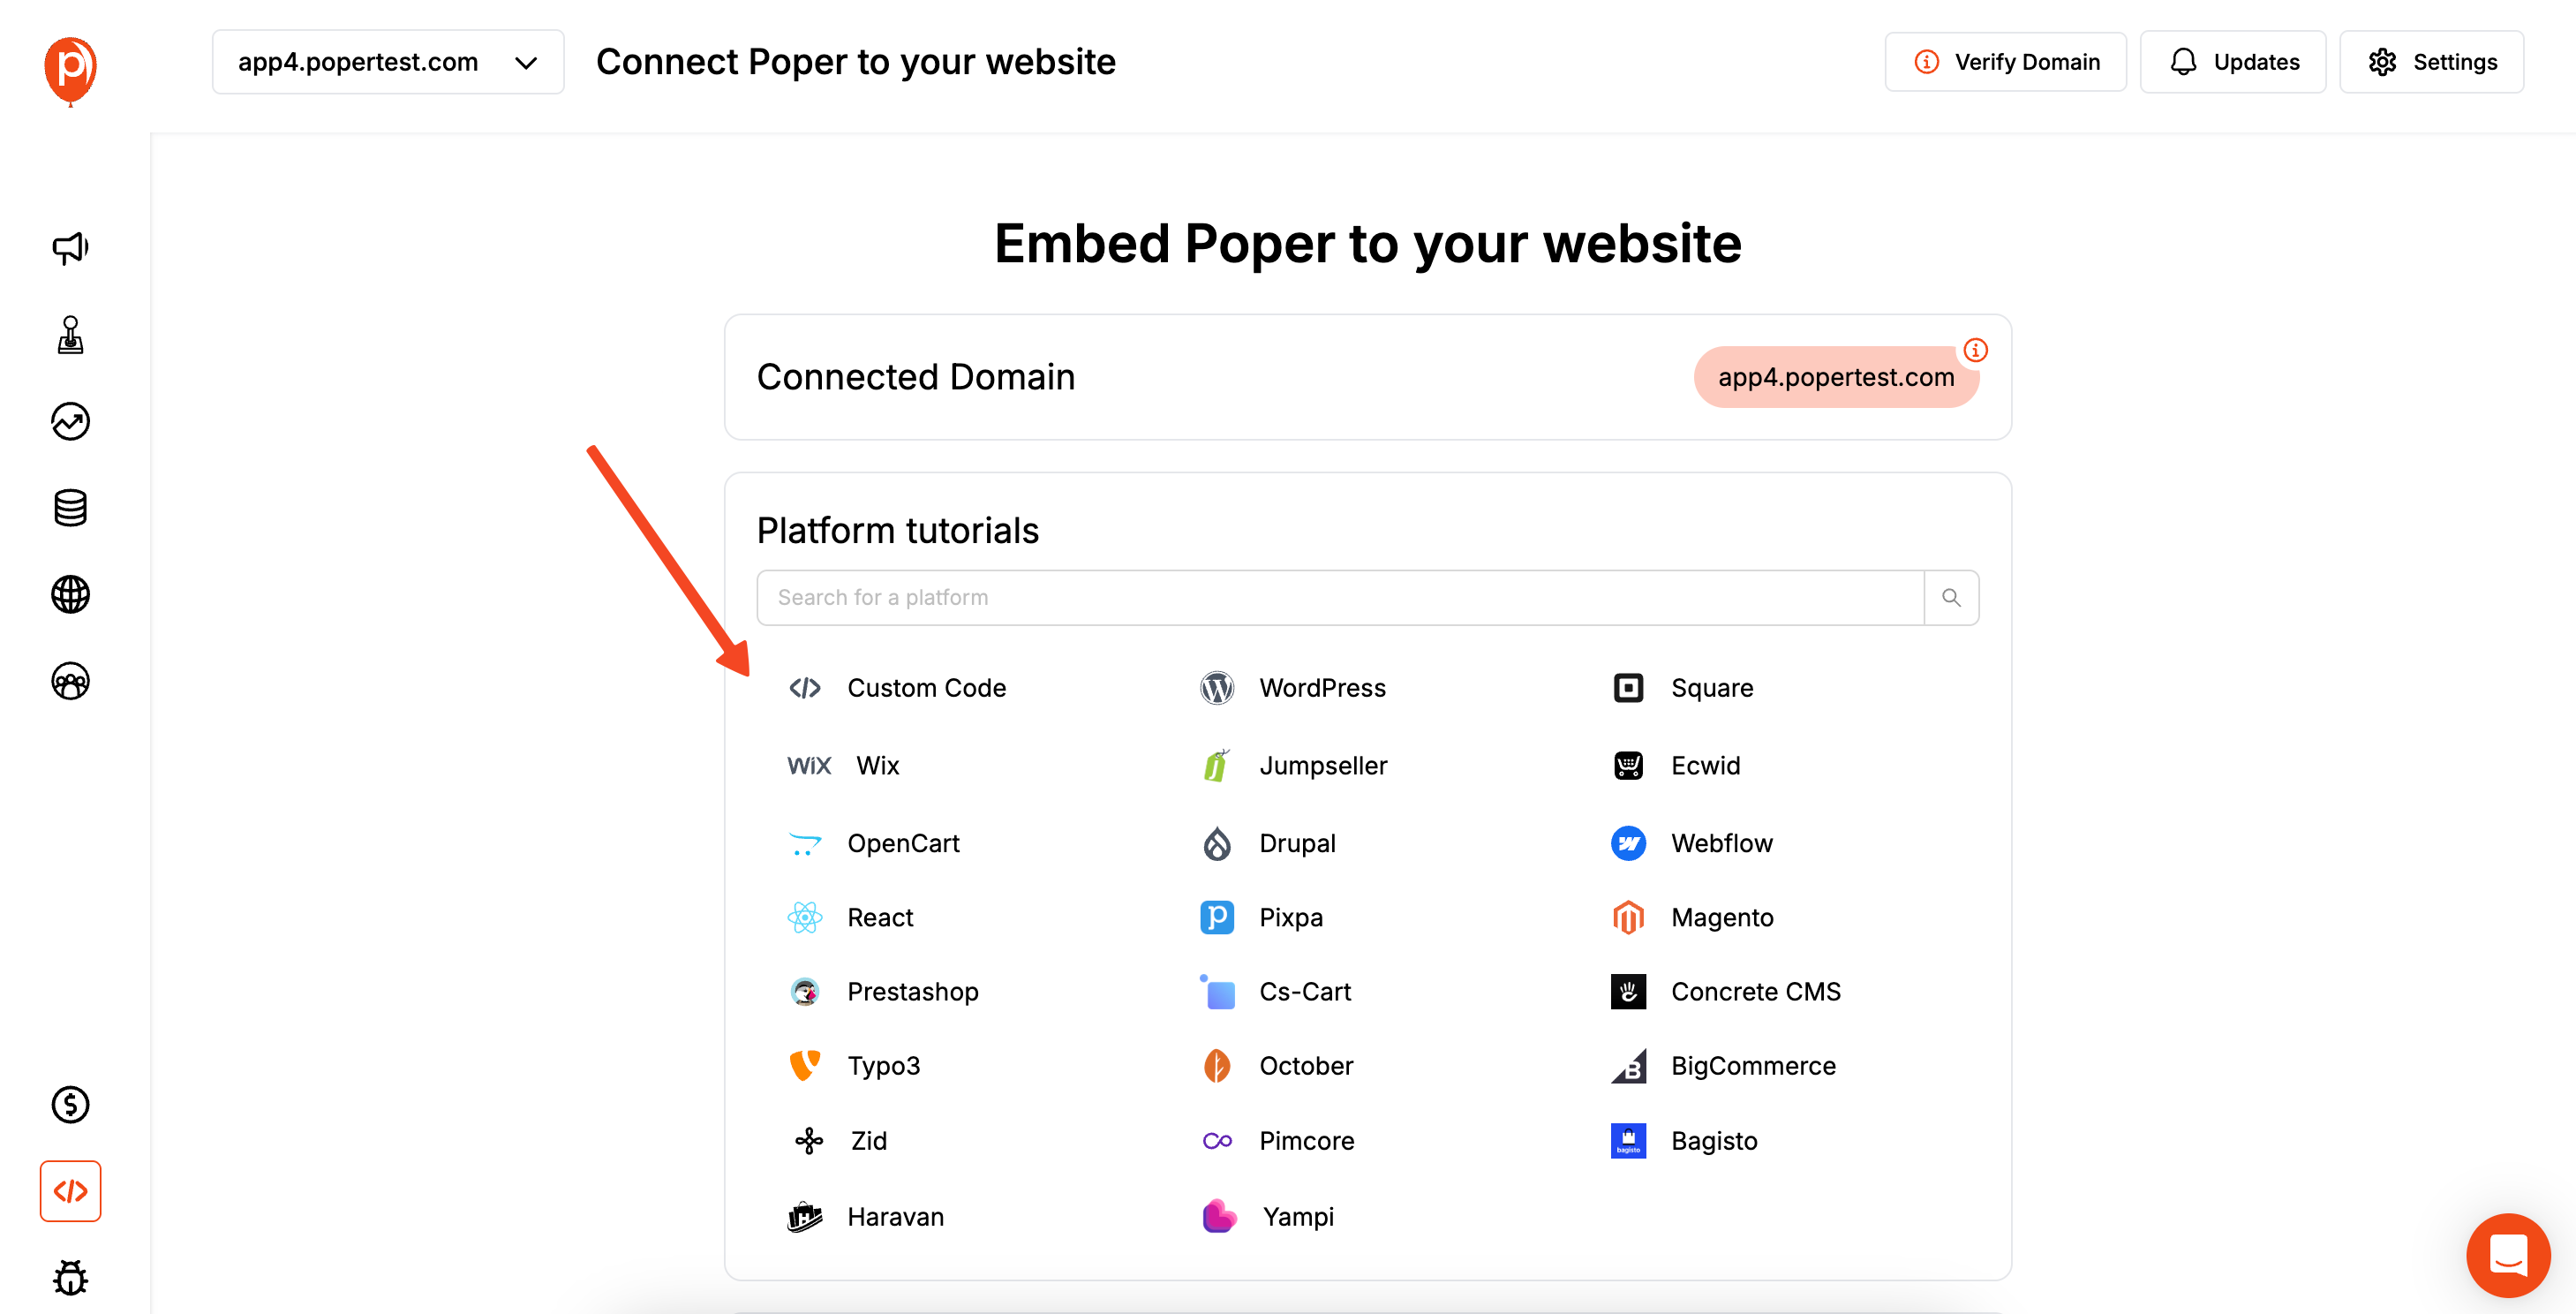
In your Poper dashboard, find the "Code" section in the left-hand navigation bar. Click on it, and you'll see a small block of code. This is your unique workspace code. Just click the button to copy it.
Step 7: Add the Code to Your Shopify Theme
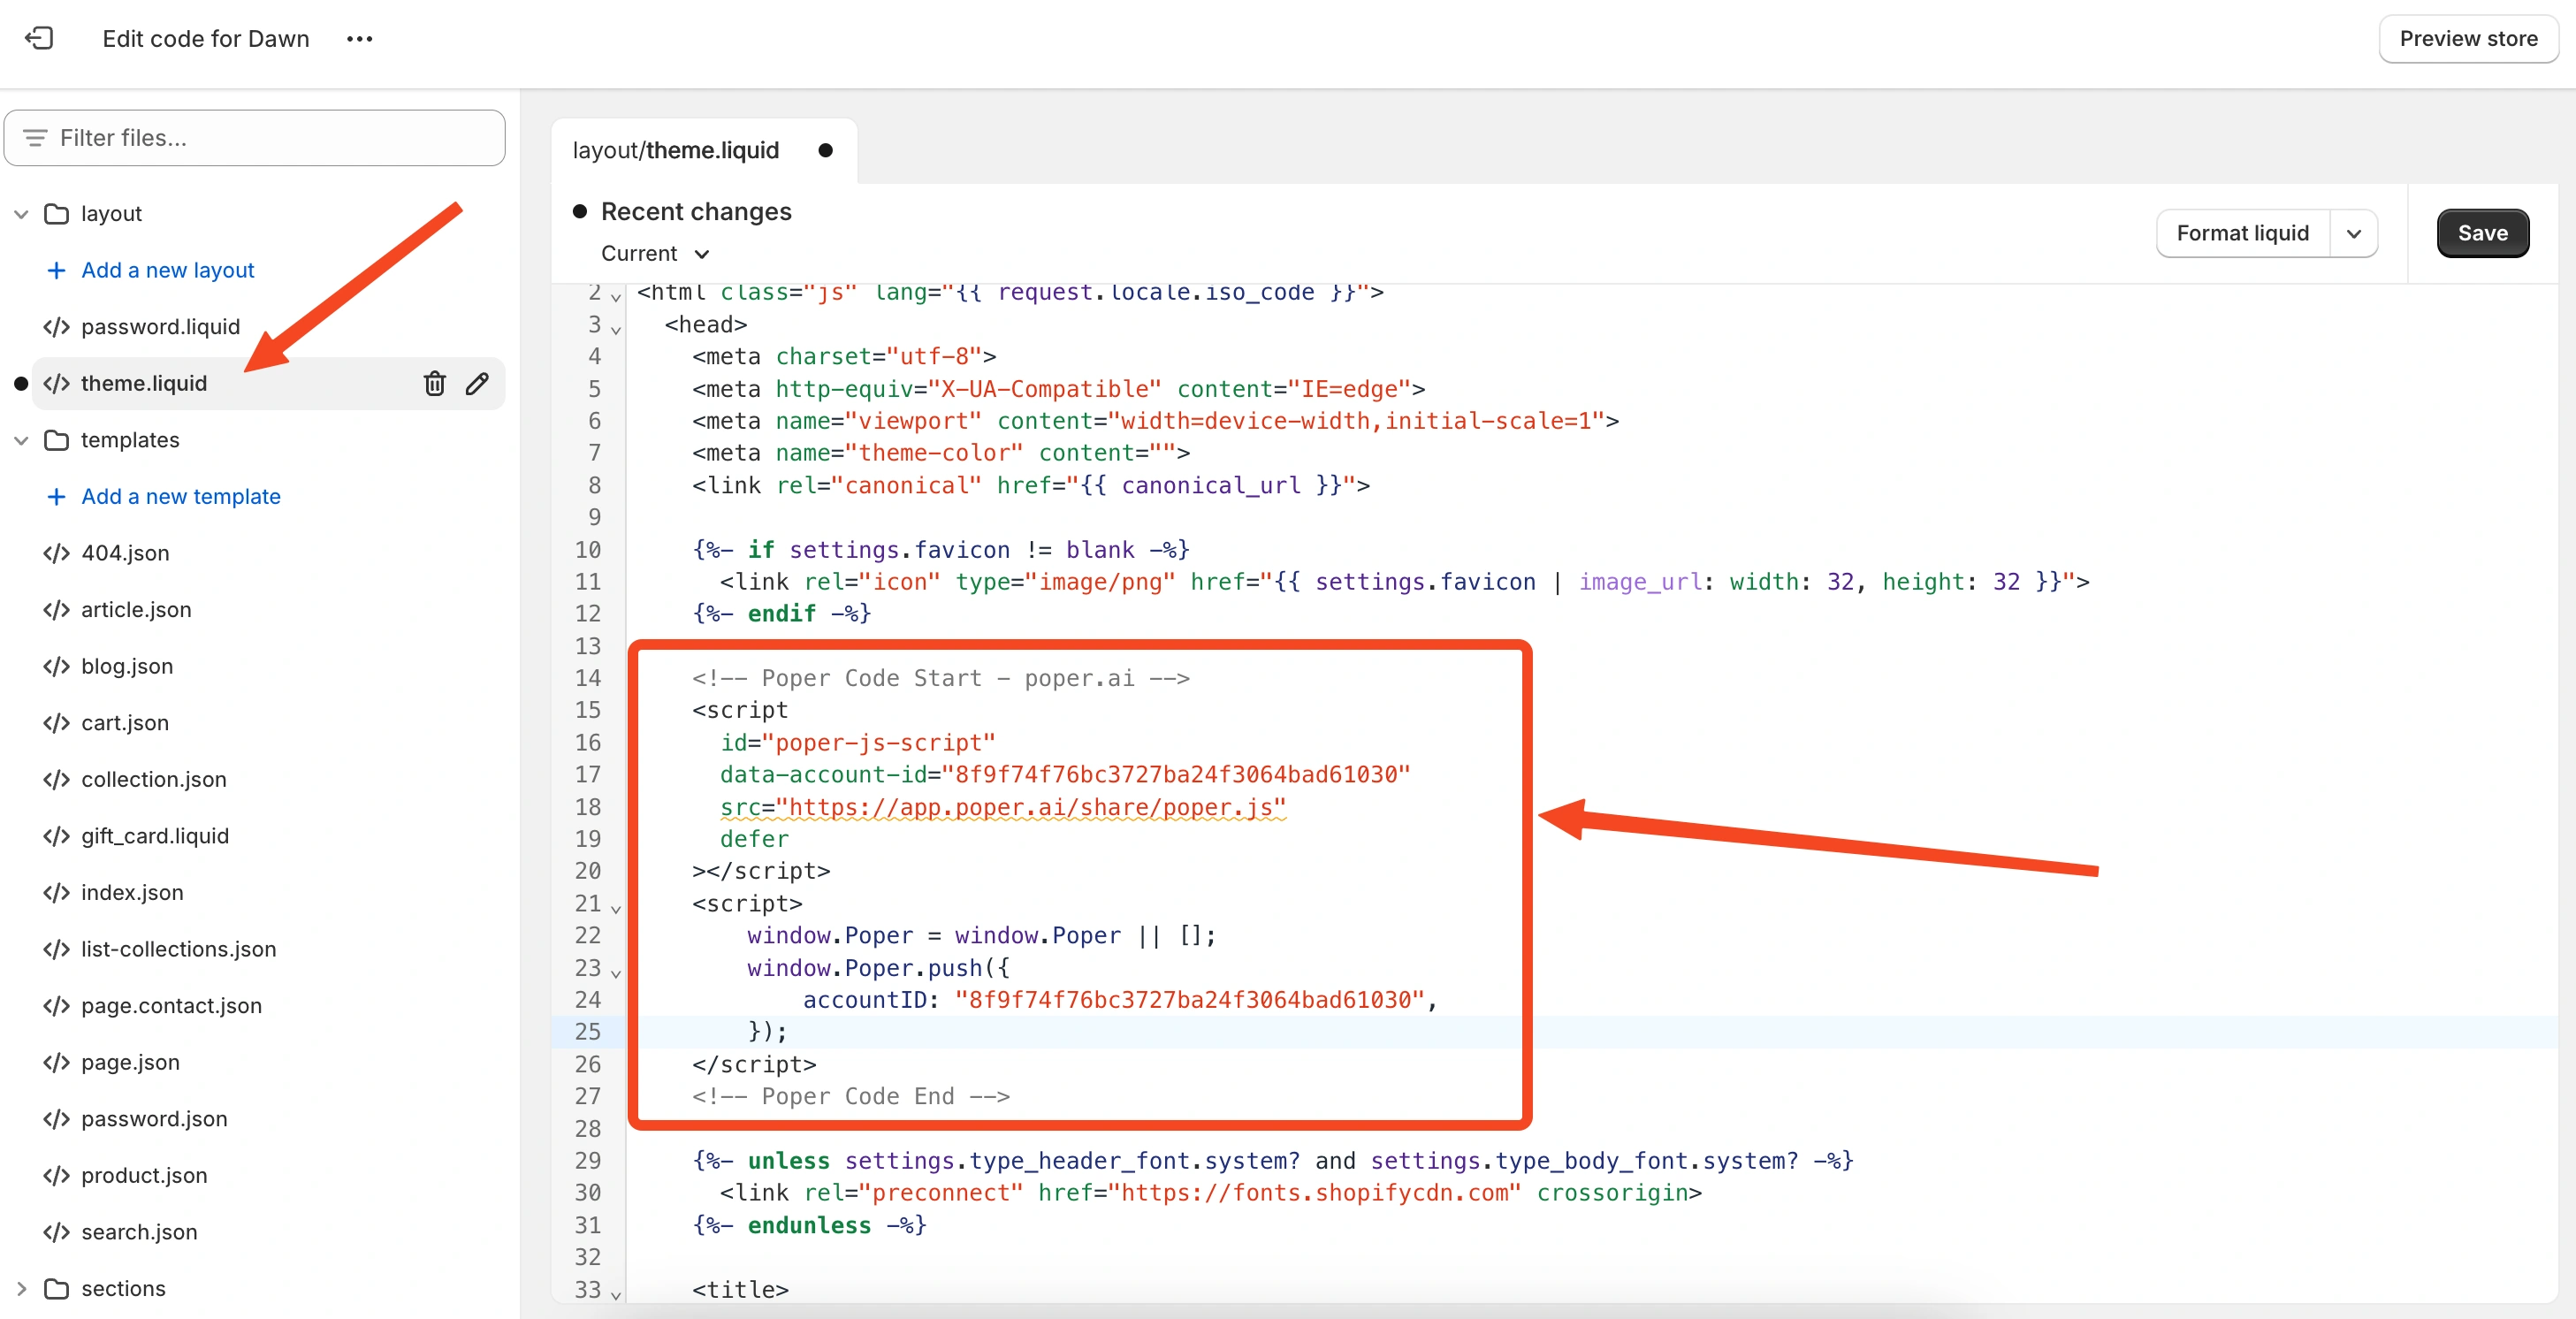
Now, head over to your Shopify admin dashboard. Go to Online Store > Themes. Find your current theme, click the three-dots icon (…), and select Edit code.
In the theme file editor, look for a file named theme.liquid or header.liquid. Open it, and scroll down until you find the closing </head> tag. Paste your Poper code snippet on a new line right before that </head> tag, and click "Save."
That’s it! Your Poper popup is now live on your Shopify store. It will follow the display rules you set, and every new signup will automatically appear in your chosen Klaviyo list, ready for your next email campaign.
Method 2: Using Klaviyo's Native Sign-Up Forms on Shopify
Klaviyo offers a robust, direct integration with Shopify, which includes the ability to easily display Klaviyo-built sign-up forms (including popups, flyouts, and embedded forms) on your Shopify store. This is often the first and most straightforward approach for Shopify users.
Step 1: Ensure Klaviyo is Integrated with Your Shopify Store
If you haven't already, install the Klaviyo app from the Shopify App Store and connect it to your Klaviyo account. This is essential for syncing data and enabling on-site tracking (which powers form targeting).
Verify that "Onsite tracking" (Klaviyo.js) is enabled in your Klaviyo Shopify integration settings. This script is necessary for Klaviyo forms to display and function correctly on your Shopify site.
Step 2: Create a Sign-Up Form in Klaviyo
Log into your Klaviyo account.
Navigate to Sign-up Forms in the left-hand menu.
Click "Create Sign-up Form" (or choose "Browse Templates").
Select a form type (e.g., Popup, Flyout, Full Page, Embed). For a classic "Klaviyo popup for Shopify," you'll likely choose "Popup."
Choose a template or start from scratch.
Design Your Form:
- Use Klaviyo's editor to customize the headline, body text, images, form fields (email, name, custom properties), and button text.
- Style the form (colors, fonts, layout) to match your Shopify store's branding.
- Configure the "Success" message or action after submission.
Use Klaviyo's editor to customize the headline, body text, images, form fields (email, name, custom properties), and button text.
Style the form (colors, fonts, layout) to match your Shopify store's branding.
Configure the "Success" message or action after submission.
Add Blocks: You can add text, buttons, images, coupons (if integrated), and various input fields.
Step 3: Configure Targeting and Behavior in Klaviyo
This is where you define who sees the popup and when on your Shopify store:
Targeting Tab:
- Visitors: Target all visitors, or segment by new vs. returning, or those who are/are not already in a Klaviyo list.
- URLs: Display on all pages, specific URLs, or URLs containing certain keywords (e.g., only on product pages, or hide on checkout).
- Location: Target by country (if this data is available).
- Shopify Specifics: Klaviyo often leverages its Shopify integration to target based on cart contents or value, which is very powerful.
Visitors: Target all visitors, or segment by new vs. returning, or those who are/are not already in a Klaviyo list.
URLs: Display on all pages, specific URLs, or URLs containing certain keywords (e.g., only on product pages, or hide on checkout).
Location: Target by country (if this data is available).
Shopify Specifics: Klaviyo often leverages its Shopify integration to target based on cart contents or value, which is very powerful.
Behavior Tab:
- Triggers:
- Time Delay: Show after X seconds on page.
- Scroll Percentage: Show after user scrolls X% down the page.
- Exit Intent: Show when a desktop user is about to leave. Klaviyo also offers mobile-specific exit-intent based on scroll behavior.
- Frequency: Control how often the same visitor sees the form (e.g., show once per session, don't show again for X days after closing).
- Devices: Choose to show on desktop, mobile, or both.
- Triggers:
Triggers:
- Time Delay: Show after X seconds on page.
- Scroll Percentage: Show after user scrolls X% down the page.
- Exit Intent: Show when a desktop user is about to leave. Klaviyo also offers mobile-specific exit-intent based on scroll behavior.
Time Delay: Show after X seconds on page.
Scroll Percentage: Show after user scrolls X% down the page.
Exit Intent: Show when a desktop user is about to leave. Klaviyo also offers mobile-specific exit-intent based on scroll behavior.
Frequency: Control how often the same visitor sees the form (e.g., show once per session, don't show again for X days after closing).
Devices: Choose to show on desktop, mobile, or both.
List Submission: Select the Klaviyo list to which subscribers from this form will be added.
Step 4: Publish Your Klaviyo Form
Once you're satisfied with the design, targeting, and behavior, Publish your form in Klaviyo.
Because your Klaviyo account is integrated with Shopify and on-site tracking (Klaviyo.js) is enabled, the form should automatically start appearing on your Shopify store according to the rules you set. No manual code installation on Shopify is typically needed for these native Klaviyo forms once the initial Shopify-Klaviyo app integration is complete.
Step 5: Test on Your Shopify Store
Open your Shopify store in an incognito/private browser window.
Navigate to a page where the popup is targeted and perform the trigger action (e.g., wait for the time delay, scroll, or attempt to exit).
Verify the popup appears correctly and that submissions are added to the designated Klaviyo list.
Klaviyo Native Shopify Popups vs. Poper for Shopify + Klaviyo: Key Considerations
| Feature | Klaviyo Native Forms on Shopify | Poper Popups on Shopify (Klaviyo Integrated) |
| Shopify Integration | Deep, direct via Klaviyo App & Klaviyo.js | Via Poper's universal JS snippet in Shopify theme |
| Ease of Setup (Initial) | Very easy once Klaviyo App is installed | Easy, involves Poper script install + integration |
| Popup Design Flexibility | Good, within Klaviyo's builder | High, with Poper's dedicated design editor |
| Popup Types | Standard popups, flyouts, embeds | Wider range (e.g., gamified, advanced bars) |
| Trigger/Targeting | Robust, including Shopify-specific data | Very advanced & granular, broad applicability |
| Centralized Management | Popups managed within Klaviyo | Popups managed in Poper, leads in Klaviyo |
| Cost | Included in Klaviyo plan | Poper subscription + Klaviyo subscription |
Choose Klaviyo's Native Forms for Shopify When:
You want the absolute tightest, most "out-of-the-box" integration between your Shopify store and Klaviyo popups.
Klaviyo's native design, trigger, and targeting options (including Shopify-specific ones like cart value) meet all your current needs.
You prefer to manage everything within the Klaviyo ecosystem.
Choose Poper for Shopify (Integrated with Klaviyo) When:
You need more advanced popup designs, a dedicated mobile editor for popups, or popup types (like gamified popups) not available natively in Klaviyo.
You require more granular or different types of triggering and audience targeting rules than Klaviyo offers for its forms on Shopify.
You manage popups for multiple websites (some perhaps not on Shopify) and prefer a centralized popup management platform (Poper) that can feed leads to Klaviyo (and other tools).
You want to leverage Poper's specific A/B testing or analytics for popups.
Conclusion
Implementing a Klaviyo Popup for Shopify is a proven strategy to accelerate your email list growth and drive sales.
Klaviyo's native sign-up forms provide a powerful and deeply integrated solution for Shopify store owners, leveraging on-site tracking and Shopify-specific data for targeting.
Poper, when integrated with Shopify and Klaviyo, offers an alternative path for those seeking enhanced design control, a wider variety of popup types, or more diverse triggering and targeting capabilities for their on-site lead capture efforts, all while ensuring leads flow seamlessly into Klaviyo.
Evaluate your specific needs for design complexity, targeting granularity, and popup management to determine which approach—or even a combination for different scenarios—will best serve your Shopify store and Klaviyo marketing goals.
Frequently Asked Questions (FAQ)
Do I need to install any code on Shopify for Klaviyo's native popups to work?
Typically, no additional code beyond what the main Klaviyo Shopify App installs. Once the Klaviyo app is integrated with Shopify and "Onsite tracking" (Klaviyo.js) is enabled in Klaviyo's Shopify integration settings, your published Klaviyo sign-up forms should work on your Shopify store.
Can Klaviyo's popups target Shopify customers based on what's in their cart?
Yes, one of the powerful features of Klaviyo's deep Shopify integration is the ability to target sign-up forms (including popups) based on cart contents, cart value, and other Shopify-specific browsing behaviors.
If I use Poper on Shopify, can it still access Shopify-specific data for targeting popups?
Poper's targeting would primarily rely on standard web data (URLs, device, geo-location, cookies, referral source, Poper's own tracking of site behavior). For deep Shopify-specific data like "cart value," Klaviyo's native forms would have the more direct integration. However, Poper can target specific Shopify URLs (like product pages or cart page) very effectively.
Can I use both Klaviyo native popups and Poper popups on my Shopify store at the same time?
Technically, yes, but it requires careful planning of targeting and triggers to avoid overwhelming visitors or creating conflicting experiences. It's generally better to choose one primary popup strategy per page or user scenario.
How does Poper ensure leads from Shopify are correctly attributed in Klaviyo?
Through the Poper-to-Klaviyo integration, you can map fields and often assign specific Klaviyo tags to leads captured via Poper popups on your Shopify store. This allows you to segment and track these leads within Klaviyo.

