
Capturing a visitor's attention right before they leave your website can be a game-changer for lead generation and conversions. An Exit Intent Popup in HubSpot (or integrated with HubSpot) serves as a timely intervention, offering value at the critical moment a user signals they're about to depart. This can significantly reduce bounce rates and recover potentially lost leads.
This guide will explore how to create effective exit-intent popups using HubSpot's native pop-up form tools and how third-party platforms like Poper can offer alternative design and triggering capabilities while still seamlessly integrating with your HubSpot CRM.
What is an Exit-Intent Popup and Why is it Effective?
An exit-intent popup is a type of website overlay that appears when a visitor's mouse movements indicate they are about to leave the webpage (e.g., moving the cursor towards the browser's close button or address bar). On mobile devices, it can be triggered by a quick upward scroll or an attempt to hit the back button.
Effectiveness:
Last-Chance Offer: It gives you one final opportunity to present a compelling offer, discount, or lead magnet.
Non-Intrusive (when done right): Unlike immediate popups, it doesn't interrupt the user's initial browsing experience.
High Conversion Potential: Targets users who might still be interested but were about to leave without converting.
Reduces Cart Abandonment: Can offer a discount or reminder to complete a purchase.
Grows Email Lists: Perfect for offering a valuable piece of content in exchange for an email address.
Method 1: Using Poper for Advanced Exit-Intent Popups with HubSpot Integration
First, we’ll build and design the popup itself inside your Poper account. This is where you decide what your visitors will see.
Step 1: Start a New Popup Campaign
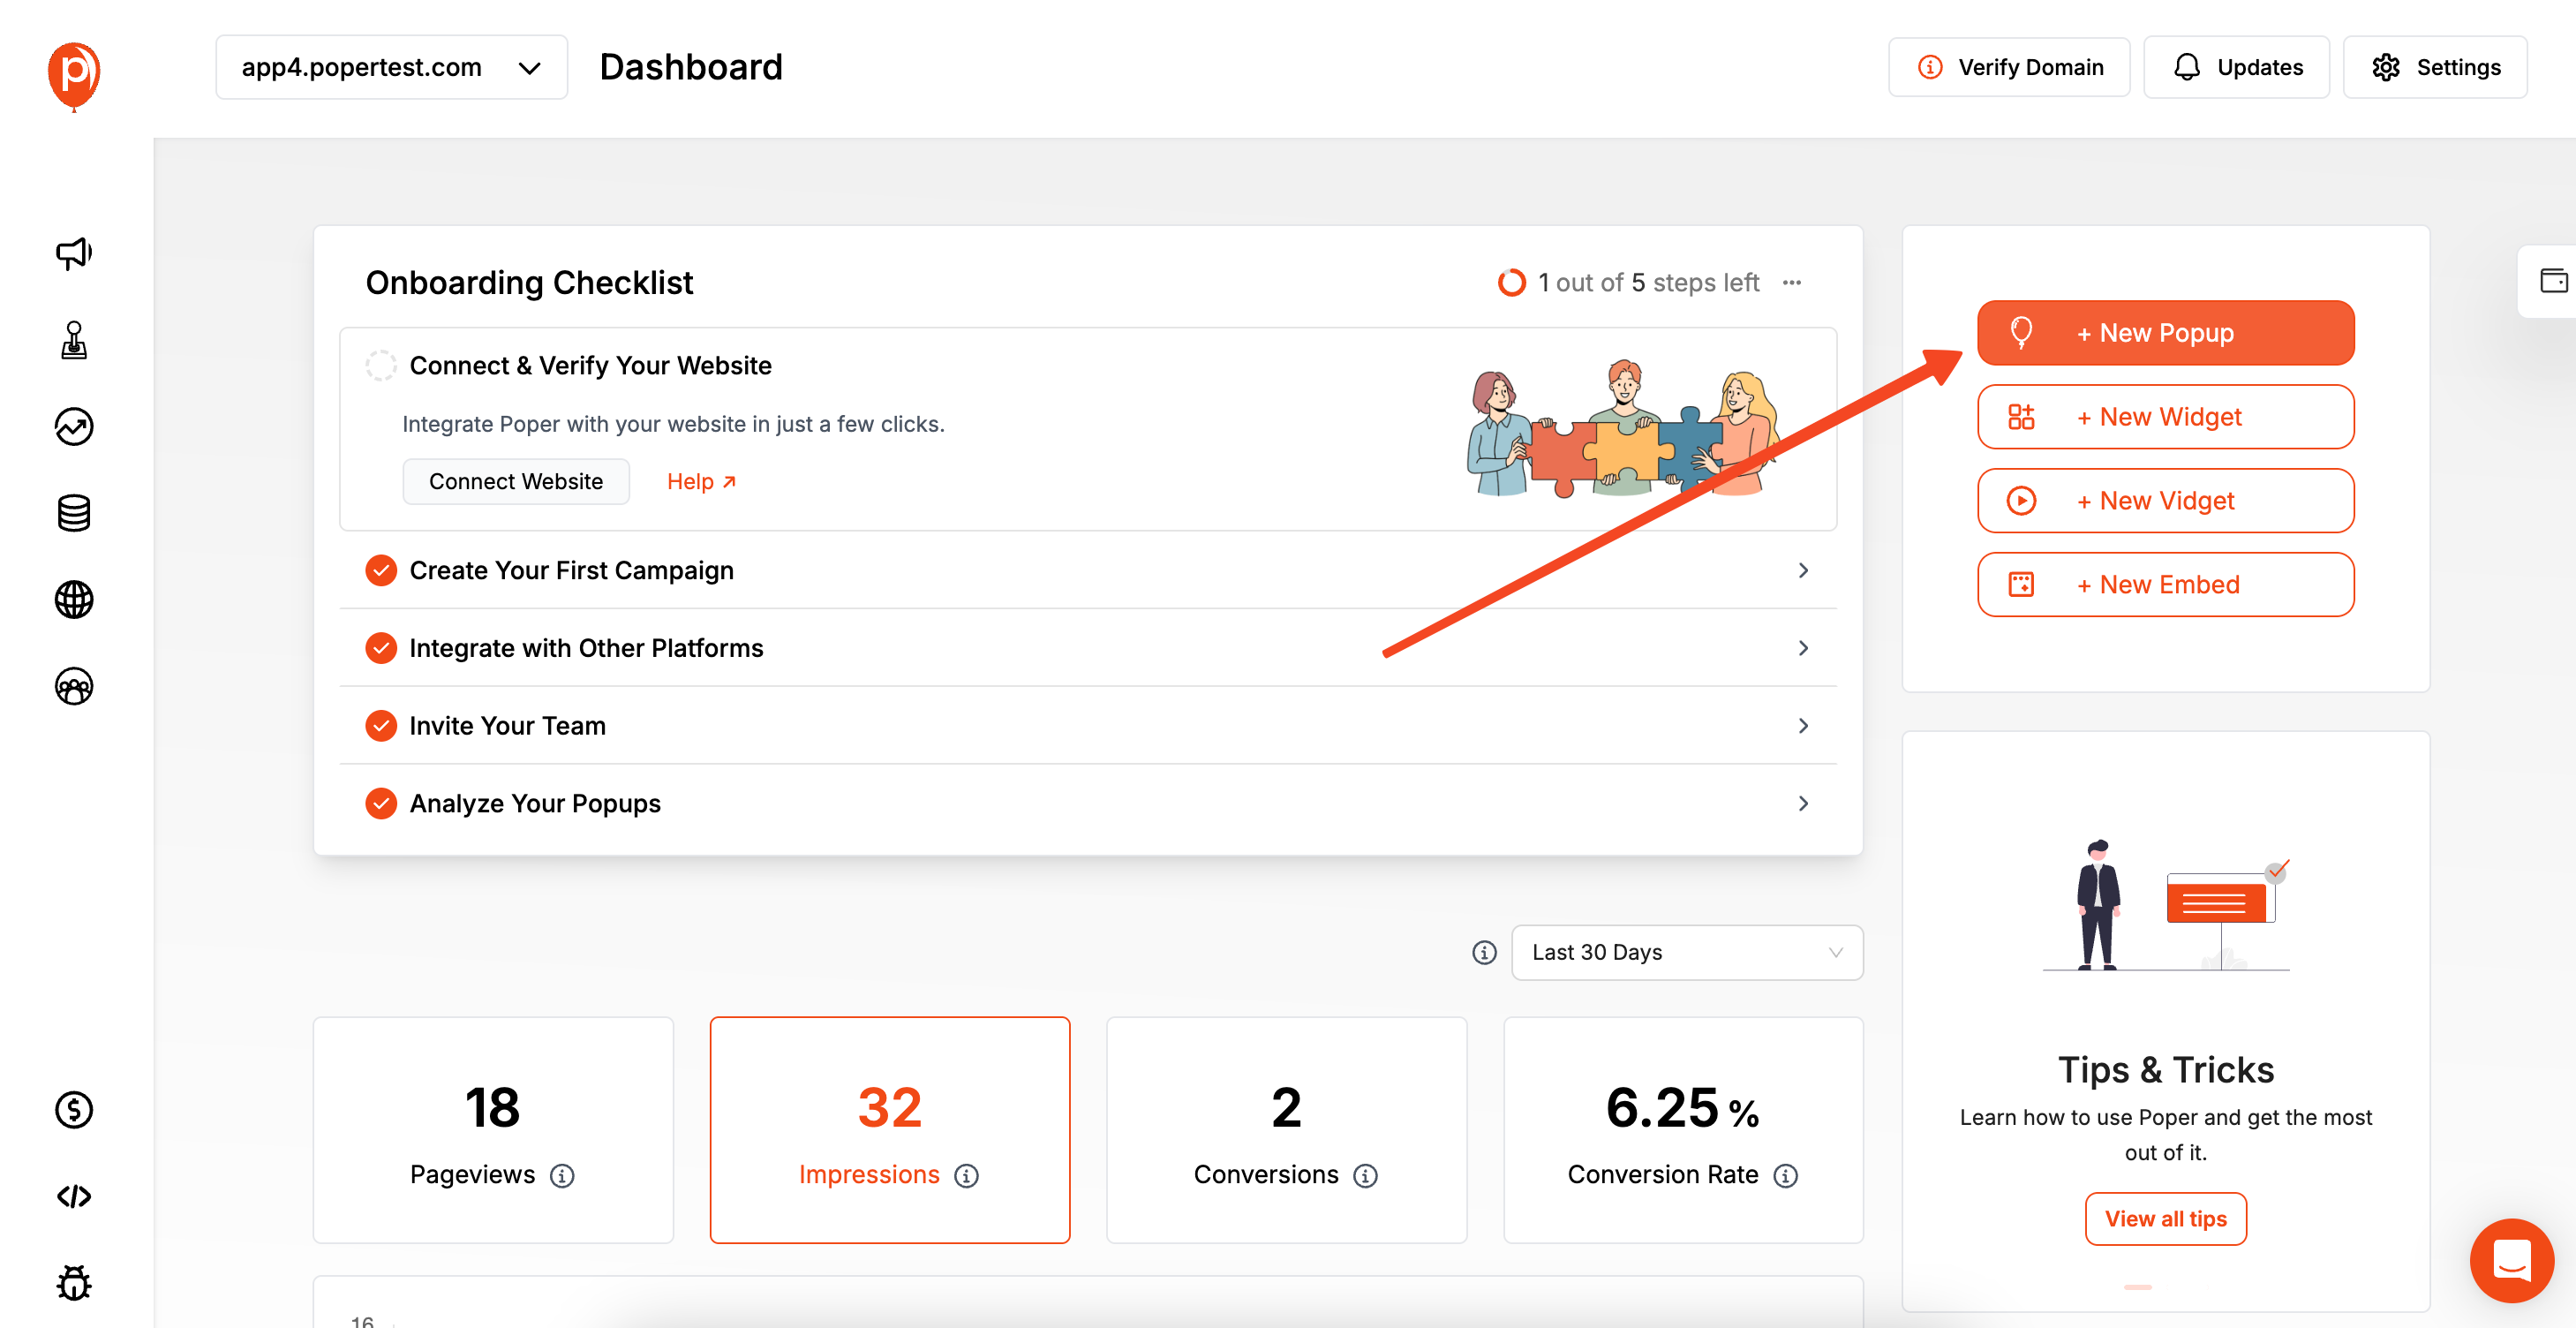
After logging into your Poper account and adding your website's domain, find and click the "New Popup" button. I always suggest starting with a template, so go ahead and choose "Choose from Templates." This gives you a great head start on design and layout.
Think about what kind of last-minute offer would be most compelling. A 15% discount? A free e-book download? Select a template that matches that goal. For instance, the "Lead Magnet" template is perfect if you're offering a guide.
Step 2: Customize Your Popup's Design
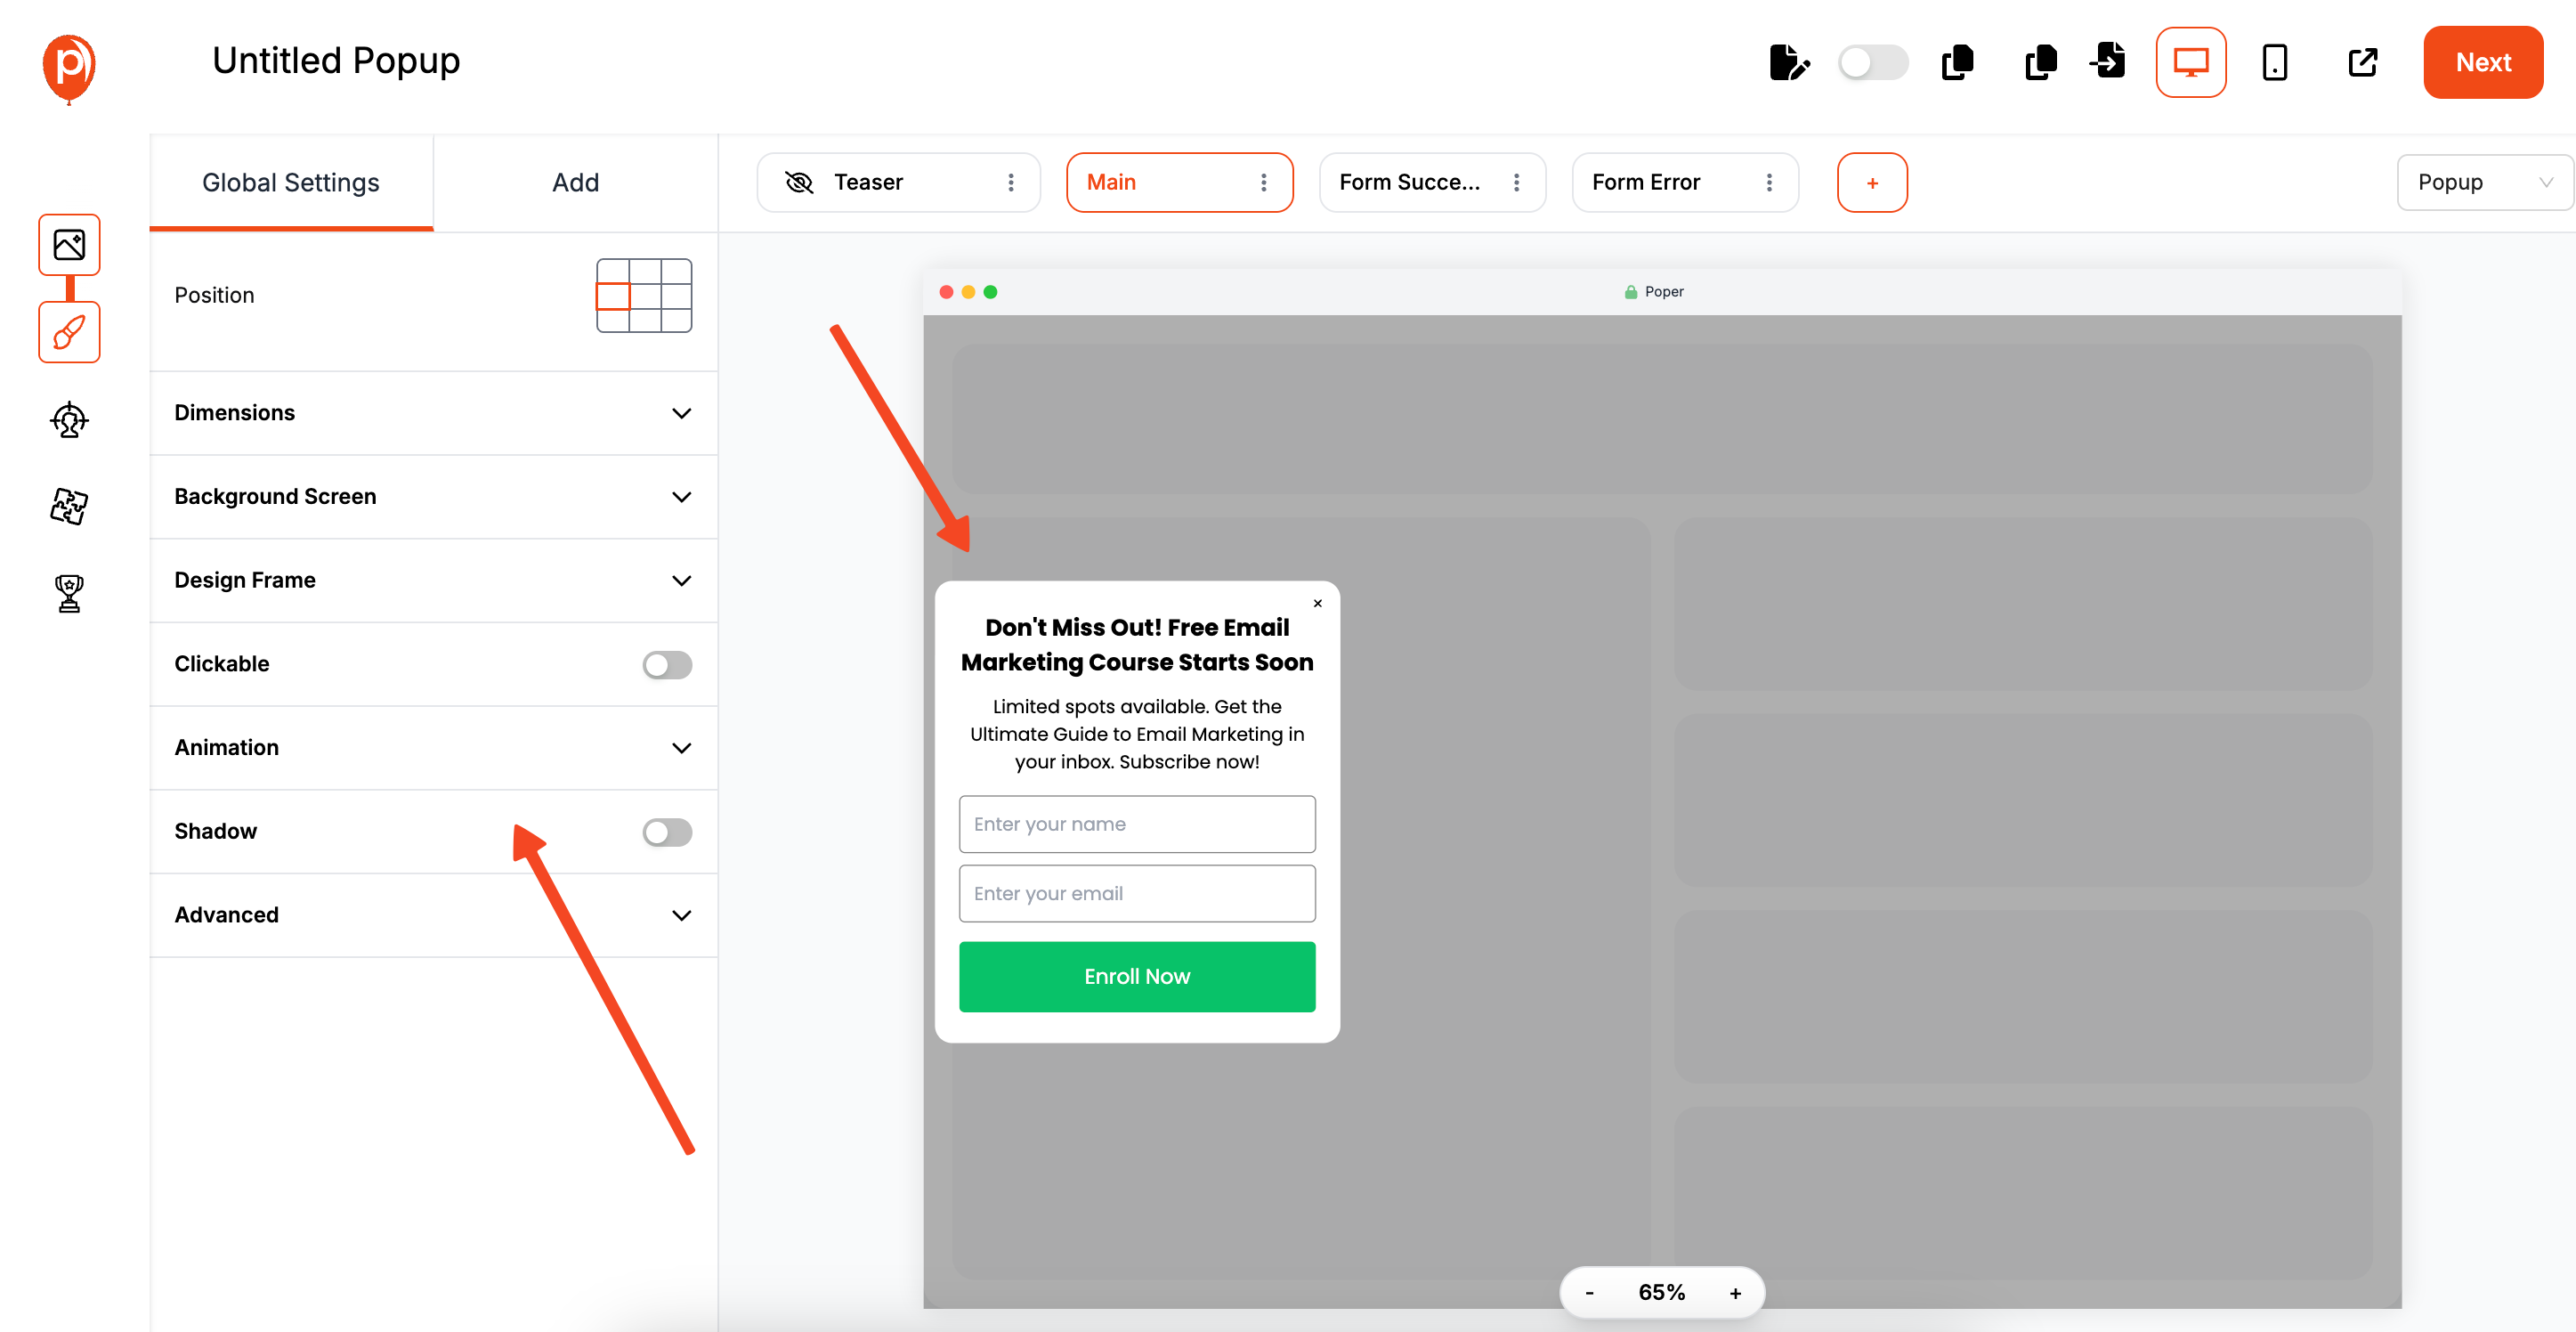
Once you select a template, you'll land in our editor. Here, you can adjust everything to match your brand—change the colors, update the fonts, and write compelling copy. My biggest tip here is to keep it simple. Your message should be instantly clear.
Focus on a strong headline, a brief description of the offer, and a single, clear call-to-action button like "Get My Discount" or "Download Now." Overcrowding the popup can confuse visitors, so stick to the essentials.
Step 3: Set the Exit-Intent Display Rule
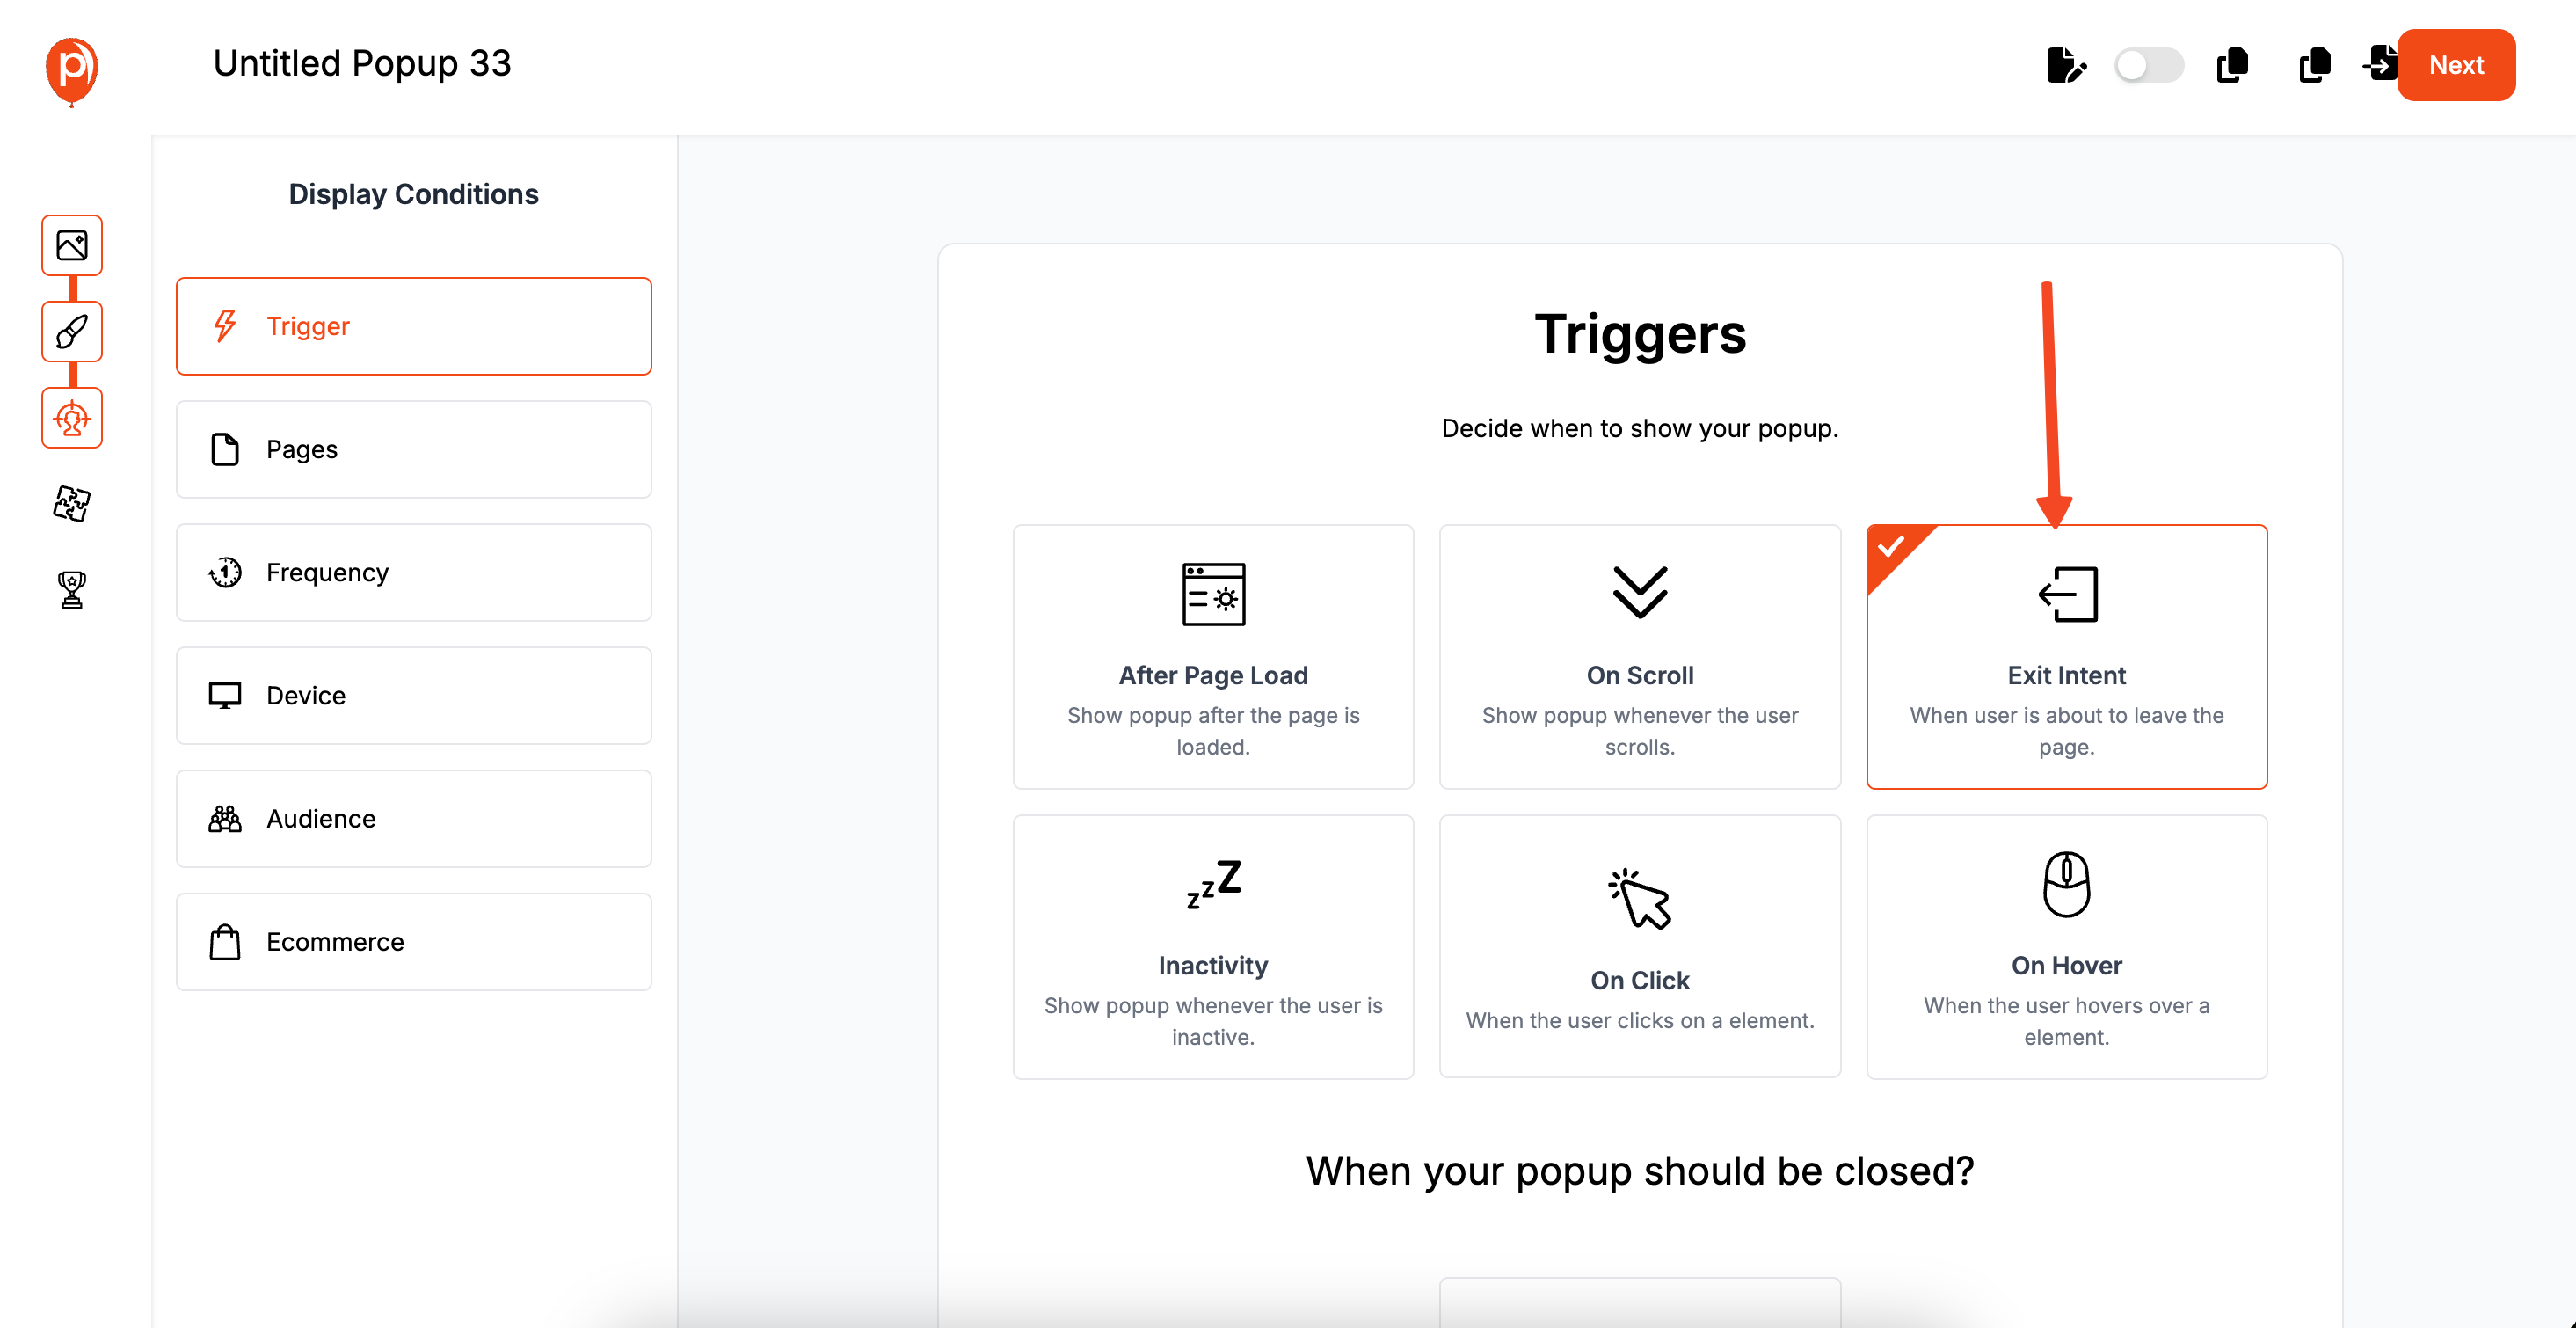
After you've perfected the design, click "Next" to go to the "Display Conditions" screen. This is the most important step. Find and select the "Exit Intent" option.
This tells Poper to only show the popup when a visitor's cursor moves towards the top of the browser, signaling they intend to leave.
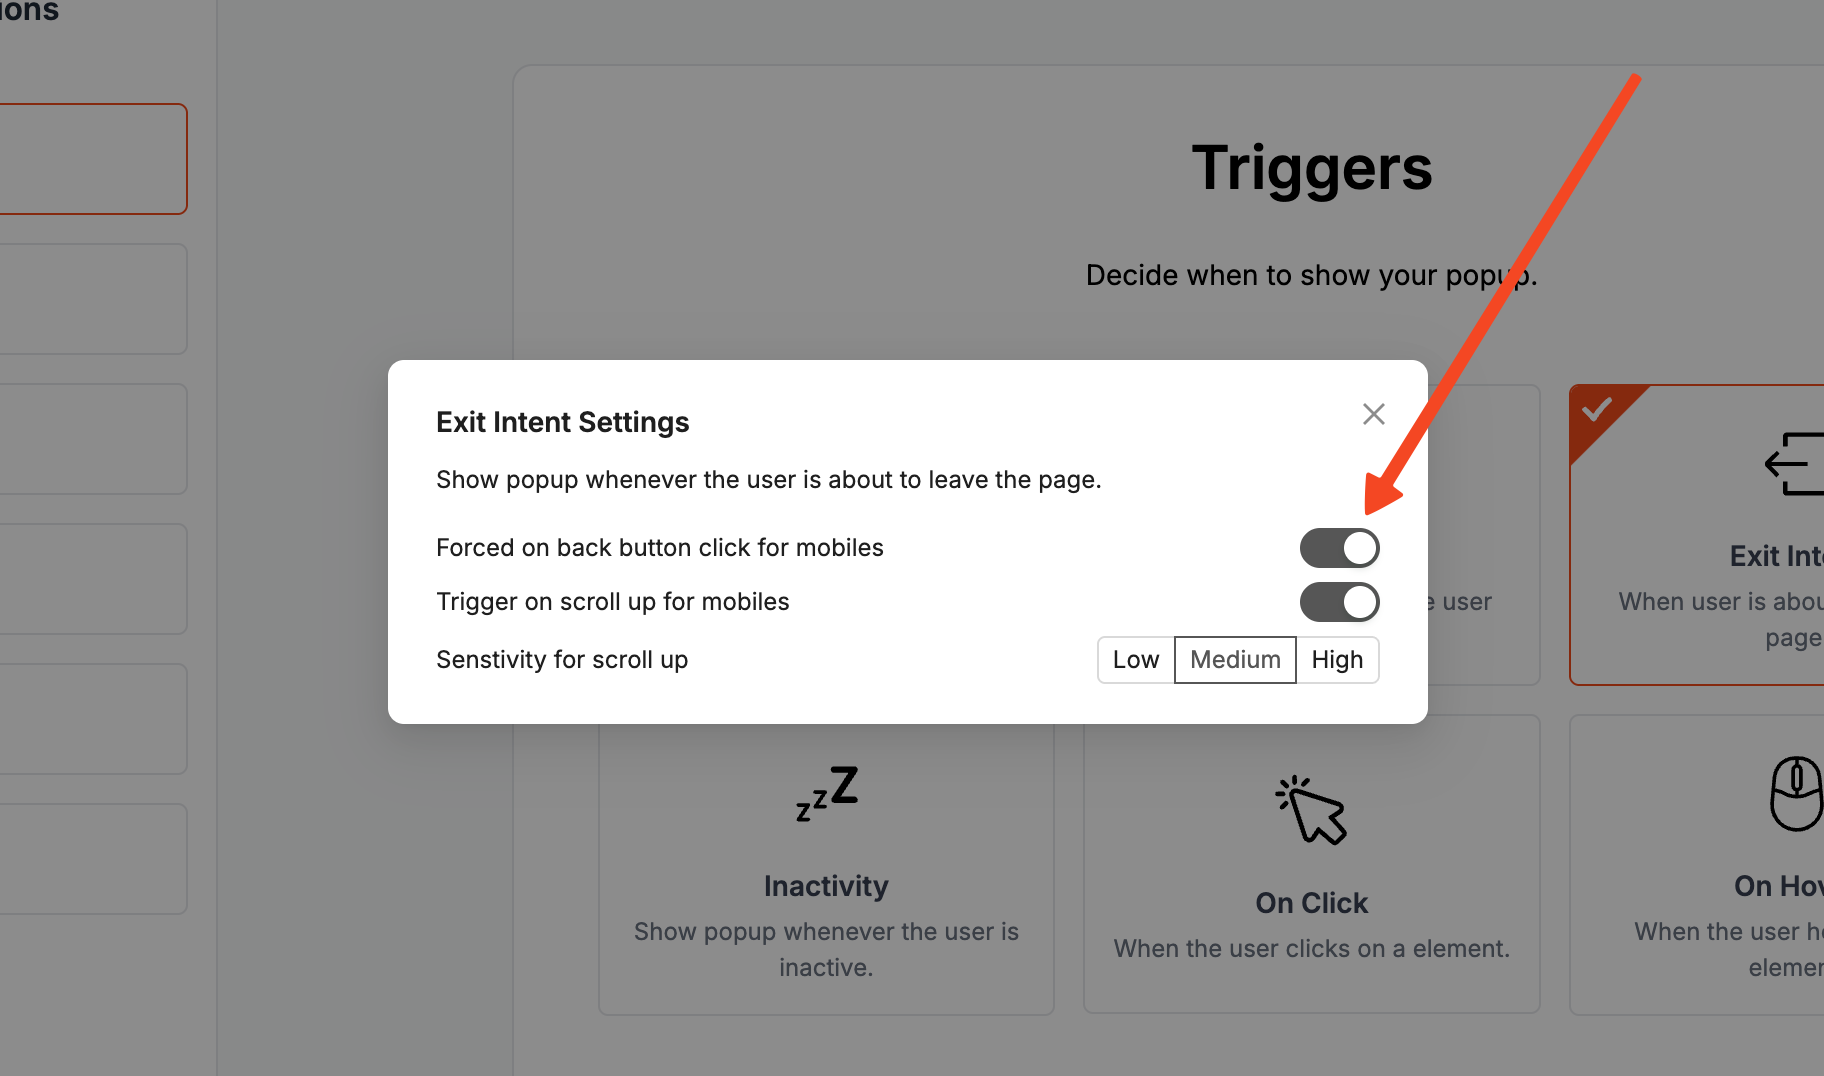
You can also set up how this works on mobile devices. I recommend activating "Trigger on scroll up for mobiles," as a quick upward scroll is often a sign someone is about to tap the back button. You can even adjust the scroll sensitivity to get the timing just right.
Connecting Poper to Your HubSpot Account
Now that the popup is ready, let's make sure every lead you collect automatically ends up in your HubSpot CRM.
Step 4: Add and Configure the HubSpot Integration
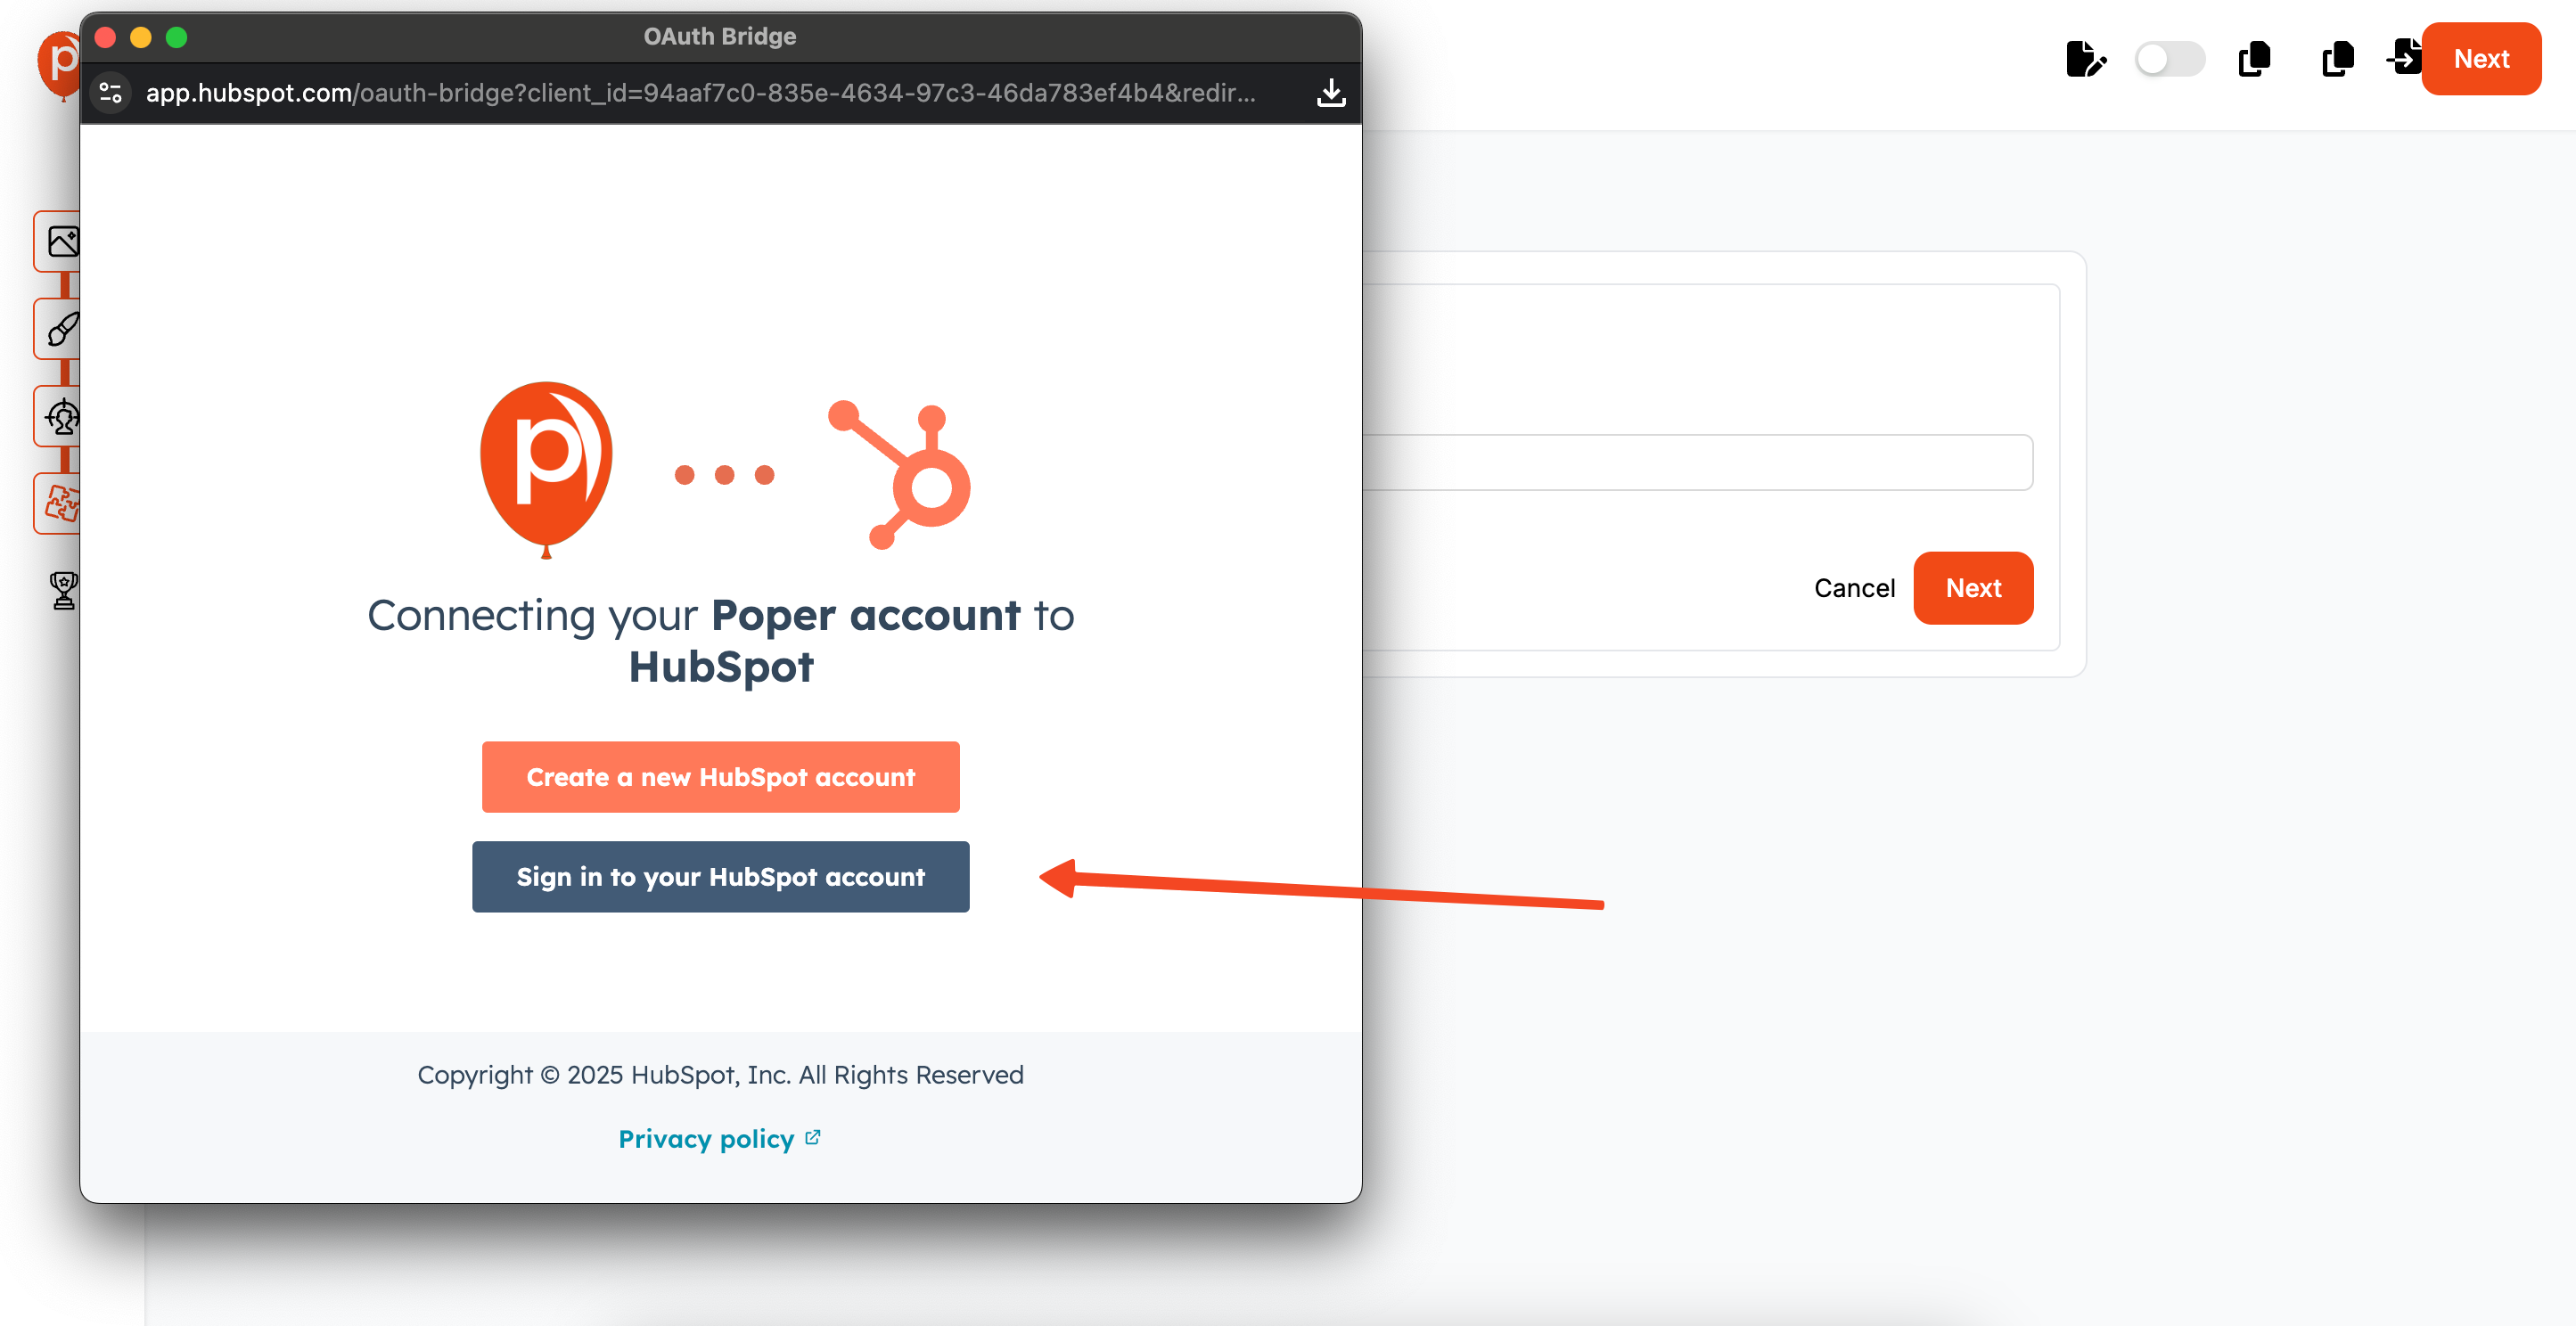
Click "Next" again to move to the "Integrations" tab. Find HubSpot in the list and click to connect. Give your connection a memorable name, like "My Website Leads," and you'll be prompted to log in to your HubSpot account to authorize the connection.
Once connected, you’ll map the fields. This is simply telling Poper which information goes where.
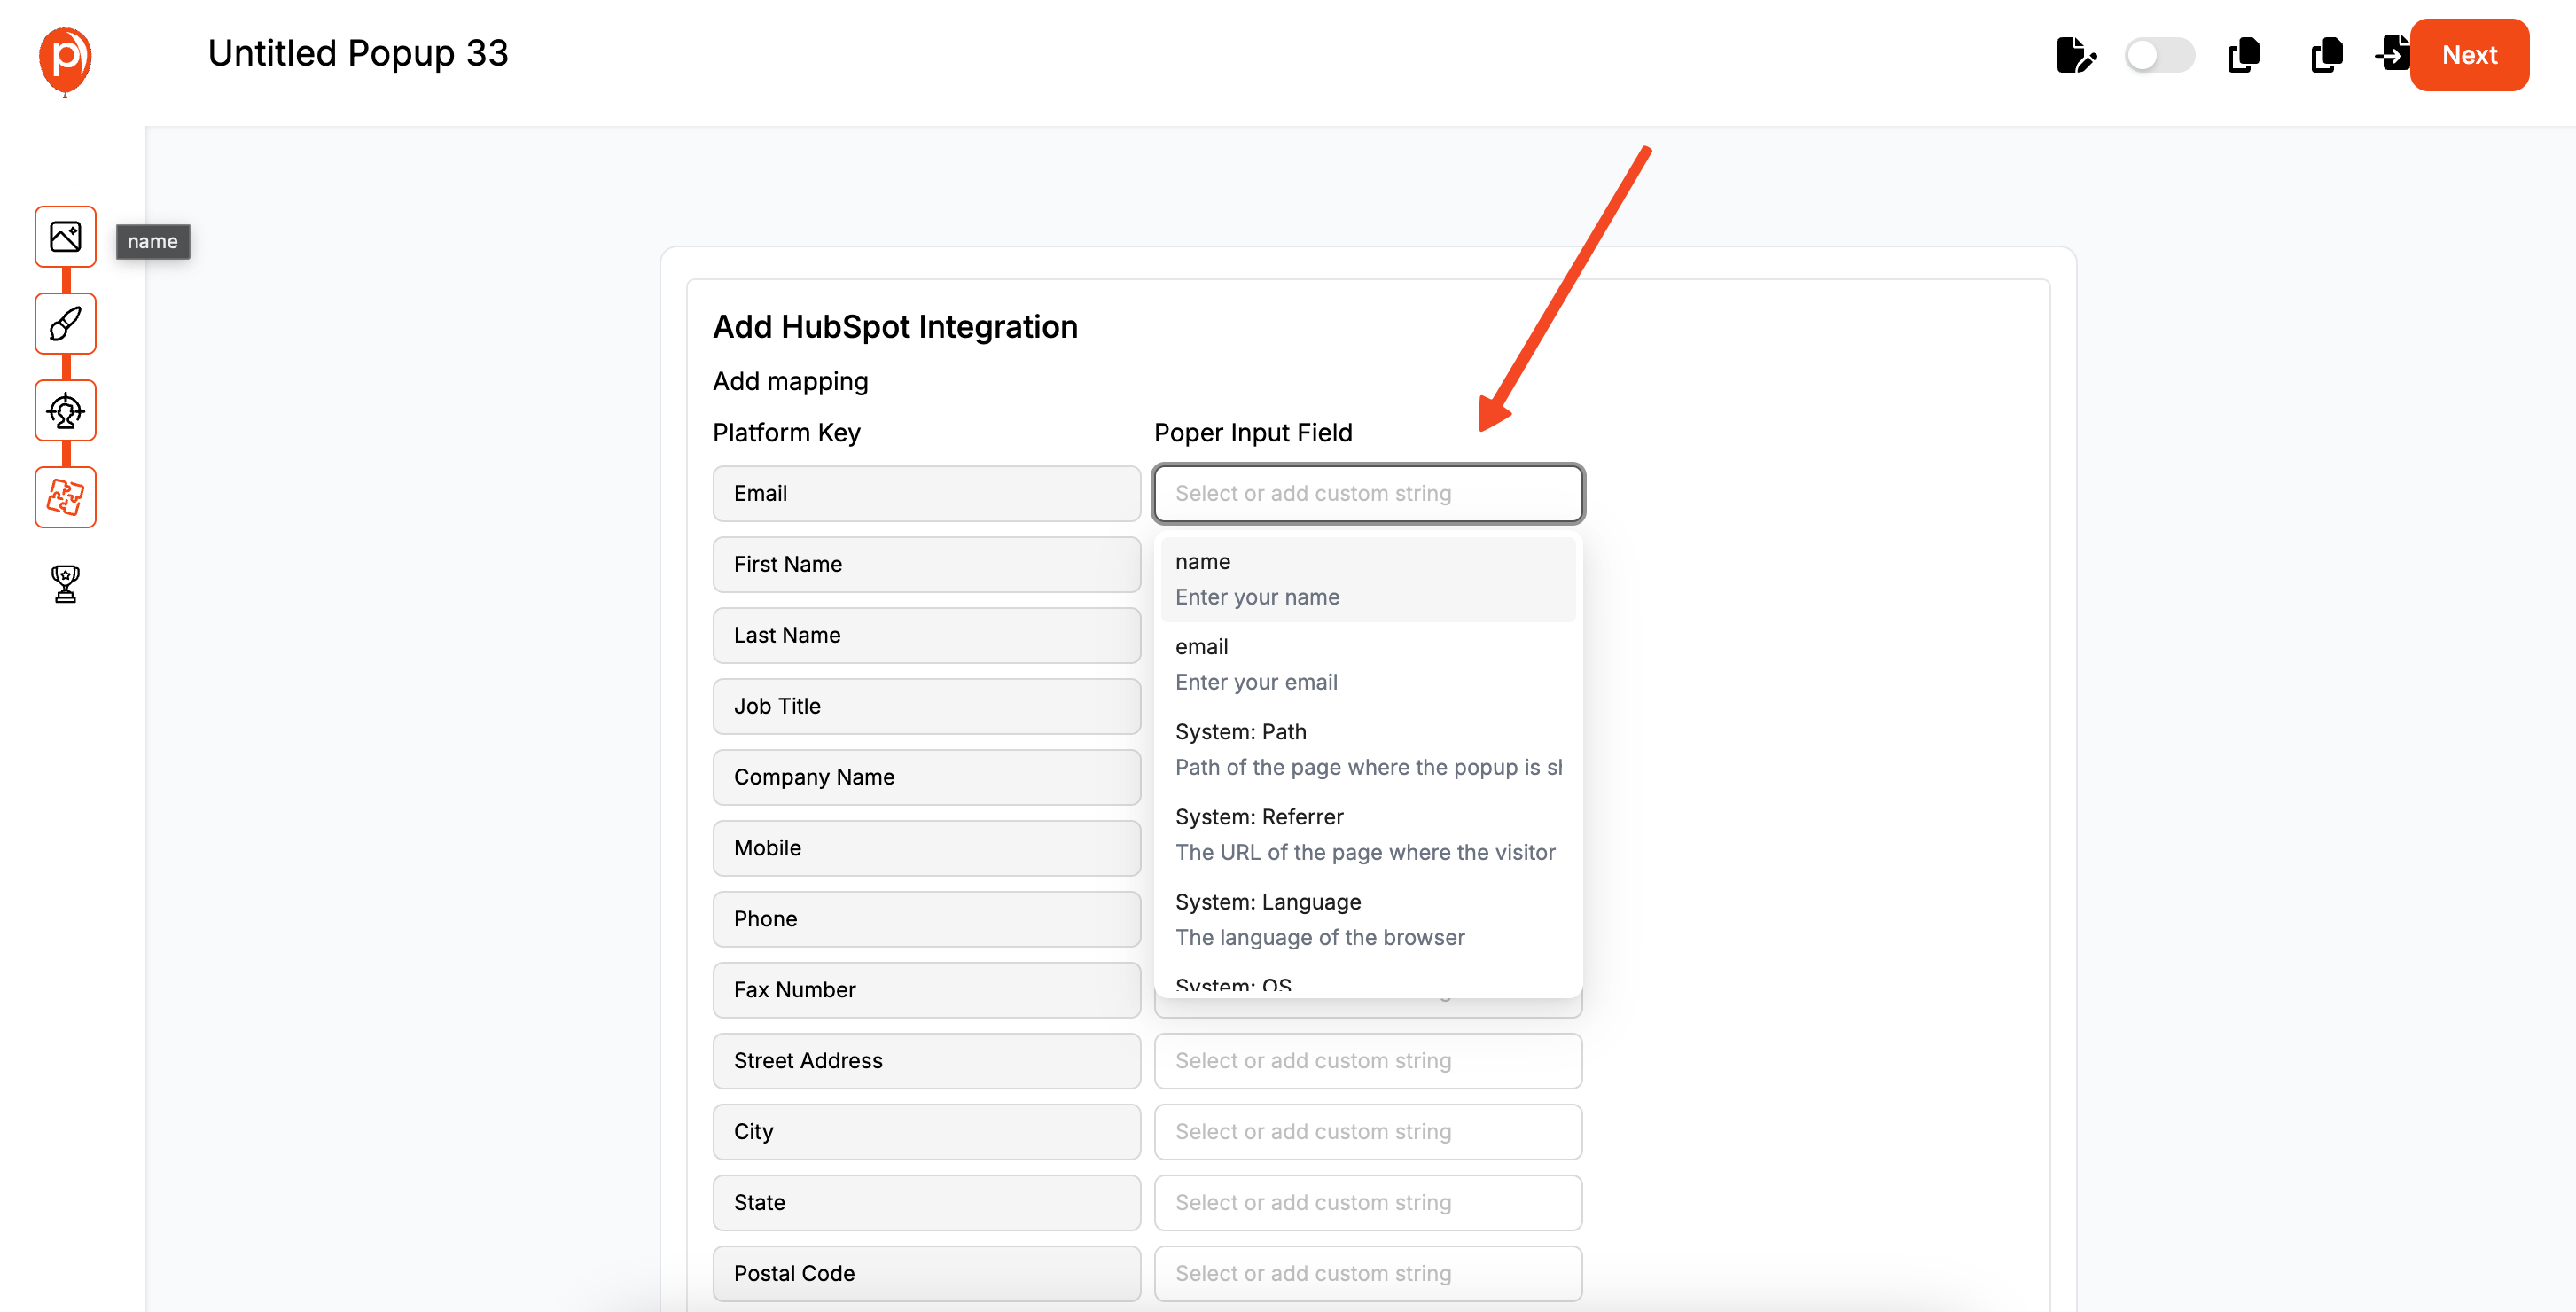
For example, you’ll map the "Email" field in your popup to the "Email" property in HubSpot. You can even do this for custom fields, ensuring all your data syncs perfectly.
Step 5: Install the Poper Code on Your Website
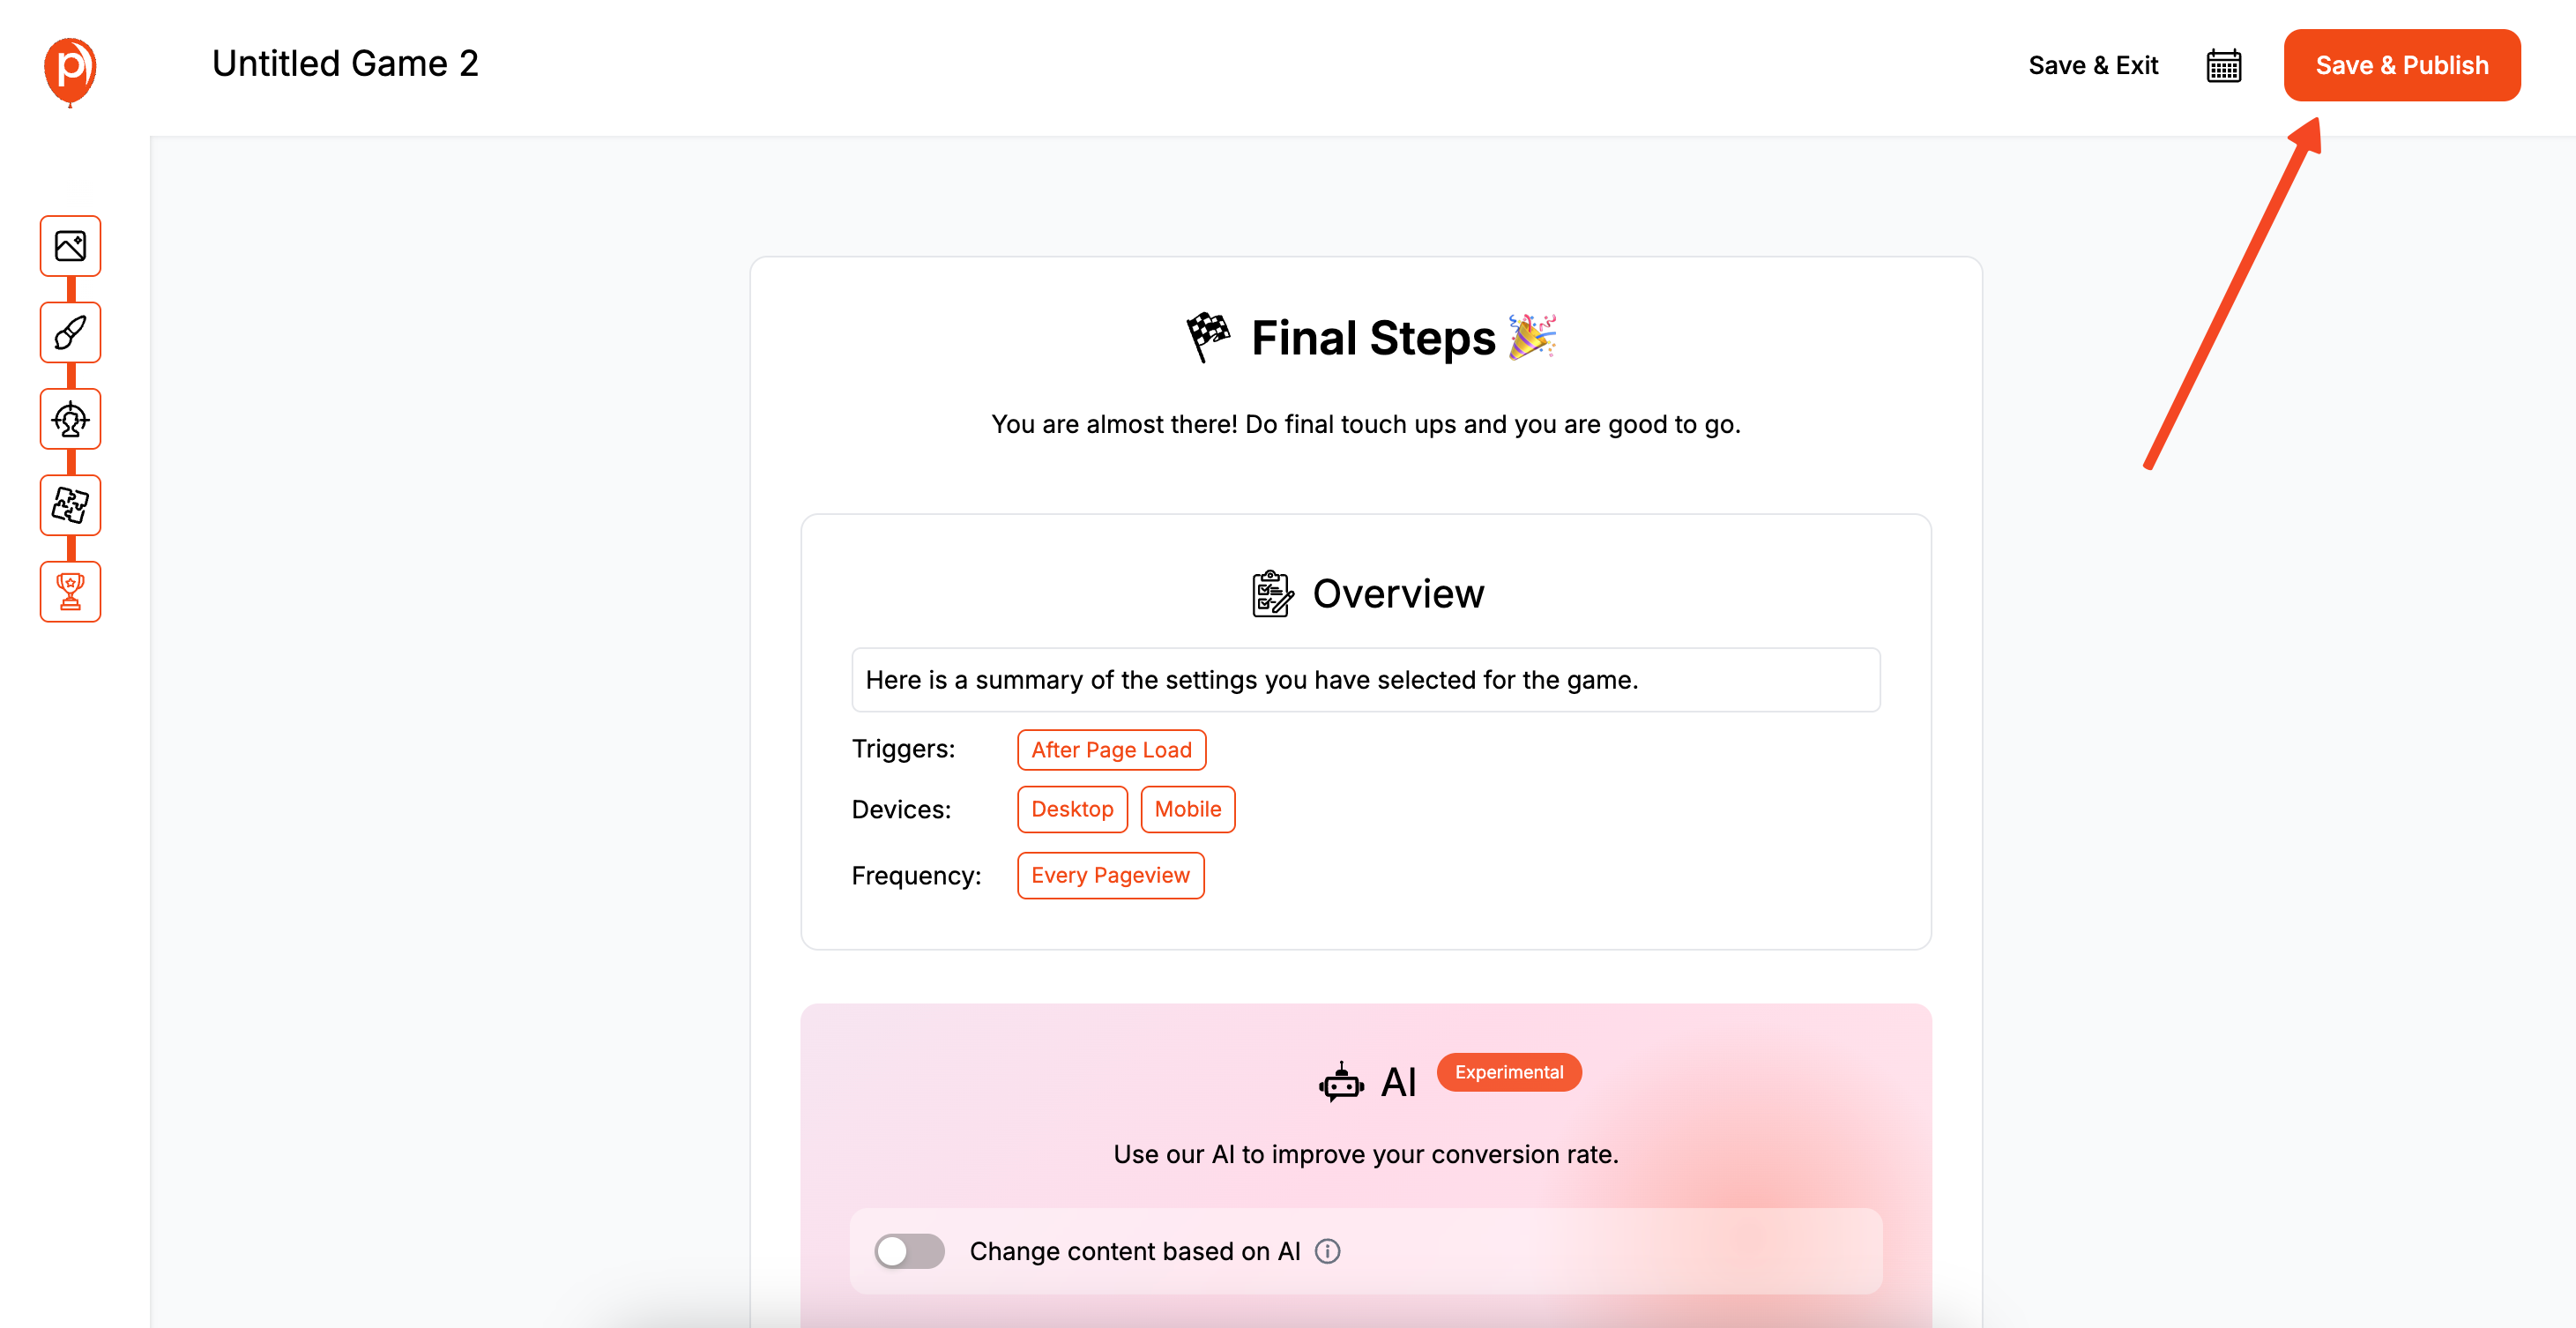
With the integration active, it’s time to get the popup live. Click "Save & Publish." Now, head back to your main Poper Dashboard and navigate to "Code." Click on "Custom Code" and copy the single snippet of code you see there.
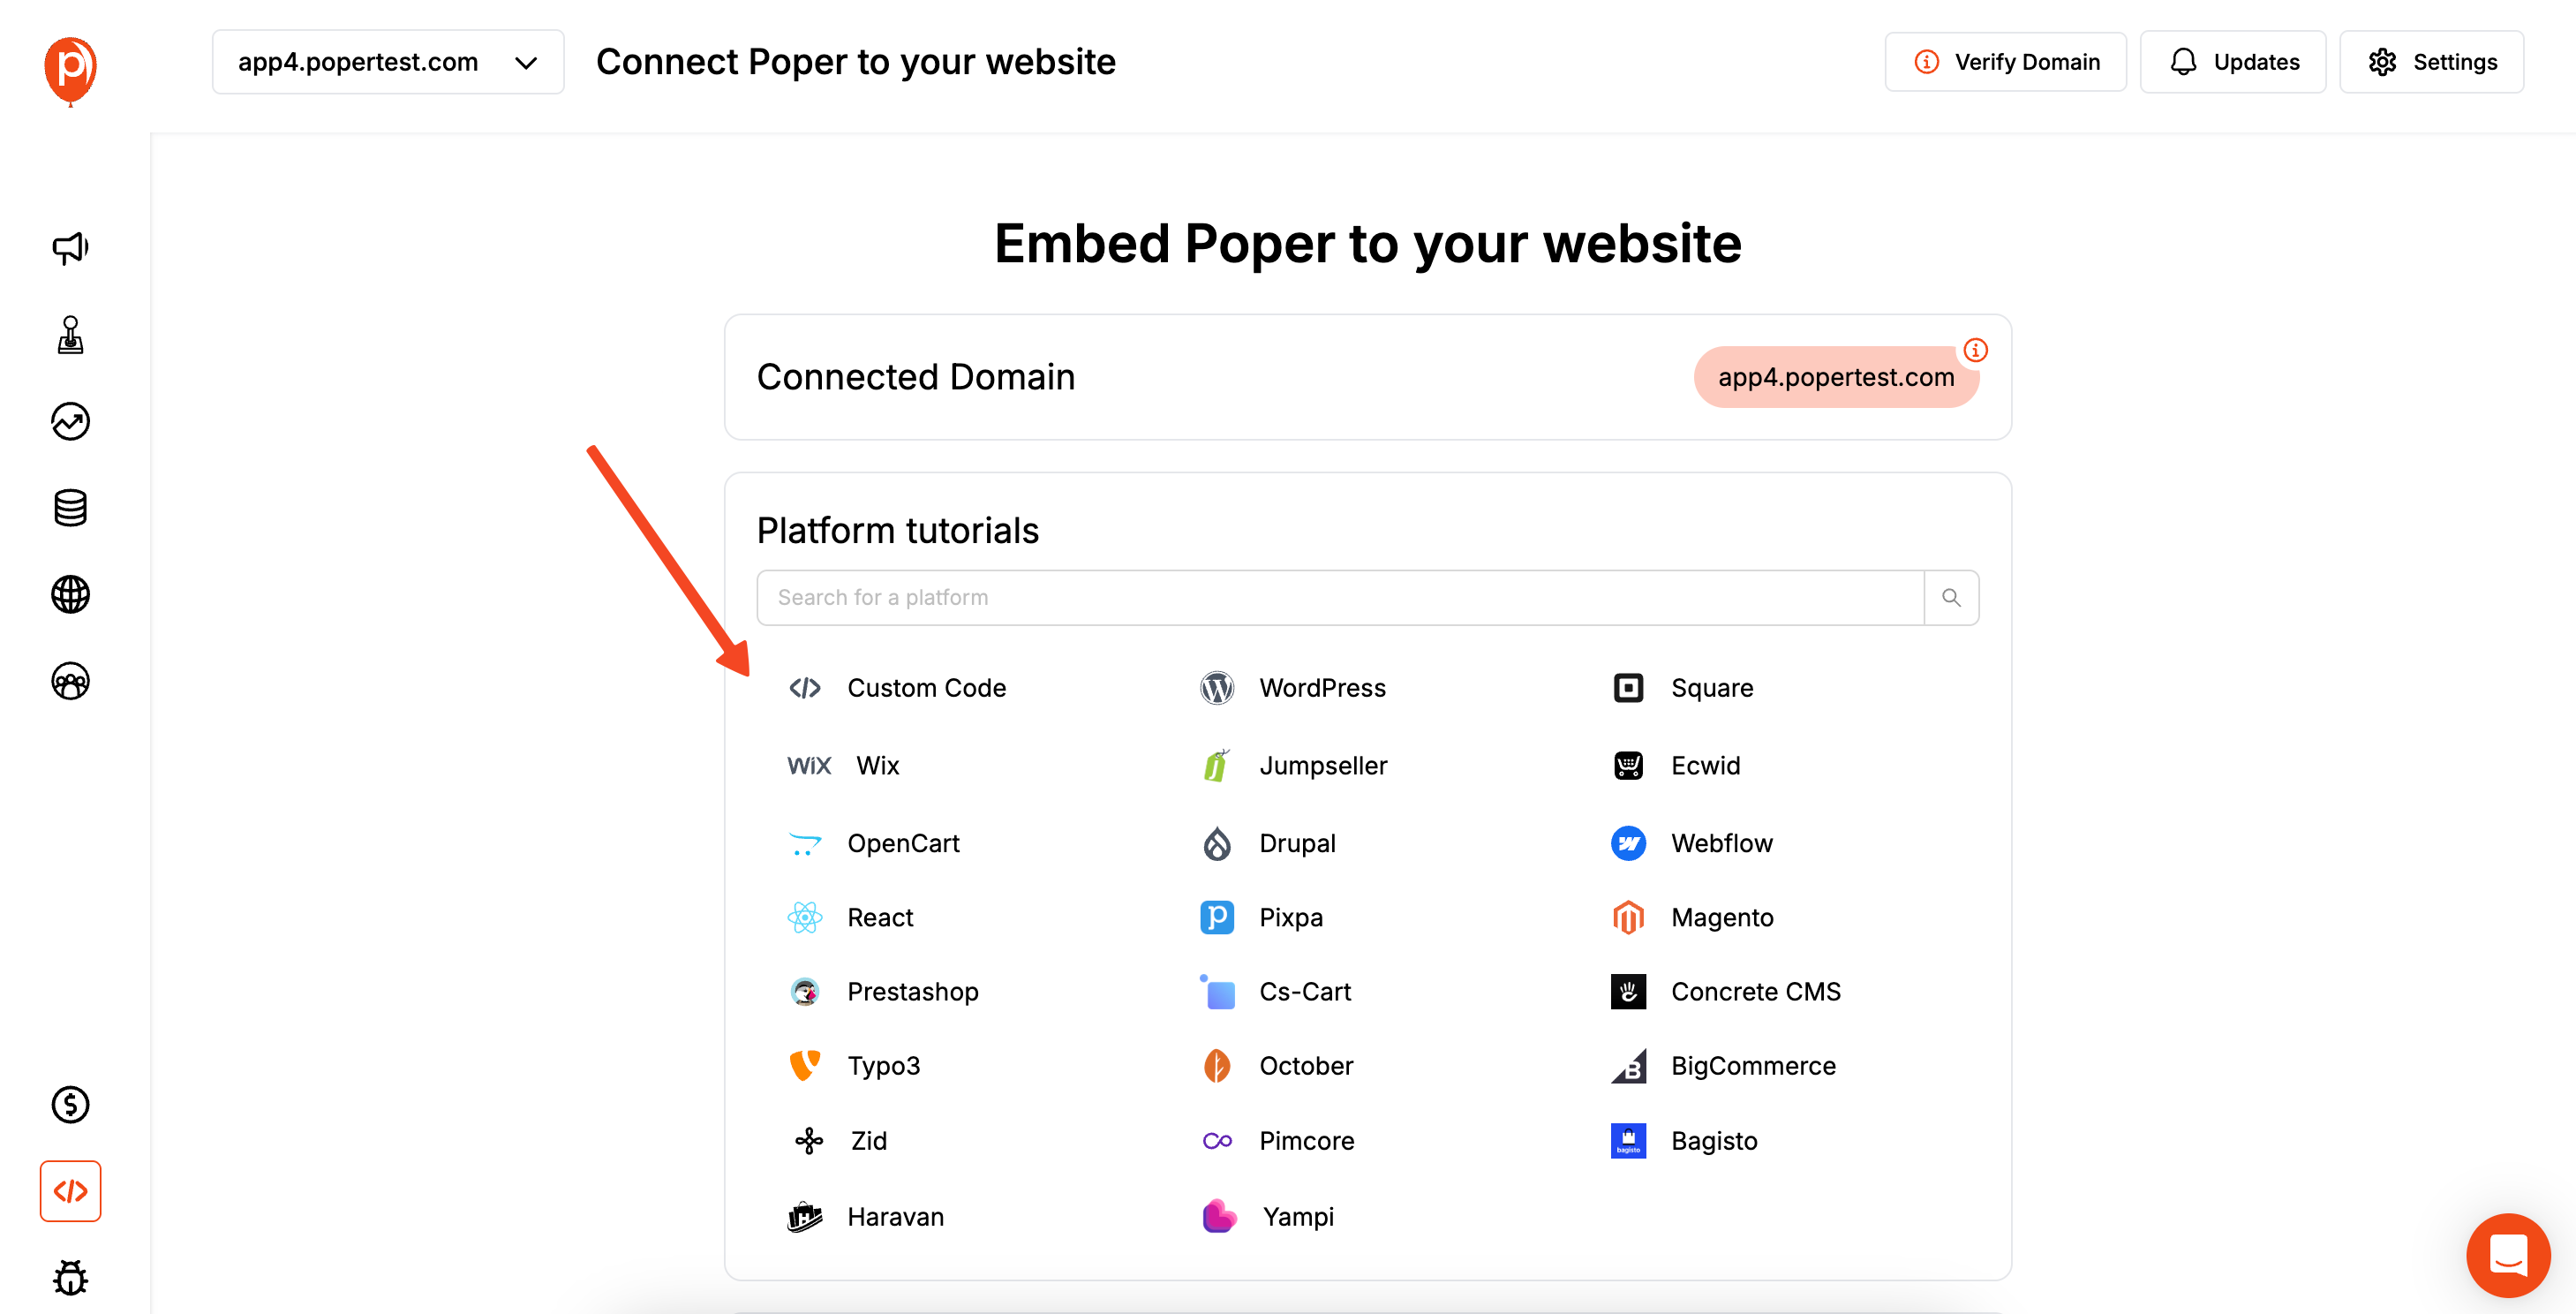
This code works on any website platform. Most sites have a settings area for code injection, often found under "Settings > Code Injection" or a similar name. Paste the Poper code into the global "Header" section of your website. This ensures Poper can run on every page.
Step 6: Save and Test Your Popup
Finally, save the changes on your website. To test it, open a new incognito window and visit your site. Move your mouse cursor up and out of the main page area as if you were going to close the tab. Your brand-new exit-intent popup should appear!
And that's it. You've now set up a powerful lead generation machine that works silently in the background, capturing high-intent leads and sending them directly into HubSpot for your sales team to follow up with.
Method 2: Creating an Exit-Intent Popup Using HubSpot's Native Pop-Up Forms
HubSpot provides built-in tools to create pop-up forms, including the ability to trigger them based on exit intent. This is often the most direct way for HubSpot users to implement this feature.
Step 1: Navigate to Pop-Up Forms in HubSpot
Log into your HubSpot account.
Go to Marketing > Lead Capture > Forms.
Click "Create form" (or you might find a dedicated "Pop-up form" option depending on your HubSpot version and subscription). Select "Pop-up form" if available as a distinct type.
Step 2: Choose a Pop-Up Form Type and Template
HubSpot offers different styles like "Box," "Banner," or "Slide-in." Choose one that suits your offer.
You can often start with a template or a blank slate.
Step 3: Design Your Pop-Up Form
Callout: Add a compelling headline and a brief description of your offer.
Form Fields: Add the necessary fields to collect information (e.g., Email, First Name). Keep it minimal for exit-intent popups to reduce friction.
Button: Customize the call-to-action button text (e.g., "Get My Discount," "Download Free Guide").
Thank You: Configure what happens after submission (e.g., an inline thank you message, redirect to a page).
Styling: Adjust colors, fonts, and images to match your website's branding.
Step 4: Configure Targeting and Triggers (Including Exit Intent)
This is where you set up the exit-intent behavior:
Targeting Tab:
- Website URL: Specify which pages the pop-up form should appear on (e.g., all pages, specific URLs, URLs containing certain text).
- Visitor Information & Behavior (Optional): You can further refine targeting based on device type, visitor type (new vs. returning), etc.
Website URL: Specify which pages the pop-up form should appear on (e.g., all pages, specific URLs, URLs containing certain text).
Visitor Information & Behavior (Optional): You can further refine targeting based on device type, visitor type (new vs. returning), etc.
Triggers Tab:
- Look for the trigger options. Select "On exit intent."
- HubSpot usually provides options for both desktop (mouse movement) and mobile (scroll up) exit intent. Configure these as needed.
- You might also be able to set a delay or scroll percentage before exit intent becomes active, though exit intent is the primary trigger here.
Look for the trigger options. Select "On exit intent."
HubSpot usually provides options for both desktop (mouse movement) and mobile (scroll up) exit intent. Configure these as needed.
You might also be able to set a delay or scroll percentage before exit intent becomes active, though exit intent is the primary trigger here.
Frequency: Set how often the pop-up should be shown to the same visitor to avoid annoyance.
Step 5: Publish Your HubSpot Pop-Up Form
Review all your settings.
Click "Publish" or "Update."
HubSpot Tracking Code: For the pop-up form to work on your website (if it's not a HubSpot-hosted page), ensure the HubSpot tracking code is correctly installed on all pages of your site. HubSpot usually guides you on this.
Step 6: Test Your Exit-Intent Popup
Open your website in an incognito window on a page where the pop-up is targeted.
Simulate leaving the page by moving your mouse cursor towards the top of the browser.
Verify the pop-up appears as configured and that lead submissions are correctly captured in your HubSpot CRM.
HubSpot Native Pop-Up Forms vs. Poper for Exit Intent: Key Considerations
| Feature | HubSpot Native Pop-Up Forms | Poper (Integrated with HubSpot) |
| Ease of Setup | Very easy for existing HubSpot users | Easy, with a one-time script install & integration setup |
| Design Flexibility | Good, within HubSpot's builder constraints | Potentially more design freedom with Poper's editor |
| Trigger Options | Solid exit-intent, basic other triggers | Often more advanced/varied triggers & combinations |
| Targeting | Good, based on HubSpot data & page URLs | Can be very granular based on Poper's rules engine |
| A/B Testing | Available for pop-up forms (HubSpot Pro+) | Often a core feature in Poper |
| Analytics | Within HubSpot's form analytics | Poper provides its own popup analytics |
| Centralization | All within HubSpot | Popups managed in Poper, leads synced to HubSpot |
| Cost | Included in HubSpot Marketing Hub (features vary by tier) | Poper subscription cost + HubSpot subscription |
Best Practices for Exit-Intent Popups (General)
Compelling Offer: Provide genuine value (discount, free resource, exclusive content).
Clear Call to Action (CTA): Make it obvious what you want the user to do.
Minimal Form Fields: Ask only for essential information (email is often enough).
Strong Headline: Grab attention immediately.
Mobile Optimization: Ensure it looks and works perfectly on mobile devices.
Easy to Close: Never hide or obscure the close button (X).
Test and Iterate: Continuously monitor performance and A/B test different offers, designs, and copy.
Conclusion
Implementing an Exit Intent Popup in HubSpot, whether through its native pop-up form tools or by integrating a specialized platform like Poper, is a highly effective strategy to capture leads that might otherwise be lost.
HubSpot's native pop-up forms offer a tightly integrated and convenient way to deploy exit-intent popups if their features meet your needs.
Poper integrated with HubSpot provides an alternative for those seeking different design capabilities, potentially more advanced trigger/targeting options for the popups themselves, or a dedicated platform for managing diverse website overlay campaigns, all while ensuring leads are seamlessly funneled into the HubSpot CRM for nurturing and follow-up.
Evaluate your specific requirements for design, triggering, and management to choose the approach that best empowers your lead generation efforts.
Frequently Asked Questions (FAQ)
Does HubSpot have built-in exit-intent functionality for its pop-up forms?
Yes, HubSpot's pop-up form tool (available in Marketing Hub) includes an "on exit intent" trigger option for both desktop and mobile.
Can I use HubSpot's exit-intent popups on a non-HubSpot website (e.g., WordPress)?
Yes, as long as the HubSpot tracking code is installed on your external website, HubSpot's pop-up forms (including those with exit intent) can be displayed.
What kind of offers work best for exit-intent popups?
Discounts, free shipping, limited-time offers, valuable content downloads (ebooks, checklists), webinar invitations, or a chance to subscribe to a newsletter for exclusive updates.
How does Poper send lead data to HubSpot?
Poper typically uses HubSpot's API to create/update contacts. This involves authorizing Poper to access your HubSpot account and then mapping fields from your Poper form to HubSpot contact properties.
Can I trigger HubSpot workflows based on leads from a Poper exit-intent popup?
Yes. When Poper sends a new contact to HubSpot (or updates an existing one), you can have HubSpot workflows trigger based on that contact creation, updates to specific properties, or if the contact is added to a specific HubSpot list via the Poper integration.

