
Integrating your Calendly scheduler directly into your website is a game-changer for streamlining appointments, demos, and consultations. It allows visitors to book time with you seamlessly, without ever leaving your site, leading to higher conversion rates and a more professional user experience.
If you're looking to make online scheduling effortless for your clients and prospects, embedding Calendly is the way to go. This comprehensive guide will walk you through exactly how to embed Calendly into various website platforms, covering all available embed options.
Why Embed Calendly on Your Website?
Before we dive into the "how," let's highlight the "why":
Increased Conversions: Reduces friction by keeping users on your site.
Improved User Experience: Makes booking quick, easy, and accessible.
Enhanced Professionalism: Shows you value your visitors' time and are organized.
Streamlined Workflow: Automates scheduling and reduces back-and-forth emails.
Lead Capture: Can act as a direct call-to-action for interested prospects.
Centralized Booking: Your website becomes the hub for appointments.
Prerequisites
A Calendly Account: You'll need an active Calendly account (free or paid).
A Published Event Type: Ensure the specific event type you want to embed is set up and published in Calendly.
Access to Your Website's Backend: You must be able to edit the HTML or use a code block/module on the page where you want to embed Calendly.
Understanding Calendly's Embed Options
Calendly offers three main ways to embed your scheduler onto your website. Understanding these will help you choose the best fit:
Inline Embed:
- What it is: Your full Calendly scheduling page is displayed directly within the content of your webpage.
- Pros: Always visible, seamless integration, great for dedicated "Book a Meeting" pages.
- Cons: Takes up significant page real estate.
- Best for: Contact pages, dedicated booking pages, service pages where booking is the primary CTA.
What it is: Your full Calendly scheduling page is displayed directly within the content of your webpage.
Pros: Always visible, seamless integration, great for dedicated "Book a Meeting" pages.
Cons: Takes up significant page real estate.
Best for: Contact pages, dedicated booking pages, service pages where booking is the primary CTA.
Popup Widget:
- What it is: A floating button (widget) appears on your site (usually in a corner). Clicking it opens your Calendly scheduler in a popup overlay.
- Pros: Less intrusive than inline, always accessible, good for site-wide availability.
- Cons: Relies on user clicking the widget.
- Best for: General site-wide booking access without dedicating a large section of a page.
What it is: A floating button (widget) appears on your site (usually in a corner). Clicking it opens your Calendly scheduler in a popup overlay.
Pros: Less intrusive than inline, always accessible, good for site-wide availability.
Cons: Relies on user clicking the widget.
Best for: General site-wide booking access without dedicating a large section of a page.
Popup Text:
- What it is: You add a text link (e.g., "Schedule a Call") to your page. Clicking this link opens your Calendly scheduler in a popup overlay.
- Pros: Integrates naturally with your content, very specific CTA.
- Cons: Relies on user clicking the text link.
- Best for: Integrating booking links within blog posts, service descriptions, or email signatures (when viewed on a webpage).
What it is: You add a text link (e.g., "Schedule a Call") to your page. Clicking this link opens your Calendly scheduler in a popup overlay.
Pros: Integrates naturally with your content, very specific CTA.
Cons: Relies on user clicking the text link.
Best for: Integrating booking links within blog posts, service descriptions, or email signatures (when viewed on a webpage).
Step 1: Grab Your Calendly Embed Code
First things first, you’ll need to get the special bit of code from Calendly. Log into your Calendly account and navigate to the event type or meeting link you want to display on your site.
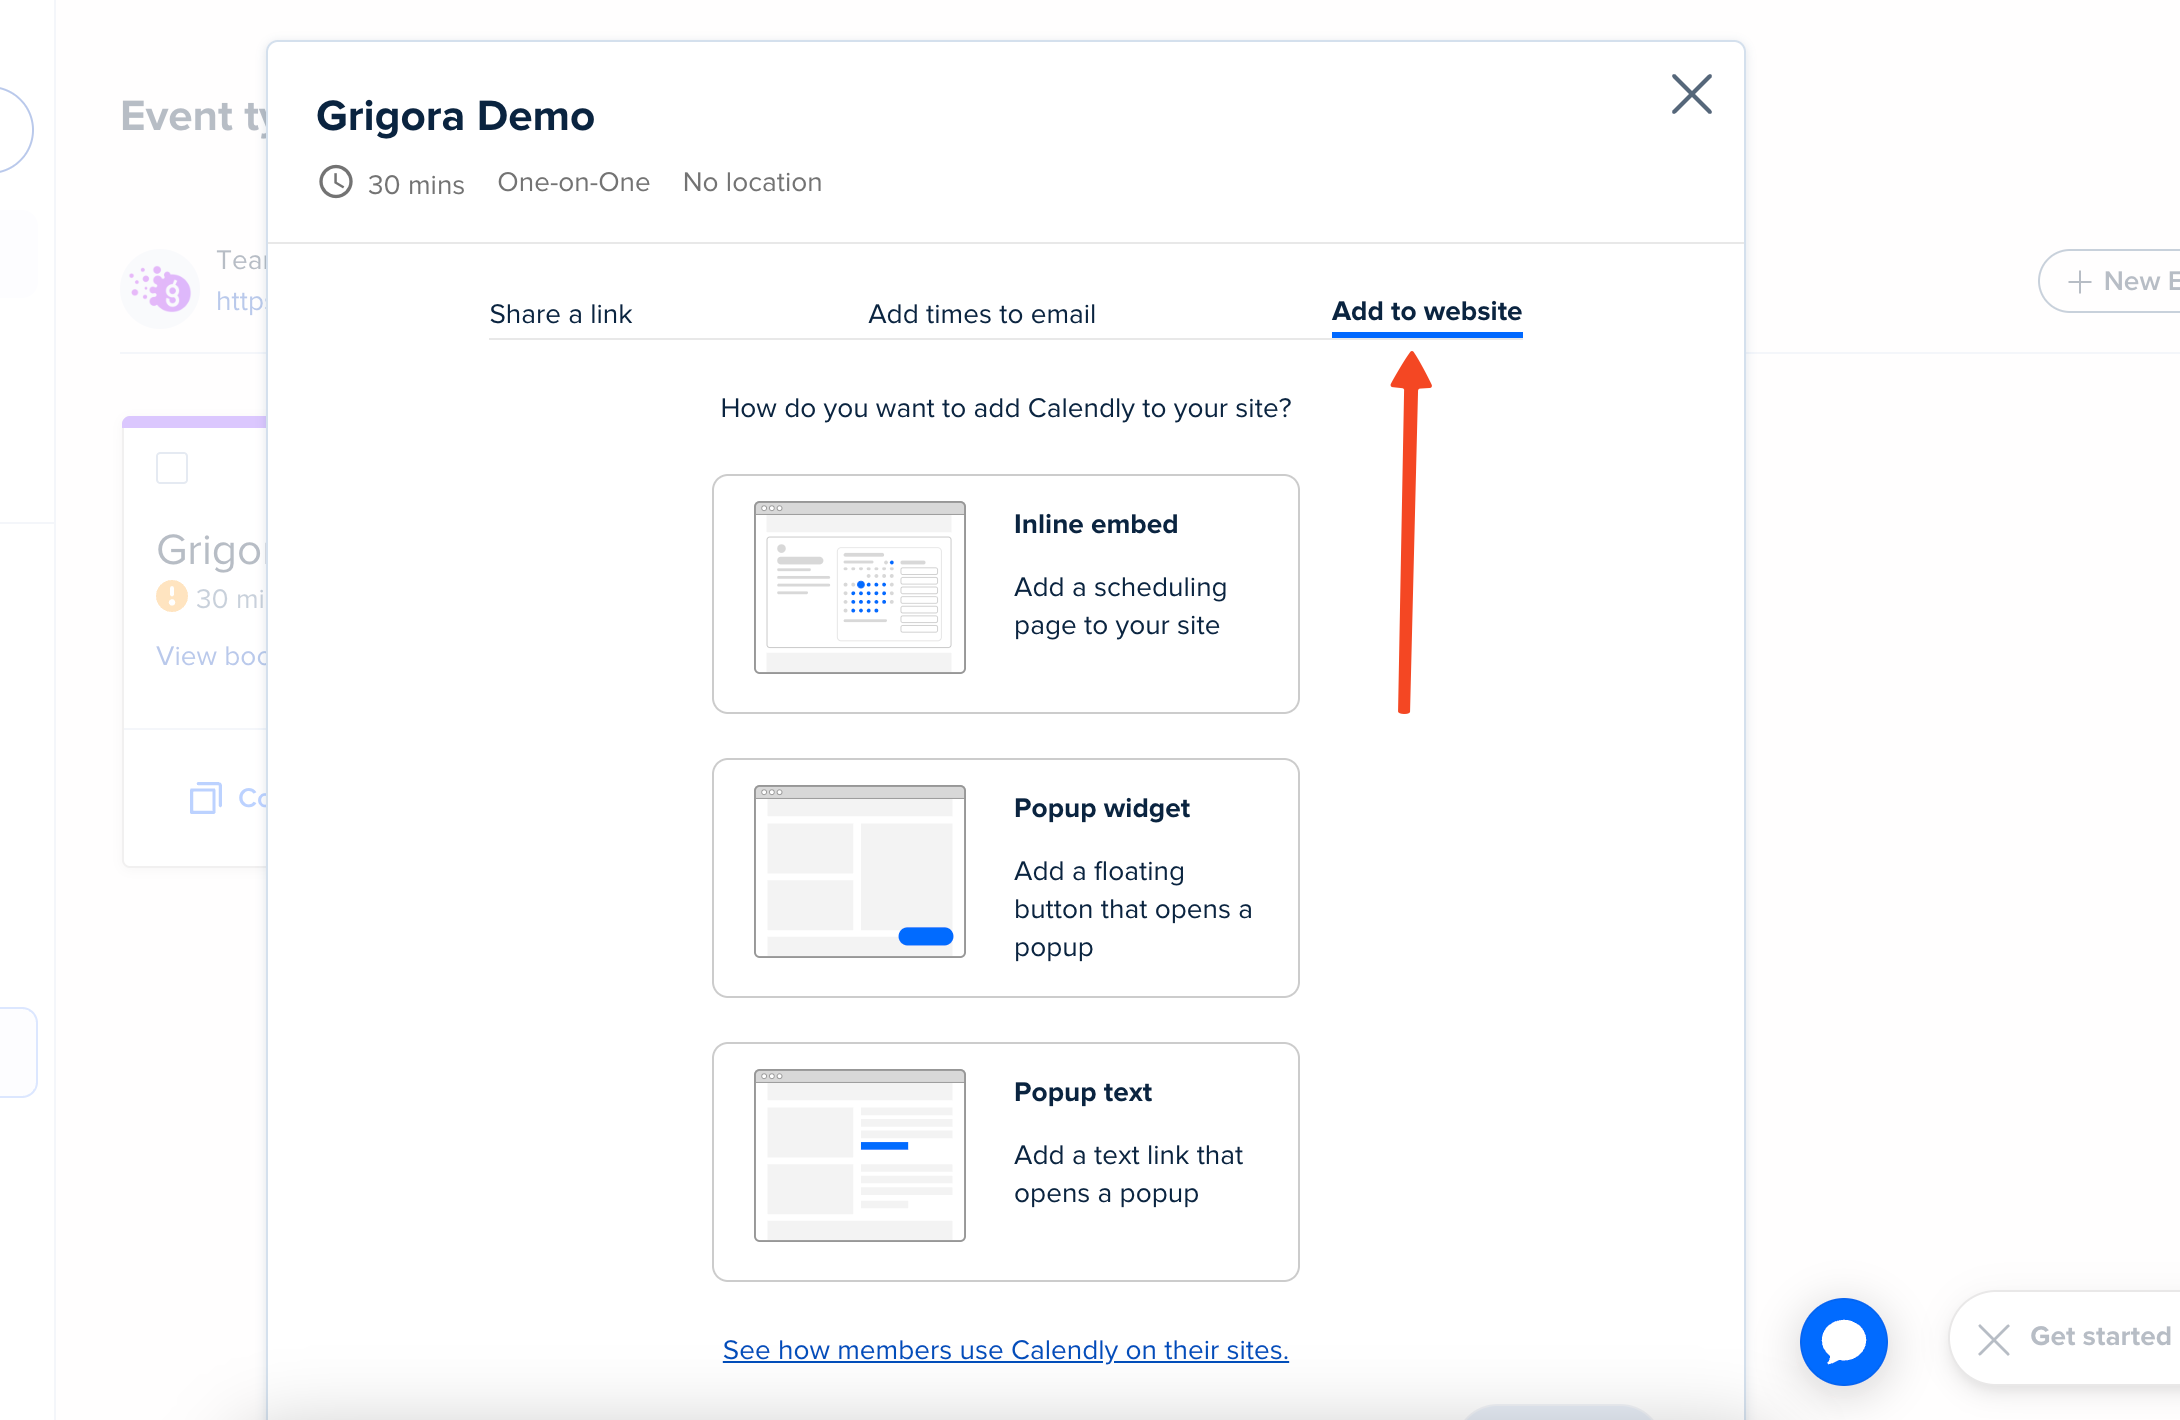
Look for an option typically labeled "Add to Website" or "Share." Calendly offers a few ways to share, but for seamlessly integrating it into your page, I recommend selecting the "Inline Embed" option.
This method keeps your visitors on your site, which is always better for their experience and for keeping them engaged with your content.
Step 2: Access Your Website's Admin Area
With your Calendly embed code copied, your next stop is your website's admin panel or editor. How you access this will vary depending on your website platform – whether you're using WordPress, Squarespace, Shopify, Wix, or a custom-built site.
Your main goal here is to navigate to the specific page where you want the calendar to appear, for example, your "Contact Us" page, a dedicated "Book a Demo" page, or even within a blog post.
Once there, you'll need to find the area where you can add or edit HTML code.
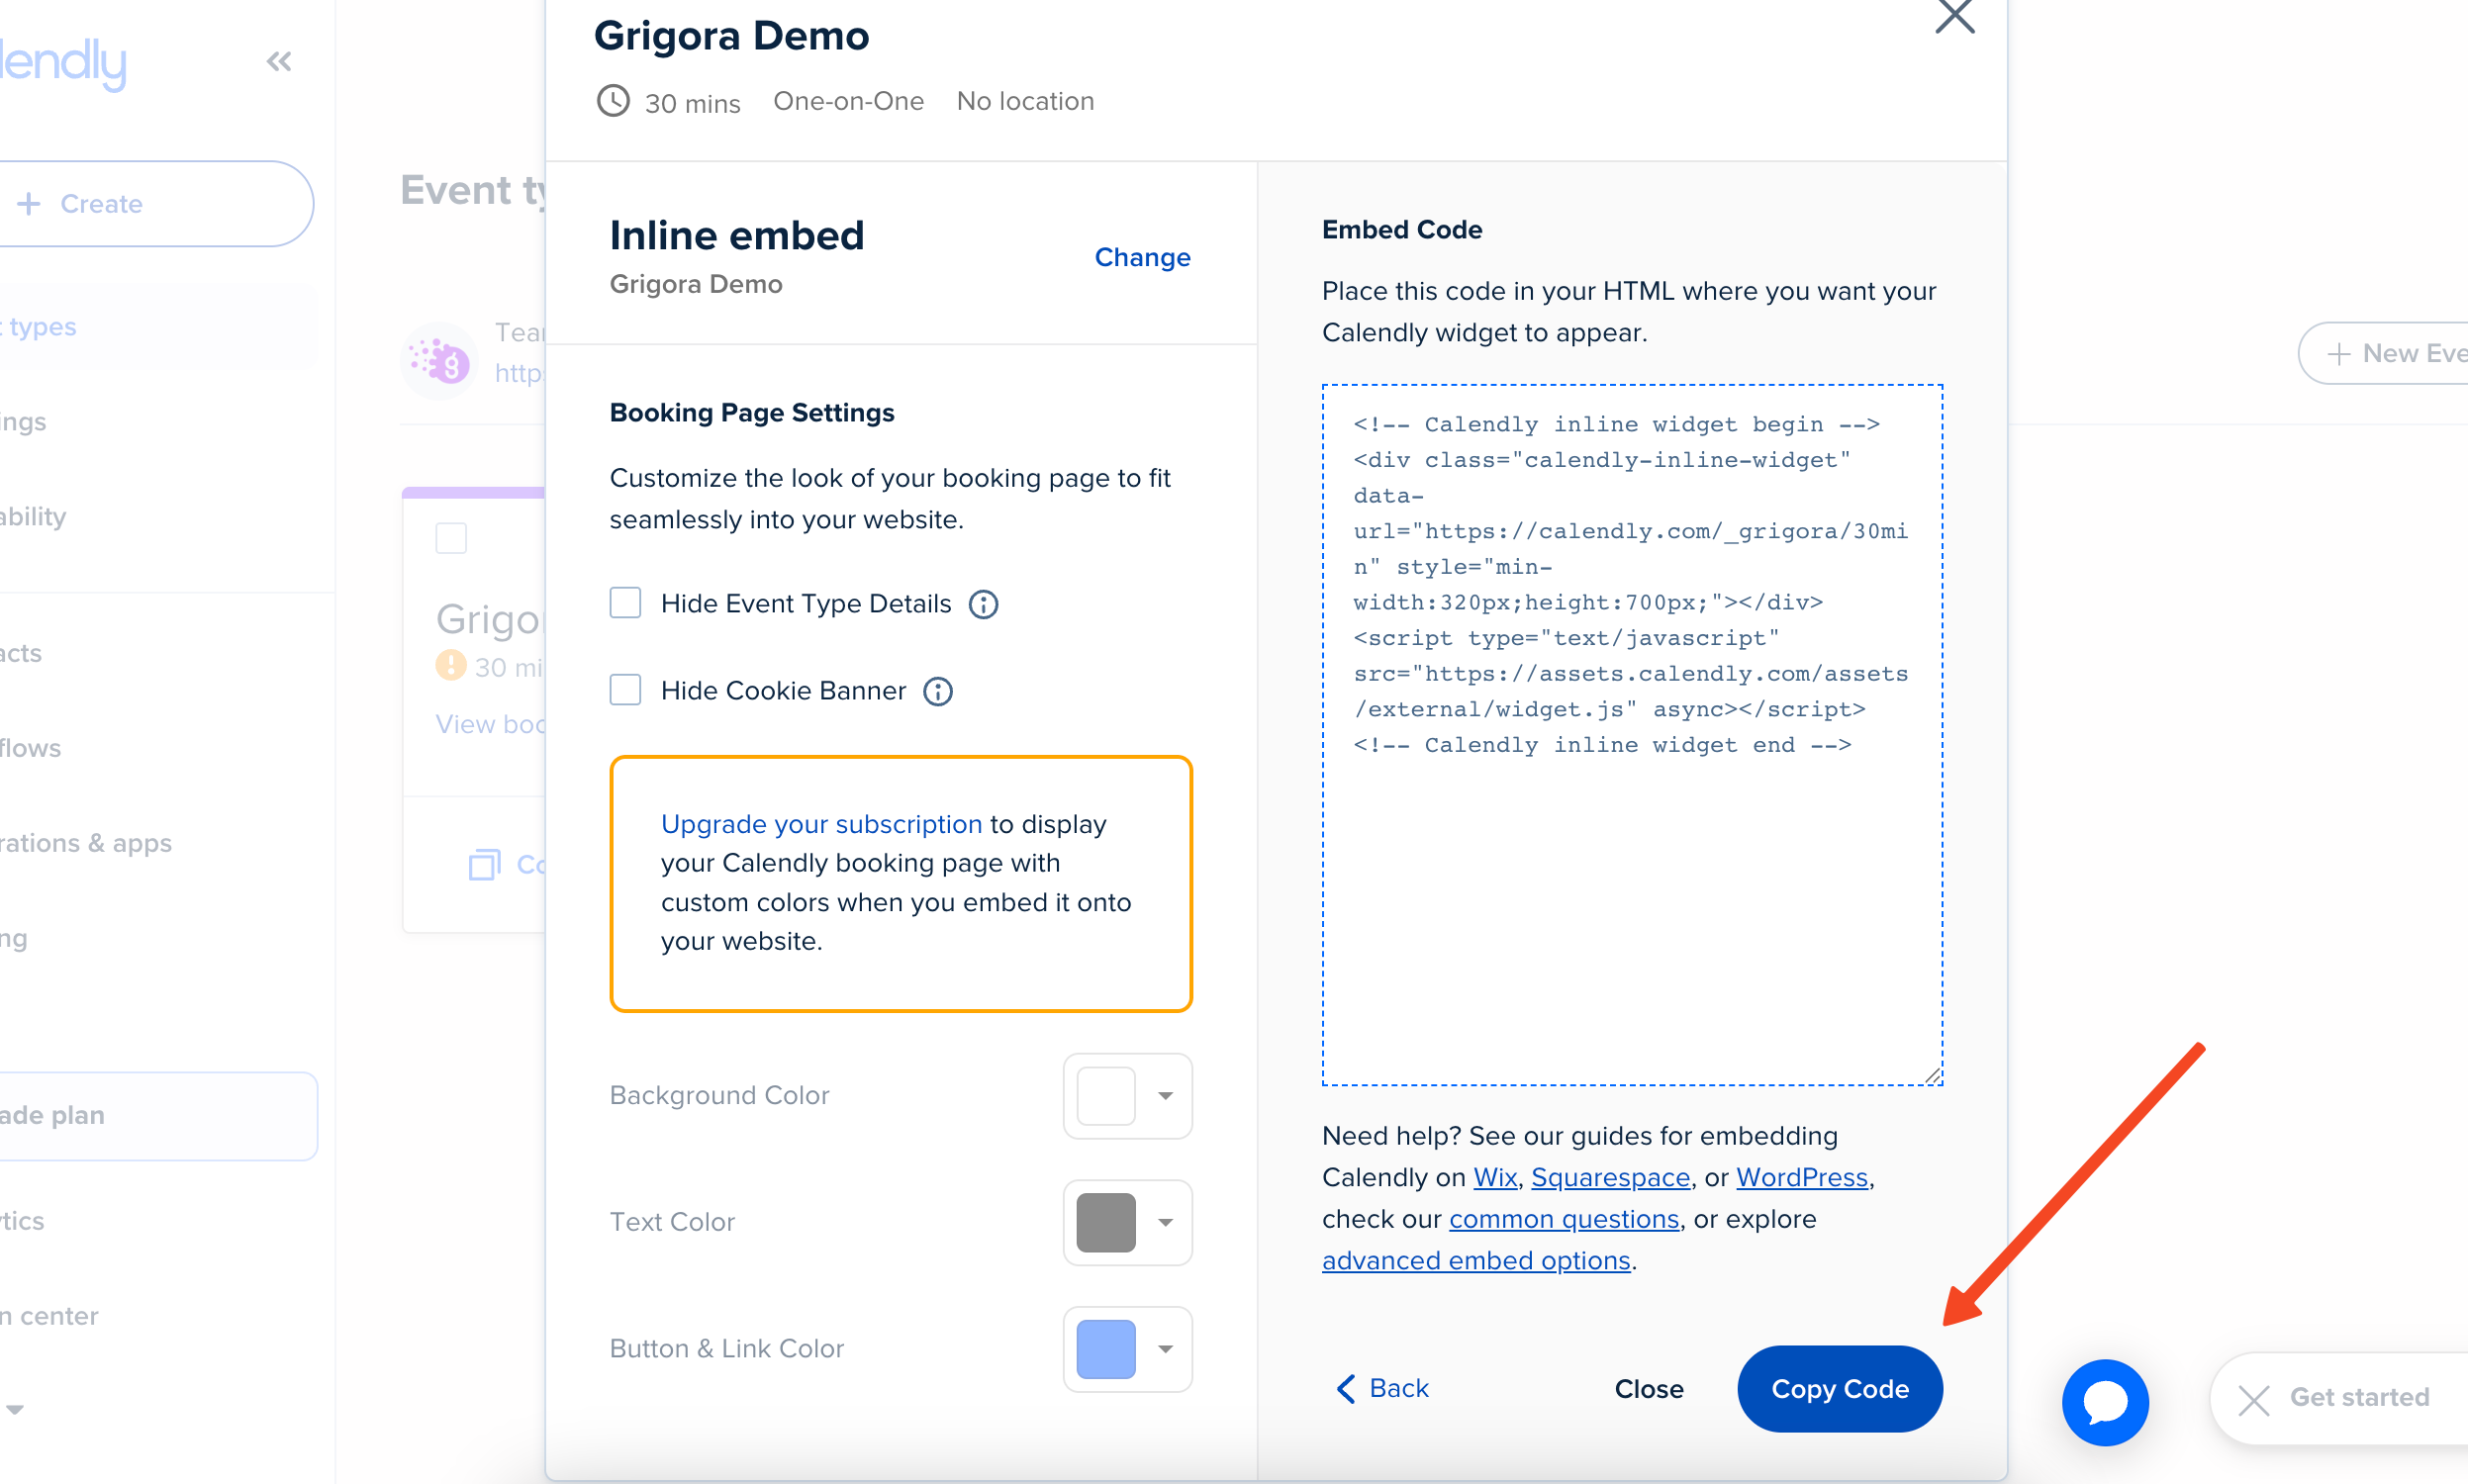
Step 3: Paste the Calendly Code into Your Page
Now that you're in the HTML or code view of your chosen page section, simply paste the entire embed code snippet you copied from Calendly.
Many website builders offer a specific element for this, often called an "HTML block," "Custom HTML," "Code Snippet," or an "Embed" element. Using one of these will tell your website to display the Calendly scheduler in that exact spot.
Think about the best placement for visibility; you want it to be prominent and easy for visitors to find and use.
Step 4: Save, Preview, and Go Live!
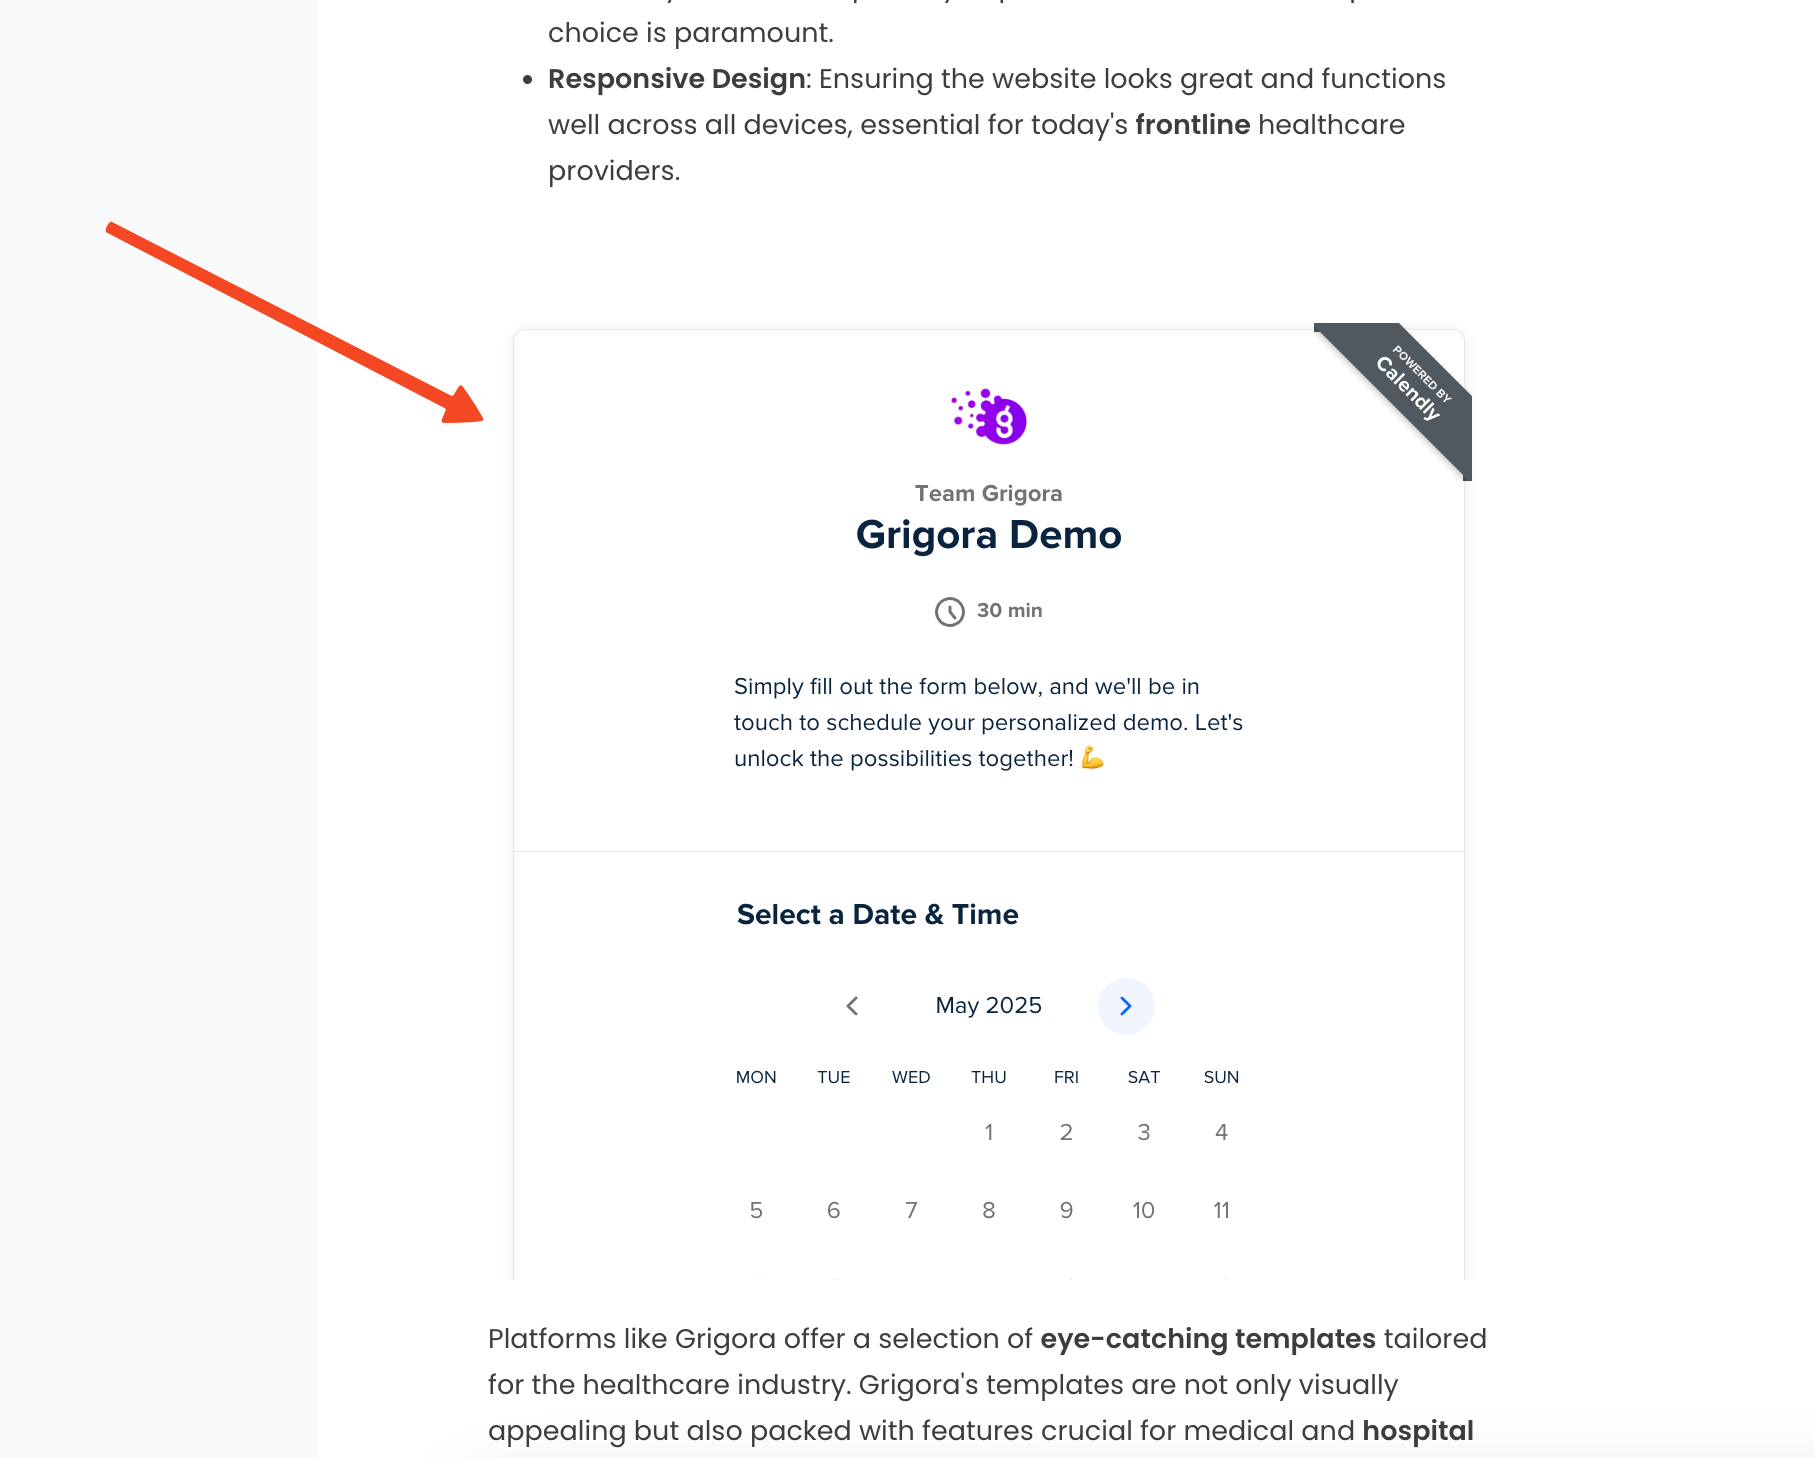
Before you announce your new, easy booking system, always save your changes and then preview the page. This is a vital step I always recommend, as it allows you to check that the Calendly embed is displaying correctly and fits well within your site's design.
Make sure it's fully functional by trying to click through a booking. If everything looks great and works as expected, go ahead and publish your page. Now your visitors can book meetings with you without any hassle!
General Instructions (for most platforms):
Look for an option to add "Custom HTML," "Code Block," "Embed," or switch to an HTML/Text editor view on the page or section where you want Calendly to appear.
WordPress:
Gutenberg Editor (Block Editor):
- Edit the page or post where you want to embed Calendly.
- Click the + (Add Block) icon.
- Search for and select the "Custom HTML" block.
- Paste your Calendly embed code into this block.
- Save/Update your page.
Edit the page or post where you want to embed Calendly.
Click the + (Add Block) icon.
Search for and select the "Custom HTML" block.
Paste your Calendly embed code into this block.
Save/Update your page.
Classic Editor:
- Edit the page or post.
- Switch from the "Visual" tab to the "Text" tab in the editor.
- Paste your Calendly embed code where you want it to appear.
- Save/Update your page.
Edit the page or post.
Switch from the "Visual" tab to the "Text" tab in the editor.
Paste your Calendly embed code where you want it to appear.
Save/Update your page.
Page Builders (Elementor, Divi, Beaver Builder, etc.):
- Most page builders have an "HTML," "Code," or "Embed" widget/module.
- Drag this module onto your page.
- Paste your Calendly embed code into the module's settings.
- Save/Update.
Most page builders have an "HTML," "Code," or "Embed" widget/module.
Drag this module onto your page.
Paste your Calendly embed code into the module's settings.
Save/Update.
Squarespace:
Edit the page or section where you want to add Calendly.
Click an insert point (+ icon) where you want the embed to appear.
Select the "Code Block" (it might be listed under "More").
Paste your Calendly embed code into the code block. Ensure "Display Source" is NOT checked and "HTML" is selected as the mode.
Click "Apply" and save your page.
Shopify:
Pages/Blog Posts/Product Descriptions:
- Go to the page, post, or product in your Shopify admin.
- In the content editor, click the Show HTML (<>) icon in the toolbar.
- Paste your Calendly embed code into the HTML view.
- Click the Show HTML icon again to return to the rich text editor (optional).
- Save.
Go to the page, post, or product in your Shopify admin.
In the content editor, click the Show HTML (<>) icon in the toolbar.
Paste your Calendly embed code into the HTML view.
Click the Show HTML icon again to return to the rich text editor (optional).
Save.
Theme Sections (e.g., homepage):
- Go to "Online Store" > "Themes" > "Customize."
- Navigate to the section where you want to add Calendly.
- Look for an option to "Add section" and choose a "Custom HTML," "Custom Liquid," or similar section type.
- Paste your Calendly embed code into the provided field.
- Save.
Go to "Online Store" > "Themes" > "Customize."
Navigate to the section where you want to add Calendly.
Look for an option to "Add section" and choose a "Custom HTML," "Custom Liquid," or similar section type.
Paste your Calendly embed code into the provided field.
Save.
Wix:
Open your Wix Editor.
Click + (Add Elements) on the left side.
Go to "Embed Code" and then select "Embed HTML."
An HTML box will appear on your page. Click "Enter Code."
Paste your Calendly embed code into the box.
Click "Apply" or "Update." Adjust the size and position of the HTML box as needed.
Save/Publish your site.
Custom HTML Website (or other platforms):
Open the HTML file of the page where you want to embed Calendly in a text editor.
Paste the Calendly embed code directly into the <body> section of your HTML, where you want the scheduler to appear.
- For Popup Widget and Popup Text, Calendly's script often works best when placed just before the closing </body> tag. However, follow Calendly's specific instructions if they differ.
For Popup Widget and Popup Text, Calendly's script often works best when placed just before the closing </body> tag. However, follow Calendly's specific instructions if they differ.
Save the HTML file and upload it to your server.
Best Practices for Embedding Calendly
Strategic Placement:
- Inline: Use on "Contact Us," "Book a Demo," "Schedule a Consultation," or service pages.
- Popup Widget: Good for general, site-wide accessibility.
- Popup Text: Integrate within relevant content (e.g., "Ready to discuss? Schedule a call.").
Inline: Use on "Contact Us," "Book a Demo," "Schedule a Consultation," or service pages.
Popup Widget: Good for general, site-wide accessibility.
Popup Text: Integrate within relevant content (e.g., "Ready to discuss? Schedule a call.").
Clear Call to Action (CTA): If using Popup Widget or Popup Text, make sure the button/link text is compelling and clear.
Mobile-First: Calendly is generally mobile-responsive, but always verify the experience on smaller screens.
Page Load Speed: Calendly's scripts are optimized, but like any third-party script, they add a small amount to page load. Ensure your page is otherwise well-optimized.
Minimize Distractions: On pages with an inline embed, try to minimize other distracting elements if booking is the primary goal.
Troubleshooting Common Calendly Embedding Issues
Calendly Embed Not Showing Up:
- Incorrect Code: Ensure you copied the entire embed code from Calendly.
- HTML Stripping: Some visual editors might strip out script tags. Make sure you're pasting into a proper HTML block or text/HTML view.
- JavaScript Errors: Check your browser's developer console (usually F12) for JavaScript errors on the page.
Incorrect Code: Ensure you copied the entire embed code from Calendly.
HTML Stripping: Some visual editors might strip out script tags. Make sure you're pasting into a proper HTML block or text/HTML view.
JavaScript Errors: Check your browser's developer console (usually F12) for JavaScript errors on the page.
Embed Looks Broken or Misaligned:
- CSS Conflicts: Your website's CSS might be interfering. Use browser developer tools to inspect elements and identify conflicting styles.
- Container Size: The HTML element containing the Calendly embed might be too small.
CSS Conflicts: Your website's CSS might be interfering. Use browser developer tools to inspect elements and identify conflicting styles.
Container Size: The HTML element containing the Calendly embed might be too small.
Popup Not Working:
- Ensure the Calendly script for popups is correctly installed, usually before the closing </body> tag.
- Check for JavaScript conflicts.
Ensure the Calendly script for popups is correctly installed, usually before the closing </body> tag.
Check for JavaScript conflicts.
Conclusion
Embedding Calendly into your website is a powerful way to convert visitors into scheduled appointments, streamlining your operations and improving the client experience. By choosing the right embed option for your needs and following these platform-specific steps, you can seamlessly integrate Calendly and make booking time with you effortless.
Start today and watch your schedule fill up with greater ease!
Frequently Asked Questions (FAQ)
Is it free to embed Calendly on my website?
Yes, Calendly allows embedding for all its plans, including the free Basic plan. However, some customization options (like removing Calendly branding or pre-filling questions) are available only on paid plans.
Can I embed multiple different Calendly event types on my website?
Absolutely! You can generate embed codes for different event types and place them on various pages or sections of your site as needed.
How do I make my embedded Calendly responsive?
Calendly's embed options are designed to be responsive out-of-the-box. The inline embed will adapt to the width of its container, and the popups are optimized for different screen sizes. Always test on various devices.
Can I customize the colors and branding of the embedded Calendly?
Yes, Calendly allows you to customize colors (background, text, button/link) when generating the embed code to better match your website's branding. Removing Calendly branding completely is a feature of their paid plans.
Can I pre-fill information in the Calendly booking form when embedded?
Yes, with Calendly's paid plans, you can use "Advanced Embed Options" to add parameters to the embed code or URL to pre-fill guest information like name and email, making it even easier for known contacts to book.

